Style customization
Using style customization, you can create a uniform ThoughtSpot experience that matches with your company’s look and feel. To re-brand the interface, you can use the style customization option found in the Admin Console in the ThoughtSpot web application. It lets you change the logo, application background color, chart color palettes, and footer text. For help with chart and table visualization fonts, contact ThoughtSpot support.
This is especially useful if you’re using the ThoughtSpot APIs for embedding visualizations from ThoughtSpot in your own web portal or application. You can make the visualizations match the look and feel of the portal or application in which they are embedded. For more information on using the APIs, see the ThoughtSpot Application Integration Guide.
Change style customization
Make changes to the style of your ThoughtSpot interface in the Style Customization page. This option gives you defined, yet impactful capabilities for re-branding the interface, so having some understanding of typography and color schemes would be helpful.
To re-brand the interface:
-
Sign in to ThoughtSpot from a browser.
-
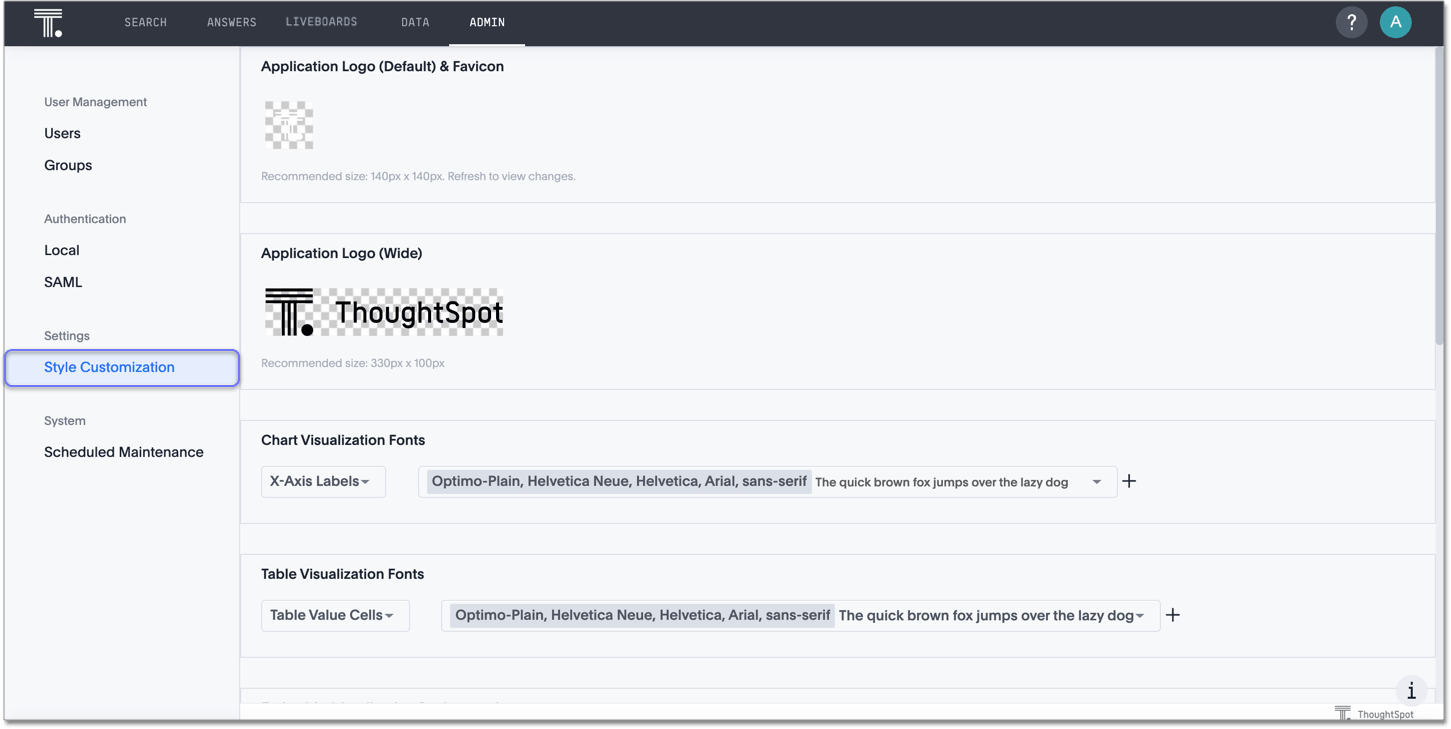
Go to the Admin settings tab. Select Style Customization from the side navigation bar that appears. To enable style customization, you must add
?customBrandingEnabled=trueto your application URL, as shown in the following examples:https://{ThoughtSpot-Host}/?customBrandingEnabled=true/#/https://{ThoughtSpot-Host}/?customBrandingEnabled=true/#/pinboardsYou can make this permanent for all users of your cluster, without needing to add customBrandingEnabled=trueto your application URL, by contacting ThoughtSpot support.If your organization uses multi-tenancy with Orgs, ensure that you are in the Primary Org, in the All orgs section of the Admin Console. You manage style customization for the whole cluster. You cannot manage it separately for each Org.
In the Style Customization page, you can perform the following actions:
Upload application logos
You can replace the ThoughtSpot logo, wherever it appears in the ThoughtSpot web application, with your own company logo. To upload a new logo, follow these steps:
-
Add
?customBrandingEnabled=trueto your application URL, as shown in the following examples:https://{ThoughtSpot-Host}/?customBrandingEnabled=true/#/https://{ThoughtSpot-Host}/?customBrandingEnabled=true/#/pinboardsYou can make this permanent for all users of your cluster, without needing to add customBrandingEnabled=trueto your application URL, by contacting ThoughtSpot support. -
Select the default icon under Application Logo (Default) to browse for and select your own default logo.

Your icon image should be a square, and the recommended size is 28px by 28px. The accepted file formats are jpg, jpeg, and png. This logo will appear on the upper left of the interface.
-
Select the wide icon under Application Logo (Wide) to browse for and select your own wide logo.

The recommended size is 330px by 100px. The accepted file formats are jpg, jpeg, and png. This logo appears on the login screen. You may need to test a few versions to make sure it appears correctly.
-
To bring back the default logos, select the Reset button on the upper-right side of the sections.
Set chart and table visualization fonts
You can add and edit fonts to customize the appearance of your charts and tables. To customize fonts, follow these steps:
-
Add
?customBrandingEnabled=trueto your application URL, as shown in the following examples:https://{ThoughtSpot-Host}/?customBrandingEnabled=true/#/https://{ThoughtSpot-Host}/?customBrandingEnabled=true/#/pinboardsYou can make this permanent for all users of your cluster, without needing to add customBrandingEnabled=trueto your application URL, by contacting ThoughtSpot support. -
Select the Add New button under Chart Visualization Fonts.

-
In the add new font menu, select the details for the font:
-
Upload your custom font.
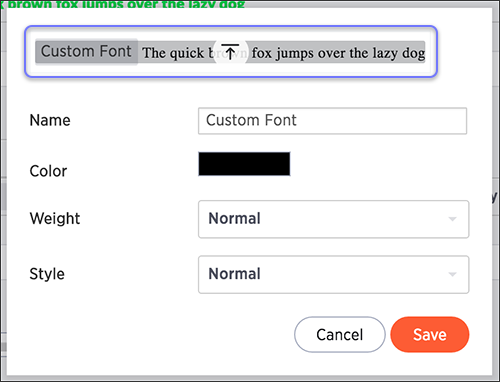
Only WOFF font types are supported.
-
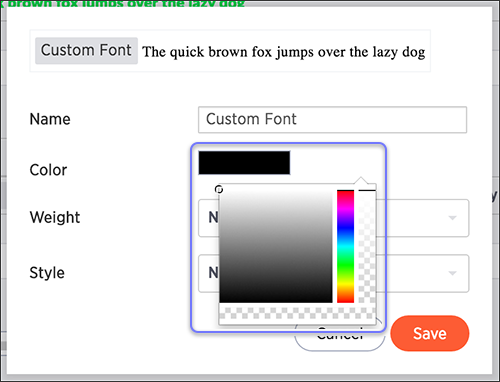
Use the color menu to choose the font color.
-
Choose the font weight and style from the dropdown menus.
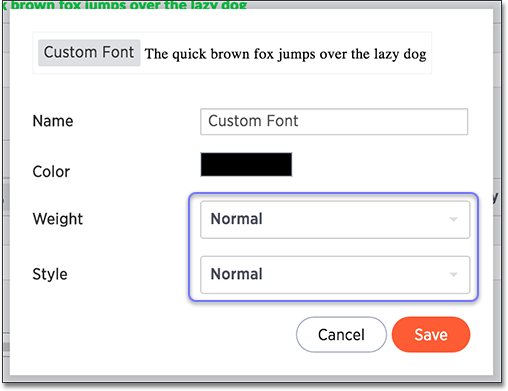
The font weight choices are normal, bold, and light. The style choices are normal, italic, and oblique.
-
Select Save.
-
-
Select the Edit Font icon
 to make changes to the font you just uploaded or to a pre-existing font.
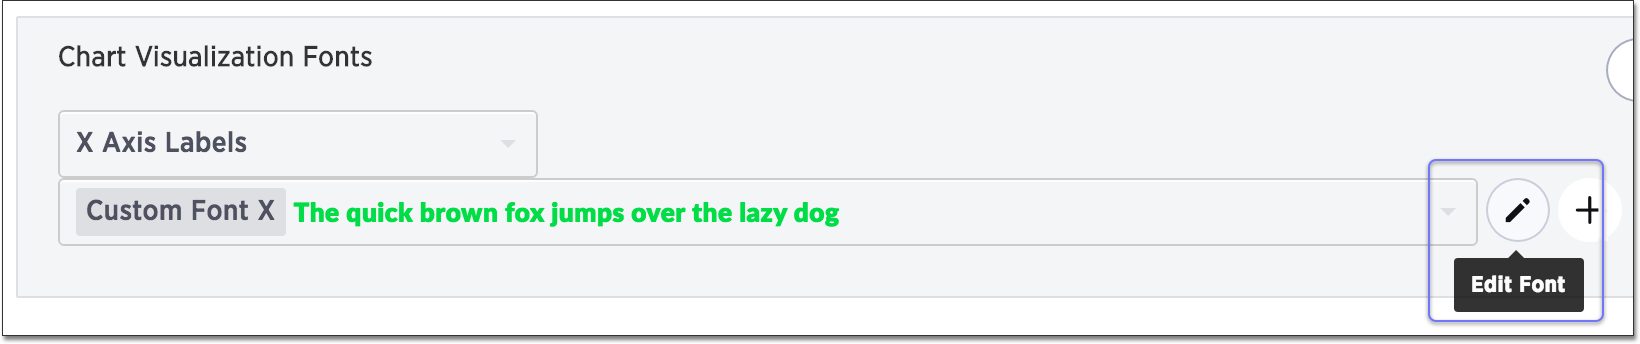
-
Make any changes to the details of the font in the edit menu and select Save.
-
Select the custom font dropdown menu to choose your custom font.

-
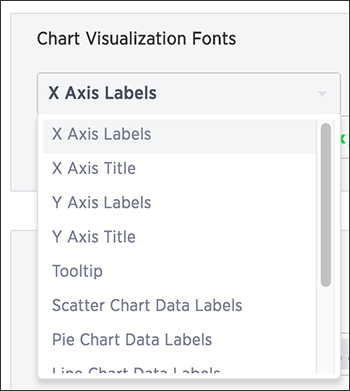
Select the chart label dropdown menu to choose where you would like to apply your custom font.
-
To set your Table Visualization Fonts, follow the same steps.
-
To bring back the default fonts, select the Reset button on the upper-right side of the sections.
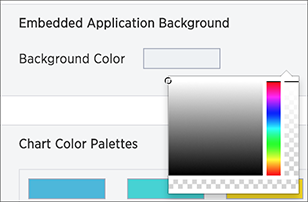
Choose a background color
You can customize ThoughtSpot’s background color to match your company’s theme. The custom background color is in effect when using the API to embed visualizations and Liveboards.
This feature is only applicable when embedding ThoughtSpot in an external web portal or application. To customize the background color, follow these steps:
-
Add
?customBrandingEnabled=trueto your application URL, as shown in the following examples:https://{ThoughtSpot-Host}/?customBrandingEnabled=true/#/https://{ThoughtSpot-Host}/?customBrandingEnabled=true/#/pinboardsYou can make this permanent for all users of your cluster, without needing to add customBrandingEnabled=trueto your application URL, by contacting ThoughtSpot support. -
Select the background color box under Application Background.

-
Use the color menu to choose your new background color.
-
To bring back the default color, select the Reset button on the upper-right side of the section.
Select chart color palettes
You can change the color palettes that are used to create your charts. To customize the color palettes, follow these steps:
-
Add
?customBrandingEnabled=trueto your application URL, as shown in the following examples:https://{ThoughtSpot-Host}/?customBrandingEnabled=true/#/https://{ThoughtSpot-Host}/?customBrandingEnabled=true/#/pinboardsYou can make this permanent for all users of your cluster, without needing to add customBrandingEnabled=trueto your application URL, by contacting ThoughtSpot support. -
Select the color you would like to change in the primary color palette, and use the color menu to choose your new color. You can also add a HEX color number directly.
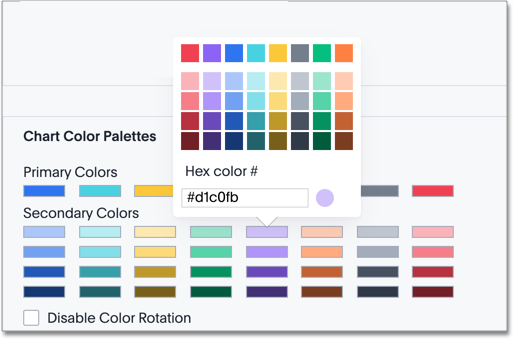
All of the colors in the primary color palette are used in a chart before any from the secondary palette are used. Therefore, the primary palette usually consists of primary colors.
-
Select the color you would like to change in the secondary color palette, and use the color menu to choose your new color. You can also add a HEX color number directly.

The colors from the secondary color palette are used after all of the colors have been exhausted from the primary palette. Therefore, the secondary palette usually consists of secondary colors.
-
To bring back the default color palettes, select the Reset button on the upper-right side of the section.
Disable color rotation
You can disable color rotation for single-color charts. If you disable color rotation, ThoughtSpot generates single-color charts in the order of your color palette, left to right. If you leave color rotation enabled, ThoughtSpot generates the color of single-color charts randomly.
How chart colors work
ThoughtSpot uses a specific logic to determine the colors in your charts. To learn more, expand the Chart color logic section.
Chart color logic
ThoughtSpot’s color palette is in the following format. ThoughtSpot assumes that any custom color palettes are in a similar format.
Standard color palette
| Primary 1 (P1) | Primary 2 (P2) | Primary 3 (P3) | Primary 4 (P4) | Primary 5 (P5) | Primary 6 (P6) | Primary 7 (P7) | Primary 8 (P8) |
|---|---|---|---|---|---|---|---|
Lightest 1 (L1) |
Lightest 2 (L2) |
Lightest 3 (L3) |
Lightest 4 (L4) |
Lightest 5 (L5) |
Lightest 6 (L6) |
Lightest 7 (L7) |
Lightest 8 (L8) |
Light 1 (l1) |
Light 2 (l2) |
Light 3 (l3) |
Light 4 (l4) |
Light 5 (l5) |
Light 6 (l6) |
Light 7 (l7) |
Light 8 (l8) |
Dark 1 (d1) |
Dark 2 (d2) |
Dark 3 (d3) |
Dark 4 (d4) |
Dark 5 (d5) |
Dark 6 (d6) |
Dark 7 (d7) |
Dark 8 (d8) |
Darkest 1 (D1) |
Darkest 2 (D2) |
Darkest 3 (D3) |
Darkest 4 (D4) |
Darkest 5 (D5) |
Darkest 6 (D6) |
Darkest 7 (D7) |
Darkest 8 (D8) |

Standard color algorithm
The standard rules for color application for charts are as follows:
-
If the chart requires only one color, ThoughtSpot selects a primary color depending on whether you enabled color rotation.
-
ThoughtSpot selects the number of primary colors based on the total number of colors required. These colors always appear in order: Primary 1 appears first, then Primary 3, and so on. See Primary color count selection.
-
If the chart requires more than one color, ThoughtSpot determines the number of shades of each color by dividing the total number of colors by the number of primary colors. For example, if the chart requires 20 colors, ThoughtSpot uses 6 primary colors. 20/6 = 3 shades of each color. ThoughtSpot picks the remaining two shades from the first two primary colors.
-
Depending on the number of shades required, ThoughtSpot uses the following shades of each color, in sequence:
Number of shades Default mode Rainbow mode 1
Primary
Primary
2
Primary, Lightest
Primary, Light
3
Primary, Lightest, Dark
Primary, Light, Dark
4
Primary, Lightest, Dark, Light
Primary, Lightest, Dark, Light
5
Primary, Lightest, Dark, Light, Darkest
Primary, Lightest, Dark, Light, Darkest
Primary color count selection
The number of primary colors a chart uses depends on the number of total colors the chart requires. Refer to the following table:
| Number of colors required | Number of primary colors used |
|---|---|
1 |
1 |
2-8 |
4 |
9-15 |
5 |
16-24 |
6 |
25-35 |
7 |
36+ |
8 |
Color rotation
The Style Customization color rotation option determines whether single-color charts use a random primary color or always use the first primary color in the palette. If you enable color rotation, ThoughtSpot may choose any color from Primary 1 through Primary 6 in your color palette for single-color charts. If you disable color rotation, ThoughtSpot always chooses Primary 1.
| Disabling color rotation only affects single-color charts. It does not apply to multi-colored charts. |
Rainbow mode
Some chart types use rainbow mode to allocate colors instead of the default allocation. The default allocation uses all shades of a color first and then applies all shades of the next color required. Rainbow mode uses all the primary colors in your color palette, then one shade of each primary color, then the next shade of each primary color, and so on.
Chart-specific color algorithms
For information on how colors work for specific charts, refer to the following table.
| Chart type | Color algorithm | Mode | Notes | ||
|---|---|---|---|---|---|
Column |
Standard |
Default |
N/A |
||
Stacked Column |
Standard |
Default |
N/A |
||
Line |
Standard |
Rainbow |
N/A |
||
KPI |
Standard |
Rainbow |
Cannot currently select colors manually. As a workaround, select a color in a different chart type, and switch back to KPI. |
||
Pivot Table |
N/A |
N/A |
If in heatmap mode, follows heatmap logic. |
||
Pie |
Standard |
Default |
N/A |
||
Bar |
Standard |
Default |
N/A |
||
Stacked Bar |
Standard |
Default |
N/A |
||
Line Column |
Standard |
Default |
N/A |
||
Area |
Standard |
Default |
N/A |
||
Stacked Area |
Standard |
Default |
N/A |
||
Line Stacked Column |
Standard |
Default |
The line counts as another color. ThoughtSpot applies color to the line before applying color to the columns. |
||
Scatter |
Standard |
Default |
ThoughtSpot chooses colors for points based on the order of the points in the data response. |
||
Bubble |
Standard |
Rainbow |
Bubble charts use translucent versions of the standard color palette. |
||
Waterfall |
Standard |
Rainbow |
N/A |
||
Heatmap |
Uses a color range based on Primary 2.
|
Default |
N/A |
||
Treemap |
Uses a color range based on Primary 1.
|
Default |
N/A |
||
Funnel |
Standard |
Default |
N/A |
||
Geo Bubble |
Standard |
Default |
Bubbles are translucent and appear lighter than the selected color. |
||
Geo Heatmap |
Uses a specific lilac.
|
Default |
No overrides are available currently. |
||
Geo Area |
Uses a specific yellow-to-red gradient. You can select an individual color to use, and ThoughtSpot builds a gradient around that color.
|
N/A |
N/A |
||
Sankey |
Standard |
Default |
Cannot override the colors used. ThoughtSpot chooses colors for points based on the order of the points in the data response. |
||
Radar |
ThoughtSpot sets the base color by default. The color of the radar line is determined by the standard algorithm. |
Default |
N/A |
||
Candlestick |
Up/down default to green/red respectively. You can override them manually. |
N/A |
N/A |
||
Pareto |
Standard |
Default |
The cumulative line is the first color. The active measure is the second color. |
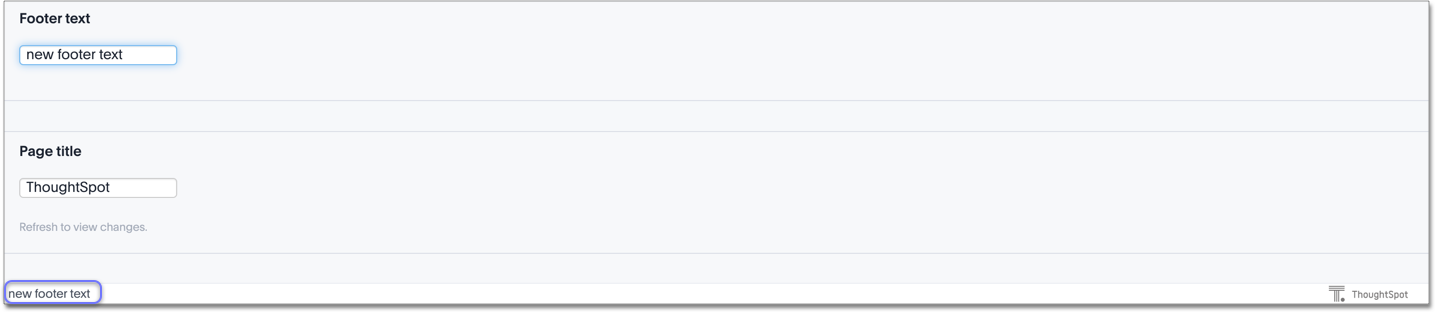
Change the footer text
You can customize ThoughtSpot’s footer text to add a company-specific message. To add new footer text, follow these steps:
-
Add
?customBrandingEnabled=trueto your application URL, as shown in the following examples:https://{ThoughtSpot-Host}/?customBrandingEnabled=true/#/https://{ThoughtSpot-Host}/?customBrandingEnabled=true/#/pinboardsYou can make this permanent for all users of your cluster, without needing to add customBrandingEnabled=trueto your application URL, by contacting ThoughtSpot support. -
Select the text box under Footer text.
-
Enter your new text message.
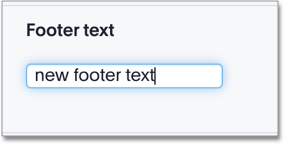
Your new text message will automatically be displayed in the footer.
-
To bring back the default footer text, select the Reset button on the upper-right side of the section.