How the worksheet join rule works
The worksheet join rule specifies when to apply joins when searching a worksheet.
Use the worksheet join rule to specify when to apply joins when a search is done on a worksheet. You can either apply joins progressively, as each search term is added (recommended), or apply all joins to every search.
Understand progressive joins
Often, a worksheet includes several dimension tables and a fact table. With progressive joins, if your search only includes terms from the fact table, you can see all of the rows that satisfy your search. But as you add terms from dimension tables, the total number of rows shown may be reduced, as the joins to each dimension table are applied. It works like this:
-
If you choose Apply joins progressively (recommended for most cases), joins are only applied for tables whose columns are included in the search.
-
If you choose Apply all joins, all possible joins are applied, regardless of which tables are included in the search.
When using Apply joins progressively, the number of rows in a search using the worksheet depends on which tables are part of the search. The worksheet acts like a materialized view. This means that it contains the results of a defined query in the form of a table. So if a particular dimension table is left out of the search, its joins aren’t applied.
Apply progressive joins
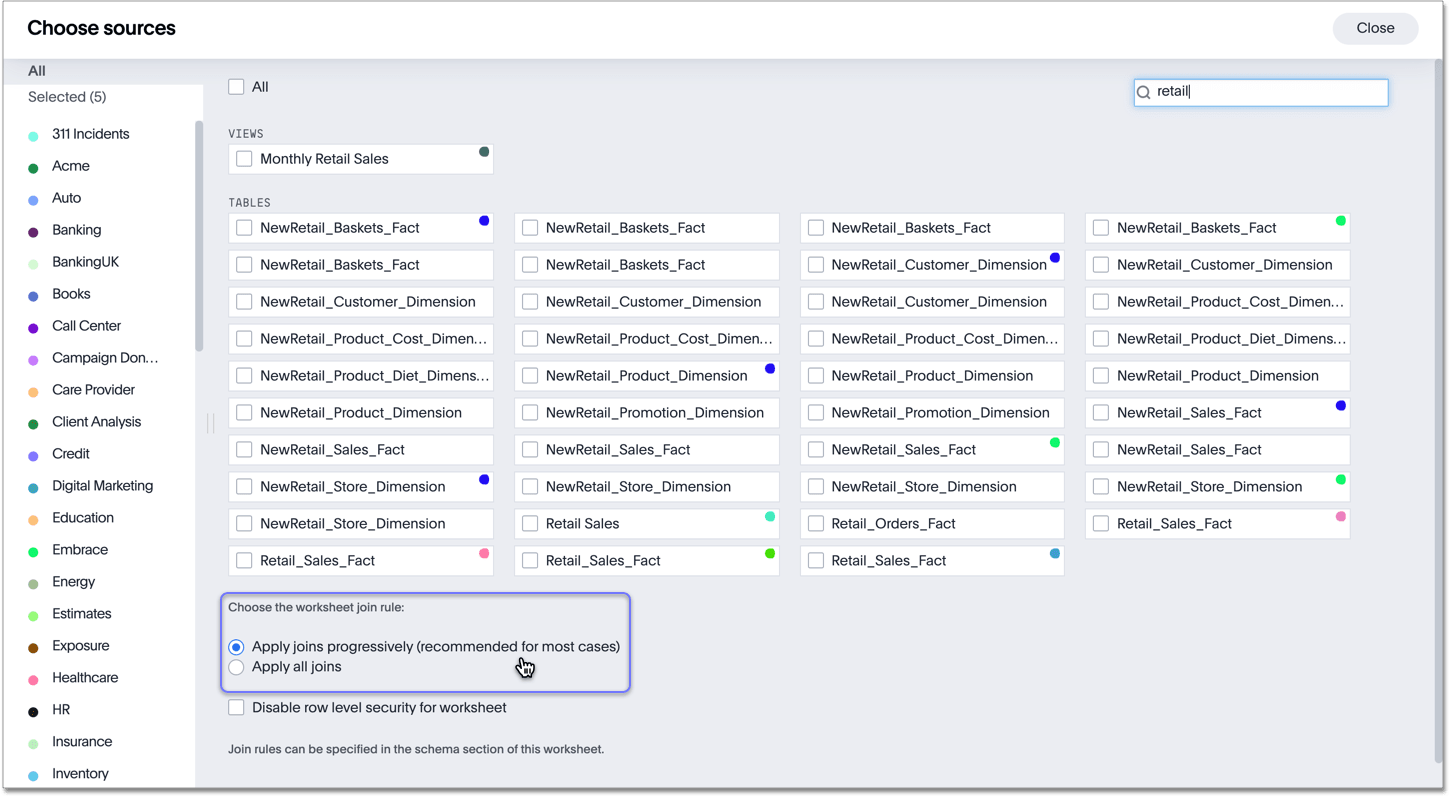
To specify how the worksheet should apply joins, follow these steps:
-
Navigate to the worksheet you would like to edit.
-
Select Edit Worksheet in the upper-right corner.
If you don’t see this option, you may not have editing privileges on this worksheet. Request edit access from your administrator, or the owner of the worksheet.
-
Select the + icon to add sources and specify join application, or to specify how to apply joins on the worksheet’s existing sources.
-
Select the sources you want to specify join application for.
-
Scroll down to the bottom of the Choose sources modal, and under Choose the worksheet join rule, select either apply joins progressively or apply all joins.
Rule-based row-level security (RLS) with worksheets
With rule-based RLS, you need to protect every table that contains any sensitive data. To do this, you can grant access by creating explicit row-level security rules on each of the underlying tables which contain data that row-level security should apply to.
When creating the row-level security rules for a table that’s part of a worksheet, you aren’t limited to referencing only the columns in that table. You can specify columns from other tables in the worksheet as well, as long as the tables are joined to the table you’re creating the rule on. Then, when creating a worksheet on top of them, the behavior is consistent regardless of the worksheet join rule you choose. Users will never be able to see data they shouldn’t, regardless of what their search contains.
Imagine you have a worksheet that contains a Sales fact table, and Customer and Product dimensions that are joined on Customer SSN and Product Code columns.
In order to secure the Sales table, you can use Customer Name from the Customer column to create a row-level security rule.
How joins are applied with chasm traps
When working with worksheets and row-level security, you need to understand how joins are applied. This is particularly important with chasm trap schemas. For chasm trap schemas, if row-level security is only set on one of the tables, people could see data they shouldn’t see if the scope of their search doesn’t include that table. (This protects them from having people see the wrong things if they have chasm trap.)
For chasm trap worksheets, progressive and non-progressive joins don’t apply. There is an entirely different methodology for how worksheet joins on a chasm trap schema work with row-level security. So you can safely ignore that setting.


