Materialize a view
Learn how to materialize a view to improve its performance.
To improve the performance of a view, you can materialize it. This operation computes the data for the view and stores it in memory, just like a table. You can expect a 3-6 times performance improvement on a materialized view over a view that isn’t materialized. However, materialized views take up space in memory, so weigh the tradeoffs and benefits of materializing a view ahead of time.
| Row-level security doesn’t apply to materialized views. All users will see the same data when using the materialized view as a data source. |
To materialize a view:
-
To find your view, click Data in the top menu.
-
Under Data Objects at the top of the page, choose Views.
-
Click the name of your view.
-
Click Joins.
-
If you don’t have any joins, you may wish to add them now. See add joins.
-
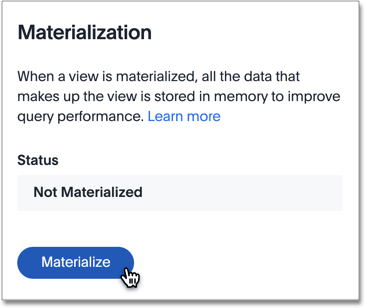
Under Materialization, select Materialize.
-
Fill in the details for primary key, sharding key, and number of shards.

If you don’t fill in the sharding details, the view is replicated on every node of your cluster. Follow the links in this step to learn more about sharding. -
Select Materialize.
-
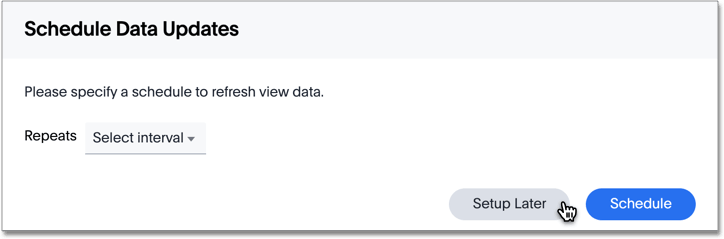
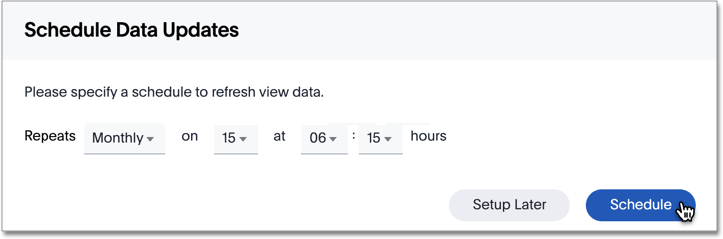
In the Schedule data updates dialog, decide if you want to configure the schedule to refresh the materialized view at a specific time.
If you want to skip this step and schedule it later, select Setup later.
-
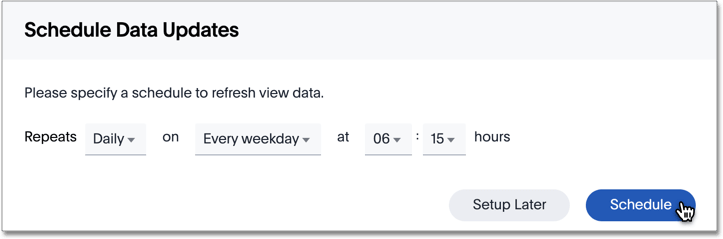
To schedule a refresh for the materialized view, next to Repeats, select the Time Interval: Daily, Weekly, or Monthly.
-
Supply the schedule details:
- Daily
-
-
From the Select days menu, select Every weekday, or Every day.
-
Specify the hour of the day.
-
Specify the minutes.
-
Click Schedule.
-
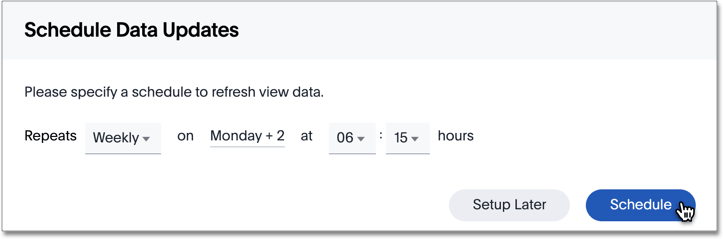
- Weekly
-
-
From the Select weekdays menu, select the days of the week, Sunday .... Saturday, for the refresh, and click Done.
-
Specify the hour of the day.
-
Specify the minutes.
-
Click Schedule.
-
- Monthly
-
-
From the Select days menu, select the day of the month, 1 ... 31, for the refresh.
-
Specify the hour of the day.
-
Specify the minutes.
-
Click Schedule.
Refresh works only if it is scheduled in the refresh window set for the cluster, with default: 8:00 PM - 4:00 AM. Only the start time of the refresh window is configurable using the flag orion.materializationConfig.refreshWindowStartTime. This flag can have values like12:00PM,01:00AM, and so on. For example, to set the cluster window from 2:00 AM to 10:00 AM, set the flag toorion.materializationConfig.refreshWindowStartTime \"02:00AM\".
-
-
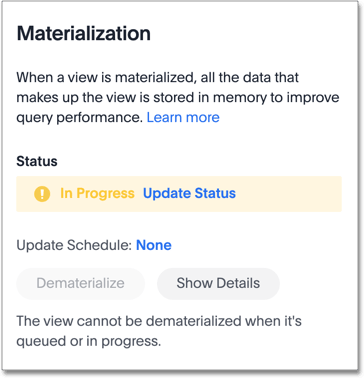
You can see the status of the materialization in progresses.
-
Select Update status to refresh materialization status.
-
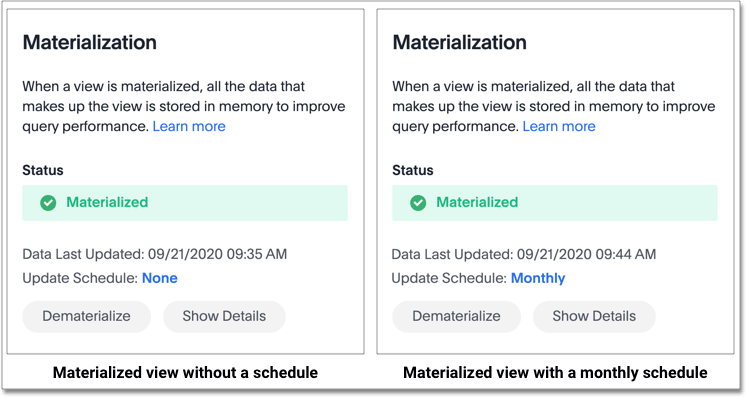
Note that when the materialization completes, the status changes to Materialized.
If after some time, the status hasn’t changed to Materialized, check the list of statuses and corresponding actions to take.
When it says Materialized your materialized view is ready for search.
Related information


