Load CSV files with the UI
The simplest way to load data is to upload a CSV or Excel file from the ThoughtSpot Web interface.
Loading data through the Web browser is recommended for smaller tables (under 50MB) with simple relationships between them. This method is recommended for small, one time data loads. Using this method, the data schema is created for you automatically.
Any user who belongs to a group that has the privilege Has administration privileges or Can upload user data can upload their own data from the browser.
Your data should be in a CSV (comma separated values) before you load it. A CSV file is a text file made up of data fields separated by a delimiter and optionally enclosed with an enclosing character. If your data contains multiple tables, you can have a separate CSV for each table.
Formatting the CSV
Your ETL (extract, transform, load) process will typically generate CSV files. You can also create a CSV file from a Microsoft Excel spreadsheet by opening the spreadsheet in Excel, choosing Save As and selecting CSV.
A CSV file contains a delimiter that marks the separation between fields in the data. The delimiter is usually comma, but it can be any character. The file also contains fields optionally enclosed with double quotes. Use these guidelines when creating the CSV file:
-
If the CSV contains column headers, they must match the column names in the database exactly.
-
Often a
|(pipe) or tab is used as the delimiter, because it may be less likely to occur within the data values. -
When a field contains a double quote, it must be escaped with the character specified in the escape character argument in
tsload. -
When a field contains the delimiter, the field must be enclosed in double quotes.
ThoughtSpot supports a wide range of date and timestamp formats (See Date and time formats reference) in the CSV file. Blank values in user uploaded CSV files are interpreted as NULL values. These include the values (case insensitive):
-
NULL -
\N -
NA -
N/A -
[space]
If you are appending data to an existing schema or table, columns in the CSV file must be in the same order as defined in the target table.
If you are loading a fact table that joins to dimension tables, you must load the fact table first, and then the dimension tables.
The joining key must be a single column of unique values in the dimension table.
NULL values in the fact table cannot be joined.
Create a CSV file
The first step in loading data is to obtain or create one or more CSV files that contain the data to be loaded into ThoughtSpot. CSV is a common format for transferring data between databases. ThoughtSpot requires this format.
Most applications such as Microsoft Excel or Google Sheets can output CSV formatted files. If your source is an Excel spreadsheet or Google Sheet:
-
Save, export, or download the file in CSV format. The exact procedure you use will depend on the source application.
-
Review the file’s format before uploading it to ThoughtSpot.
Your source data may be in another database. If this is the case, your company’s ETL (extract, transform, load) process will typically generate CSV files. If your source is another database:
-
Connect to the source database.
-
Extract each table you wish to import into ThoughtSpot as a CSV file.
The column delimiter should be a
,(comma),|(pipe), or tab.
For general information about CSV files and the rules for creating them, see Comma-separated_values on Wikipedia.
Load the CSV File
Any user who belongs to a group that has the privilege Has administration privileges or Can upload user data can upload their own data from the browser. To load the CSV or Excel file into ThoughtSpot:
-
Log in to ThoughtSpot from a browser.
-
Click Data, on the top navigation bar.
-
Click the More icon
 , in the upper right corner, and select Upload Data.
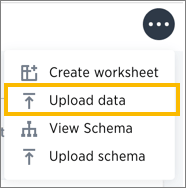
-
Upload the CSV or Excel file by doing one of these options:
-
Click Browse your files and select the file.
-
Drag and drop the file into the drop area.
-
-
Answer the question Are the column names already defined in the file header?
-
Answer the question Are the fields separated by? Click Next.
-
Click the column header names to change them to more useful names, if you’d like. Click Next.
-
Review the automatically generated data types for each column, and make any changes you want.
There are four data types: Text, Integer, Decimal, and Date.
-
Click Import.
When an upload is complete, the system reports the results and offers you some further actions.

-
Click Link to Existing Data if you want to link the data you uploaded to the data in another table or worksheet.
-
Click Search if you want to begin a new search.
-
Click Auto analyze if you want to use the SpotIQ feature to find insights in your new data.
-
Append to an existing table
You can append data to your existing system tables through the ThoughtSpot application, even if the tables were initially loaded using tsload.
The CSV file must have the same structure as the table it is being loaded into, including number and type of columns, in the same order as the target table.
To append data into ThoughtSpot:
-
Log in to ThoughtSpot from a browser.
-
Click Data on the top navigation bar.

-
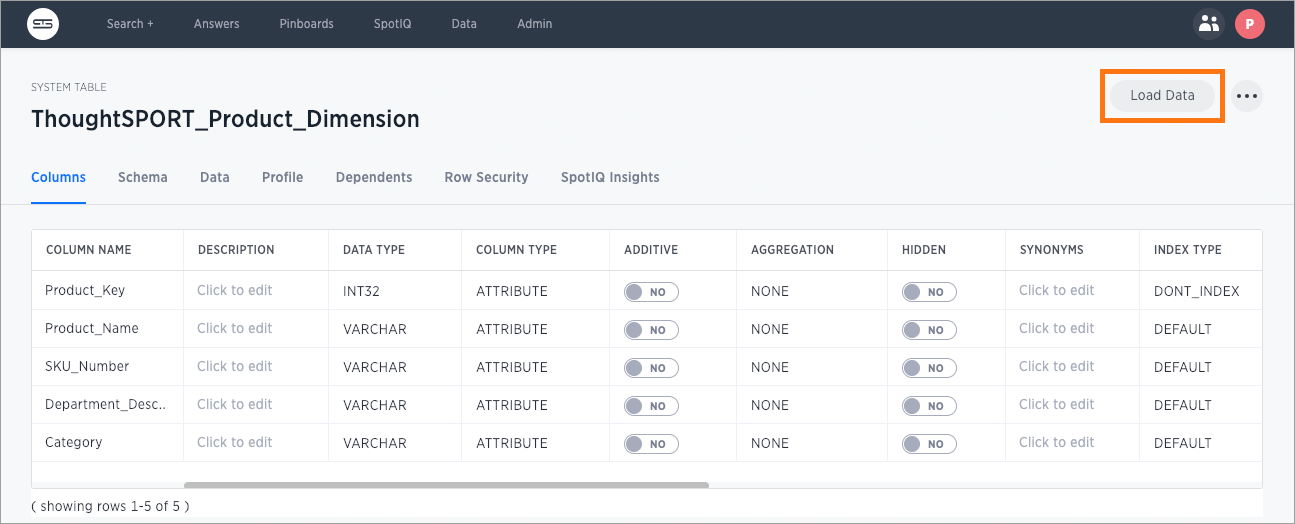
Click the name of the table you would like to append data to.
-
Click the Load Data button.
-
Upload the CSV or Excel file by doing one of these options:
-
Click Browse your files and select the file.
-
Drag and drop the file into the drop area.
-
-
Answer the question Are the column names already defined in the file header?.
-
For the question Do you want to append to the existing data or overwrite it?, select Append.
-
Answer the question Are the fields separated by?, and click Next.
-
Click Upload.
-
Click Link to existing data if you want to link the data you uploaded to the data in another table or worksheet. Or click Ask a question if you want to begin a new search.


