Using parameters
A parameter is a container or a placeholder such as a number, date, or string that can replace a constant value or a list of values. Create Model and Answer parameters to optimize your data inquiries. Use parameters to run different scenarios with adjustable values, without creating or modifying the constants in formulas for each new value.
Parameters are useful for 'what-if' analysis, financial planning, cohort analysis, and so on. When you create parameters for your Models, you guide users in their exploration of the data as they search on your Models or use Liveboards based on your Models. When you create parameters for your Answers, you empower yourself and other viewers of your Answers to run scenarios on the data in the Answer, using adjustable values.
Using parameters
Use parameters within formulas to run different scenarios when searching on your data or viewing Liveboards or Answers. For example, you may want to forecast your sales for the next month, based on various rates of growth. You might create a parameter, called growth %, with a range from 0 to 1 and a default value of .1. Then, you create a formula called profit forecast, defined by profit * (1 + growth %). You can then create Answers and Liveboards that use this formula and change the parameter value to view your forecasted profit if your sales grow by 25%, 53%, and so on.
parameters work like column names in formulas, but appear in green. For more information about formulas, see Add a formula to a search.
You can reorder the parameters in Liveboards and Answers, in the same way that you can reorder filters. When you edit a Liveboard or Answer to reorder the parameters and save your changes, the new order is reflected when anyone opens the Liveboard or Answer.
| Parameter reordering is blocked if the Liveboard has any hidden parameters, if the parameters are being updated by runtime/JWT, or if you don’t have access to the data source. |
Changing parameter values in an Answer
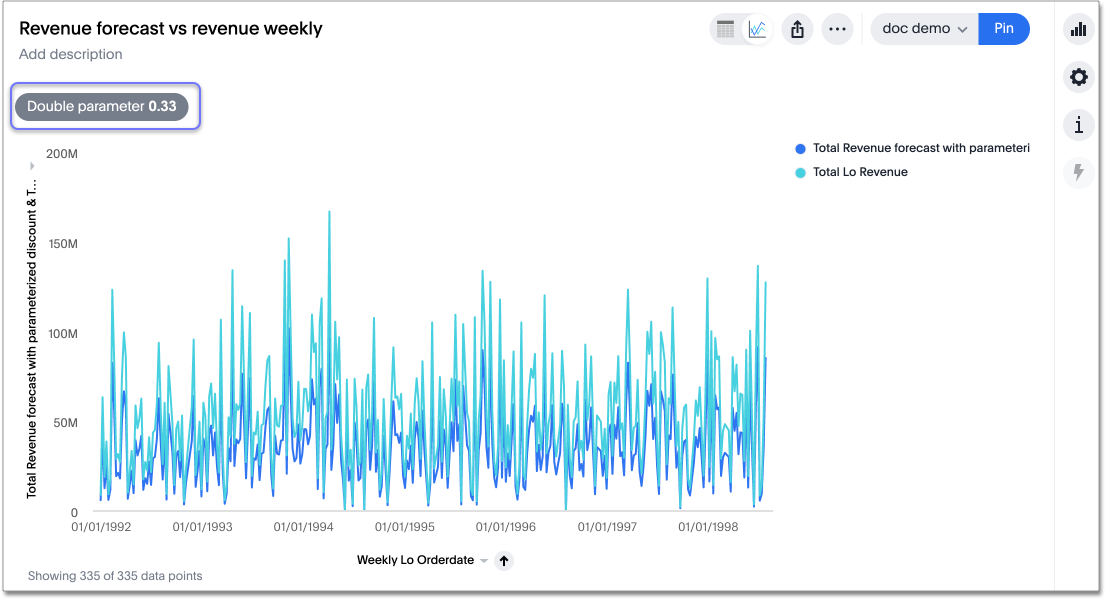
When you create or view an Answer that contains a formula with a parameter, you’ll know: ThoughtSpot displays the name of the parameter and its current value below the Answer description, in the row where it displays filters.
To change the parameter value, follow these steps:
-
Navigate to the Answer you would like to change the parameter for.
-
Select the parameter you would like to edit in the filter/parameter row. You can also find the parameter in the Parameters section of the Data panel, and select the more options menu
 > Change Value.
 -
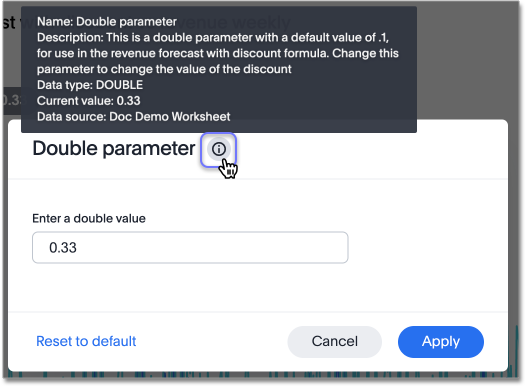
The parameter dialog appears. To view more information about the parameter, such as how to use it and what data type it supports, hover over the information icon next to the parameter name:
-
Depending on the type of parameter, you may see a text box or a list of values. Above the text box, you may see a range of values you can use; for example, you may see "Enter a value between 0 and 10000."
If there is a text box, enter a value in the text box that is valid for the data type and is within the specified range, if there is one. If there is no range, enter any value that is valid for the data type. For example, if the data type is
integer, you can’t enter a decimal such as6.4.If there is a list of values, select the value you would like to use.
-
If you would like to return the parameter to its default value, select Reset to default in the lower left corner of the dialog.
-
After you enter a new value or reset the value to the default value, select Apply.
Changing parameter values in a Liveboard
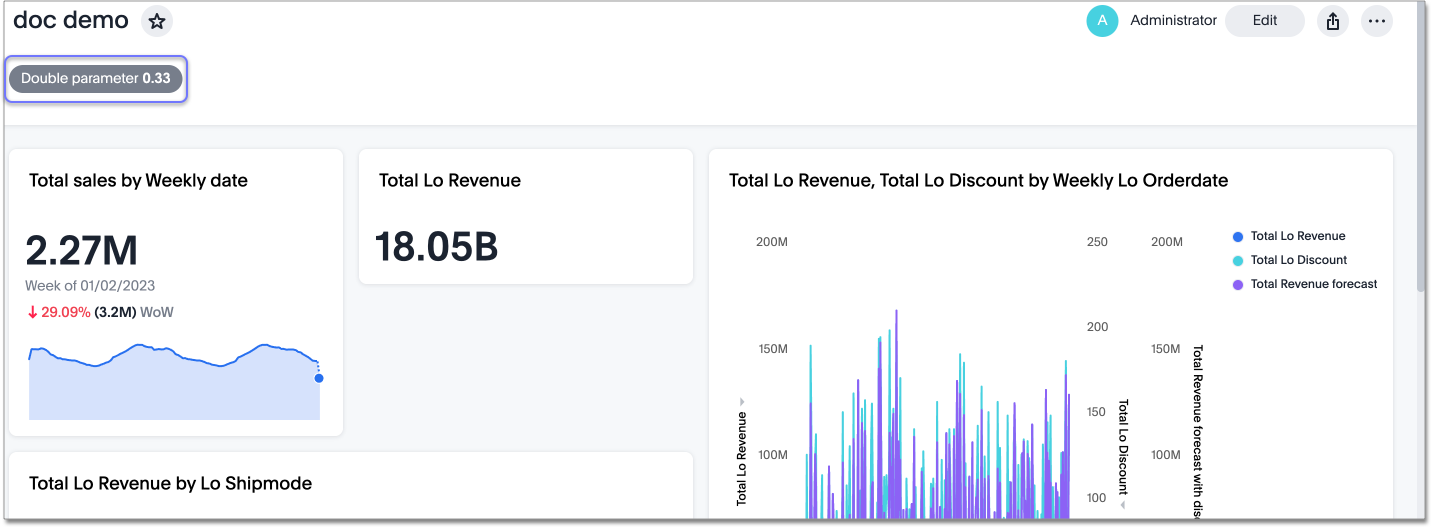
When you create or view a Liveboard that contains a formula with a parameter, you’ll know: ThoughtSpot displays the name of the parameter and its current value below the Liveboard description, in the row where it displays filters.
For parameters to affect the entire Liveboard and appear in the Liveboard filter bar, the Model the Liveboard is based on must contain parameters. Answer parameters don’t appear in the Liveboard filter bar, because they don’t affect the entire Liveboard. You can’t create new parameters from a Liveboard; you can only change their values. If an Answer in a Liveboard contains a parameter, you can change the value for the parameter in explore mode for that visualization, but it won’t affect the entire Liveboard.
If the parameter is not currently in use for any visualizations in the Liveboard, it does not appear for users in view mode. To ensure that all users can see and use the parameter, follow these steps. You must have edit access for the Liveboard.
-
Select the Edit button at the upper right of the Liveboard. If this button is grayed out, you do not have edit privileges for the Liveboard. To resolve this, contact your administrator or the creator of the Liveboard.
-
In the top menu bar that appears, select + Add parameter.
-
The Parameters sidebar appears at the left edge of your screen. Double-click on any parameter you would like to add, or select the edit icon
 that appears when you hover over the parameter name.
 -
The parameter dialog appears. To view more information about the parameter, such as how to use it and what data type it supports, hover over the information icon next to the parameter name:
-
Depending on the type of parameter, you may see a text box or a list of values. Above the text box, you may see a range of values you can use; for example, you may see "Enter a value between 0 and 10000."
If there is a text box, enter a value in the text box that is valid for the data type and is within the specified range, if there is one. If there is no range, enter any value that is valid for the data type. For example, if the data type is
integer, you can’t enter a decimal such as6.4.If there is a list of values, select the value you would like to use.
-
If you would like to return the parameter to its default value, select Reset to default in the lower left corner of the dialog.
-
After you enter a new value or reset the value to the default value, select Apply.
-
Select Save in the upper right corner of your screen.
To change the value of a parameter from view mode for a Liveboard, follow these steps. Note that if you only have view access to a Liveboard, you can’t save the Liveboard with the altered parameter value.
-
Navigate to the Liveboard you would like to change the parameter for.
-
Select the parameter in the filter/parameter row.
-
The parameter dialog appears. To view more information about the parameter, such as how to use it and what data type it supports, hover over the information icon next to the parameter name:
-
Depending on the type of parameter, you may see a text box or a list of values. Above the text box, you may see a range of values you can use; for example, you may see "Enter a value between 0 and 10000."
If there is a text box, enter a value in the text box that is valid for the data type and is within the specified range, if there is one. If there is no range, enter any value that is valid for the data type. For example, if the data type is
integer, you can’t enter a decimal such as6.4.If there is a list of values, select the value you would like to use.
-
If you would like to return the parameter to its default value, select Reset to default in the lower left corner of the dialog.
-
After you enter a new value or reset the value to the default value, select Apply.
Linking parameters across Models
Liveboard creators can link parameters of the same data type across multiple different Models. This allows you to control multiple parameters from a single parameter chip and reduces the repetitive effort required for Liveboard users to individually set identical parameters for each Model. For more information, see Link parameters across Models in a Liveboard.
Runtime overrides
You can adjust parameter values at runtime from Liveboard or Answer URLs, or using REST API v1 requests. To learn more about applying parameter runtime overrides in REST API v1 requests, see Runtime parameters. To apply runtime overrides for parameters in Liveboard or Answer URLs, see Runtime overrides for parameters.
Runtime parameters are not supported for dynamic date parameters.
Related information