Configure OAuth for a Databricks connection
ThoughtSpot supports OAuth for a Databricks connection. This page describes the setup and configuration required.
|
OAuth requires users to log in and authorize. The frequency of login will depend on the token expiry. ThoughtSpot supports Authorization Code grant flow in OAuth authentication. |
Databricks SQL warehouses are configured with OAuth 2.0 authentication. ThoughtSpot supports all IDPs supported by Databricks in OAuth 2.0, including Microsoft Azure’s Azure Active Directory (AAD), AWS, and Okta.
ThoughtSpot initiates the authorization request to Databricks for OAuth. Databricks acts as the auth token-issuing authority. The IDP (for example, Okta) is only involved in the authentication between Databricks and the IDP. That is, the IDP is responsible for signing in to Databricks. Once you are logged in to Databricks, ThoughtSpot requests Databricks send the access and refresh tokens, and these tokens are then used for the JDBC connection.
The configuration details on the ThoughtSpot connection form should be derived from the custom application parameters set up in the Databricks account. There is no integration between ThoughtSpot and the specific IDP for the Databricks authentication process.
| For OAuth, we recommend checking the Databricks documentation to confirm any IDP support and their details. |
Step 1: Registering an OAuth application from Databricks Account Console
You can register an OAuth application for U2M in your account from the Databricks Account Console by following these steps:
-
Sign in to the Databricks Account Console.
-
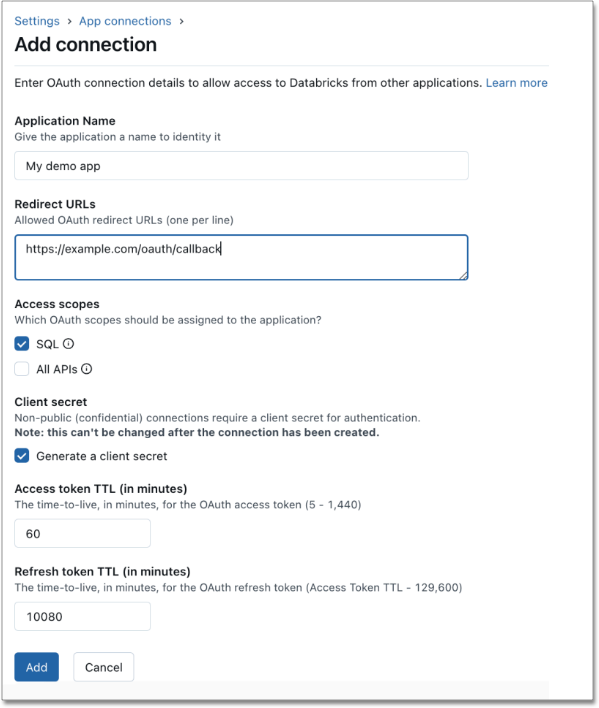
Navigate to Settings > App connections.
-
Click Add connection.
-
Enter the application name Redirect URLs and leave all other fields as default.
-
Enter the Redirect URL(s) in
<thoughtspot-cluster-url>/callosum/v1/connection/generateTokensformat. -
For Access scopes, select SQL.
-
For Client Secret, select Generate a client secret.

-
-
Click Add to create your OAuth application.
-
In the Connection created dialog box, copy the Client ID and Client Secret and store them in a safe location. The Client Secret will not be shown to you again.
Step 2: Configure the ThoughtSpot Connection form
To create a connection to Databricks, follow these steps:
-
Navigate to the Connection creation page and enter the connection name and description. Select Databricks as the connection type and click Continue.
-
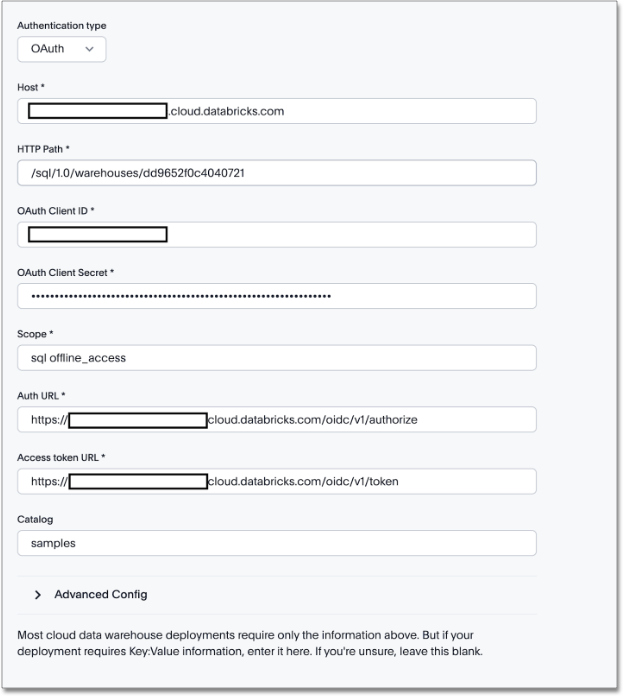
Select the Authentication type as OAuth or OAuth with PKCE.
-
Enter the following fields:
-
Client ID (generated in Step 1).
-
Client Secret (generated in Step 1).
-
Auth URL (in the format
<databricks-instance-url>/oidc/v1/authorize). -
Token URL (in the format
<databricks-instance-url>/oidc/v1/token). -
Scope ("sql offline_access").

-
(Optional) Provide additional key-value pairs that you need to set up your connection to Databricks or customize additional JDBC parameters supported by Databricks, by doing the following:
-
Select the Advanced Config menu to reveal the Key and Value fields. Refer to the installation and configuration guide that comes with the Databricks JDBC driver for information on Databricks’s supported keys and values.
-
Enter your key and value information.
-
To add more keys and values, select the plus sign (+), and enter them.
Any key-value pairs that you enter must be defined in your Databricks data source. Key-value pairs are case-sensitive.
-
-
Select Continue.
-
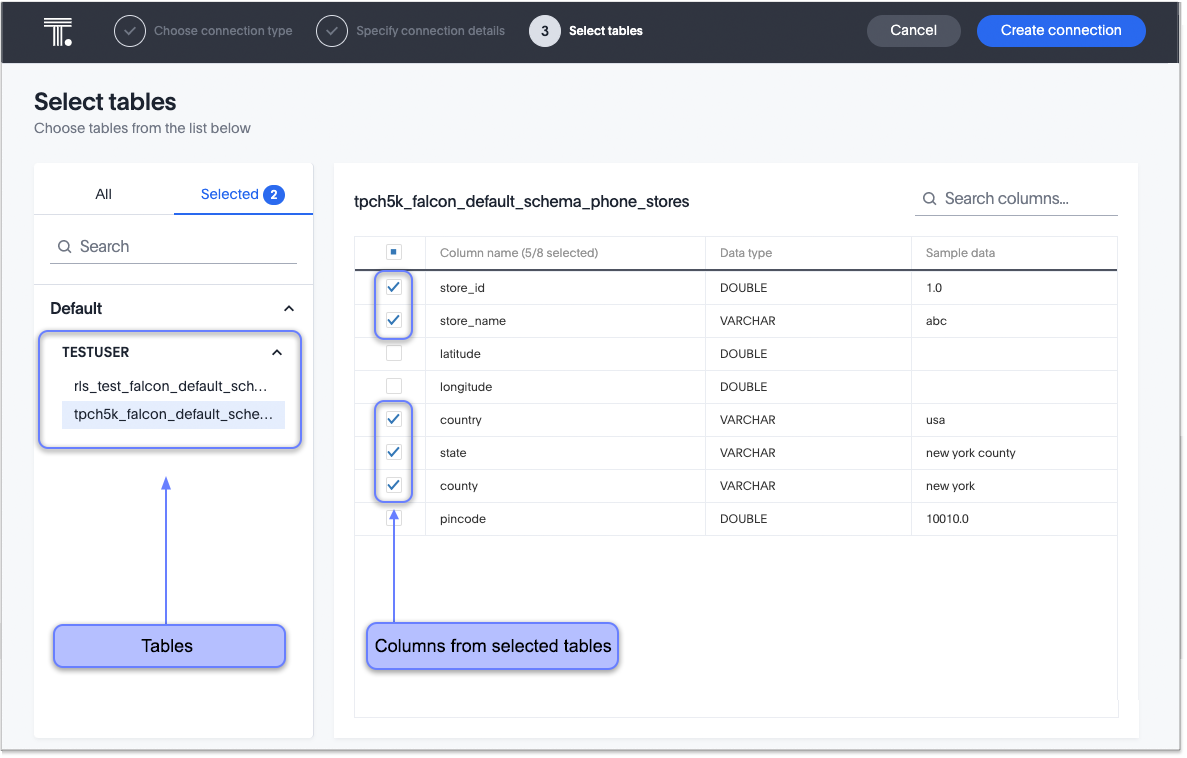
Select tables (on the left) and the columns from each table (on the right), and then choose Create connection.

A message appears indicating the number of tables and columns that will be added to your connection.
-
Select Confirm.
After you add the connection, you can search your Databricks database.

Configure OAuth with Okta example
As a prerequisite, follow the Databricks documentation to enable Single Sign-on (SSO) on your account.
Once SSO has been enabled on your account, you will need to authenticate the Databricks connection using the SSO details. The ThoughtSpot Connection details will be the same as those detailed in step 2.
This is a three-legged OAuth process where Databricks authentication is governed by the IDP.


