Integrate with dbt
ThoughtSpot’s dbt integration allows you to easily provide your existing dbt models and automatically create ThoughtSpot Worksheets, which you can use to search your data.
dbt takes your raw data in your data warehouse and transforms and validates it. ThoughtSpot’s dbt integration connects users to their cloud data warehouse, integrates with your dbt models using an API key or zip file, and generates the relationships between the tables defined in the dbt model that you select. It also brings any logical tables into ThoughtSpot. Then, ThoughtSpot creates new Worksheets, based on the relationships between the tables. If a table does not have any relationships, ThoughtSpot creates a Worksheet based only on that table. These Worksheets provide user-friendly logical views of your complex datasets. Users can use these Worksheets to easily search their complex data. This process may replace existing dbt tables you imported into ThoughtSpot, but it will not replace existing Worksheets.
| Integration with dbt is certified only for Amazon Redshift, Databricks, Google BigQuery, and Snowflake connections. |
Prerequisites
Before you can integrate with dbt, you must satisfy the following prerequisites
-
Create a connection to your external cloud data warehouse: Amazon Redshift, Databricks, Google BigQuery, or Snowflake. This cloud data warehouse must contain the tables that are created from your dbt models.
-
If you are using a single-tenant dbt environment, you must ask your dbt contact to enable access to the dbt Cloud API v2 (2.0.0).
-
If you connect to dbt via dbt cloud, you need the API key, Account ID, and Project ID:
- API key
-
This is also called the API token in dbt. To find this token, refer to the dbt documentation.
- Account ID
-
Your default dbt Cloud account ID. Find your account ID in your dbt Cloud URL, after you sign in. For example, if your URL is
https://cloud.getdbt.com/#/accounts/12345/projects/56789/dashboard, your account ID is12345. - Project ID
-
Find your project ID in your dbt Cloud URL, after you sign in. For example, if your URL is
https://cloud.getdbt.com/#/accounts/12345/projects/56789/dashboard, your project ID is56789.
-
Optionally define the relationships for the dbt models in your
ymlschema file. For more information, refer to the dbt documentation.If you do not define relationships, ThoughtSpot imports each model as a single table and creates one Worksheet based on each table.
| Manage your ThoughtSpot Worksheet and table column properties and table joins in dbt by using metadata tags to define column properties and joins within your dbt model schema. See Metadata tags for dbt. |
-
To ensure ThoughtSpot can process the latest changes defined in your
ymlschema file, which defines relationships, metatags, and tests, you must have the latest versions of themanifest.jsonandcatalog.jsonfiles. To ensure you have the latest versions of those files, run a dbt job, which generates the latest versions of these files. -
If you are using dbt cloud, the generate docs on run setting must be on. You can enable this setting in the jobs settings of the project, under Execution settings.
-
If you are using dbt core, execute the
dbt docs generatecommand along with thedbt runcommand. -
If you are using dbt core, you must connect to dbt using a zip file, which must contain the latest
manifest.jsonandcatalog.jsonfiles. By default, dbt stores these files under the<project name>/targetfolder.When you compress the manifest.jsonandcatalog.jsonfiles into one zip file, ensure that you do not include any hidden files, as this may cause errors later. To check the folder you plan to compress does not contain hidden files, refer to these articles for viewing hidden files on your Mac or Windows computer. If the folder contains hidden files, move them out of the folder before compressing it into a zip file.
Integrating with dbt
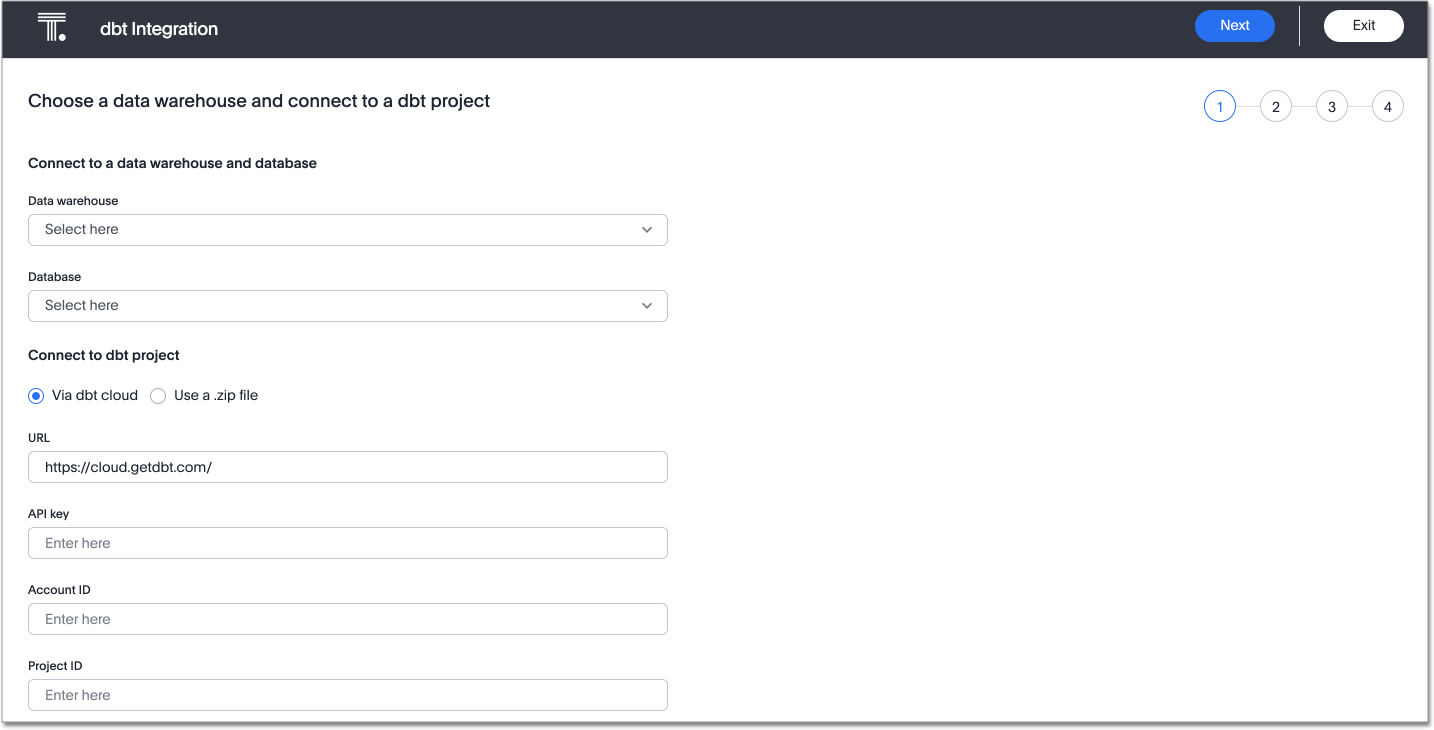
You can set up your dbt integration from the Data workspace. To integrate with dbt, follow these steps:
-
Ensure that you have already created a connection to your external cloud data warehouse. This cloud data warehouse must contain the tables that are created from your dbt models.
-
Select Data in the top navigation bar.
-
Select dbt in the side navigation bar.
-
Select Add dbt connection in the upper right corner. The dbt integration wizard opens.
-
Under Data warehouse, select the cloud data warehouse you would like to use from the dropdown menu, or search for it using the search bar in the dropdown menu. You can also select Add new connection, which opens the connection creation wizard.
-
Under Database, select the database within the cloud data warehouse that you would like to use from the dropdown menu, or search for it using the search bar in the dropdown menu. This database must contain the tables that are created from your dbt models.
-
Under Connect to dbt project, select either Via dbt cloud or Use a .zip file. If you are using dbt core, you must select Use a .zip file.
-
Under URL, specify the beginning of your dbt URL. For example, if your URL is
https://cloud.getdbt.com/#/accounts/12345/projects/56789/dashboard, puthttps://cloud.getdbt.comin the URL text box. -
If you select Via dbt cloud under Connect to dbt project, fill in the following parameters:
- API key
-
This is also called the API token in dbt. To find this token, navigate to your Account Settings page in dbt cloud. Select the Service Account tokens page, and generate a new token.
- Account ID
-
Your default dbt Cloud account ID. Find your account ID in your dbt Cloud URL, after you sign in. For example, if your URL is
https://cloud.getdbt.com/#/accounts/12345/projects/56789/dashboard, your account ID is12345. - Project ID
-
Find your project ID in your dbt Cloud URL, after you sign in. For example, if your URL is
https://cloud.getdbt.com/#/accounts/12345/projects/56789/dashboard, your project ID is56789. - Environment ID
-
Find your environment ID in your dbt Cloud URL, after you sign in. Your environment ID can be identified by the numbers that appear after
environment/in the URL.
-
If you select Use a .zip file under Connect to dbt project, select the Upload button, and add the zip file from your files. The zip file must contain the latest
manifest.jsonandcatalog.jsonfiles. By default, dbt stores these files under the<project name>/targetfolder.When you compress the manifest.jsonandcatalog.jsonfiles into one zip file, ensure that you do not include any hidden files, as this may cause errors later. To check the folder you plan to compress does not contain hidden files, refer to these articles for viewing hidden files on your Mac or Windows computer. If the folder contains hidden files, move them out of the folder before compressing it into a zip file. -
Select Next.
-
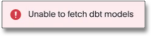
If you receive the following error, make sure you executed the dbt project with the
GENERATE DOCSoptionON, and verify that you entered the API key, account ID, project ID, and environment ID correctly. If you are using dbt cloud, ensure that thegenerate docs on runsetting is on. You can enable this setting in the jobs settings of the project, under Execution settings. If you are using dbt core, execute thedbt docs generatecommand along with thedbt runcommand. After verifying everything, run the dbt connection again.Unable to connect to dbt project. Please verify API key and retry

-
If you receive the following error, you may need to switch to an older version of dbt. ThoughtSpot supports dbt for versions 1.7 and earlier. Navigate to dbt and go to Deploy > Environments > Environment_Name > Settings. Click the dbt Version menu and scroll down to select 1.7.
Unable to fetch dbt models
-
On the next screen, select up to 4 dbt folders to import. ThoughtSpot lists the model names, paths, and the number of tables they have.
To increase the maximum number of dbt folders you can import at a time, contact ThoughtSpot support.
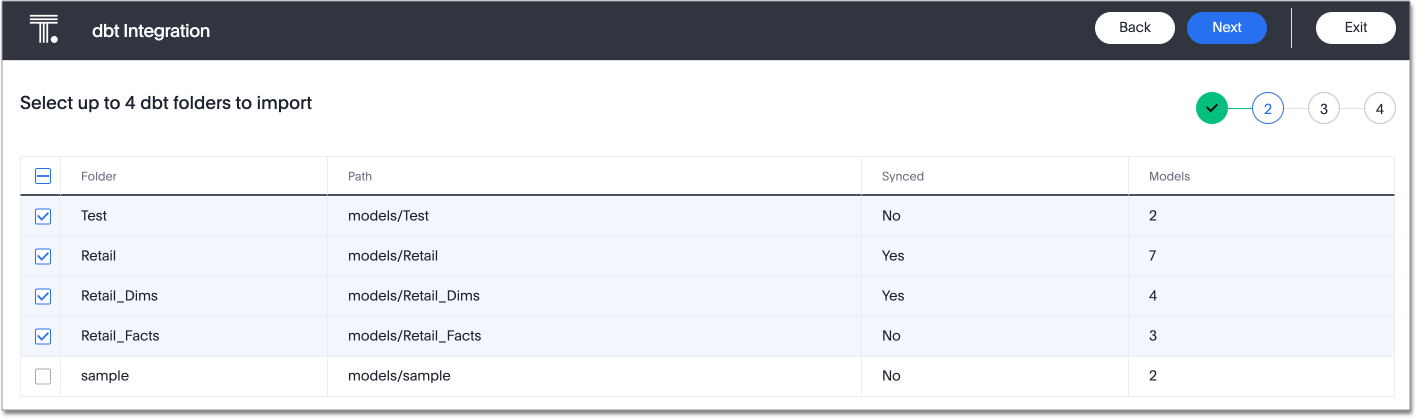
You can now filter models and folders on this page, as well as sort by column header. -
Select Next.
-
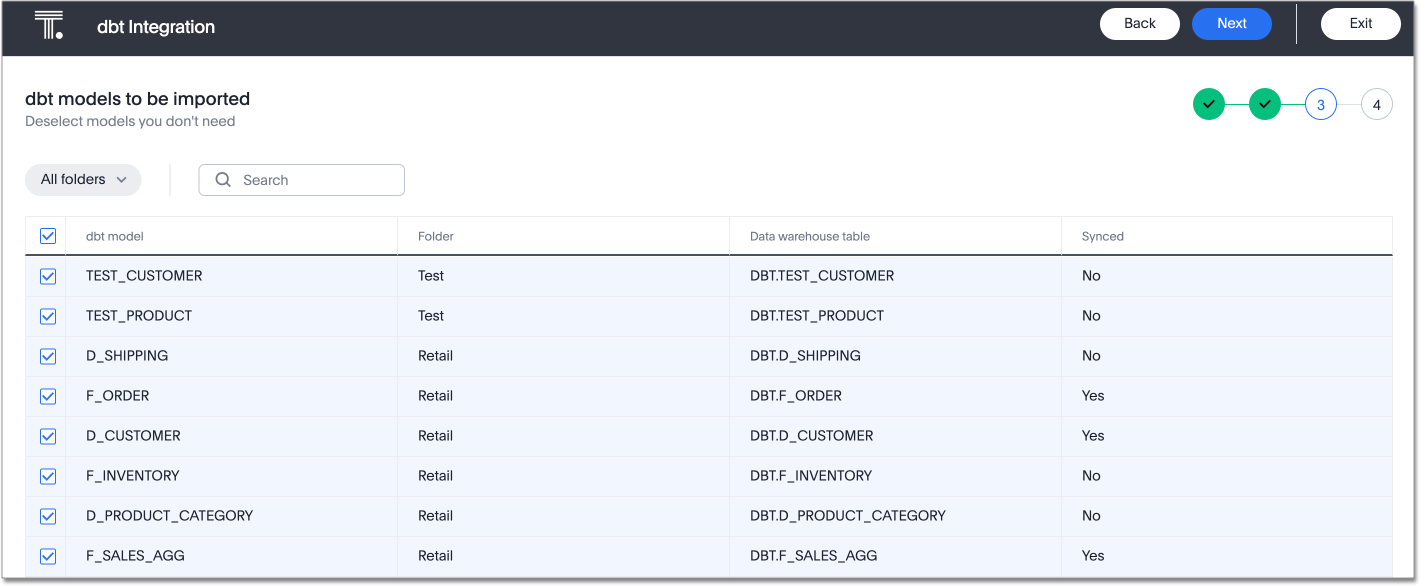
On the next screen, select tables or models to import. By default, ThoughtSpot imports all models in the folder(s). Deselect any models you do not want to import. You must select at least 1 model within each dbt folder.
The Synced column says No if this is the first time you are importing this model. The Synced column says Yes if you are importing the same model again. If the Synced column says Yes, ThoughtSpot will update the existing ThoughtSpot objects, instead of creating new objects.
-
On the next screen, choose which Worksheets you would like ThoughtSpot to create, based on the models and relationships specified.
The Synced column says No if this is the first time you are importing this Worksheet. The Synced column says Yes if you are importing the same Worksheet again. If the Synced column says Yes, ThoughtSpot will update the existing Worksheet, instead of creating a new one.
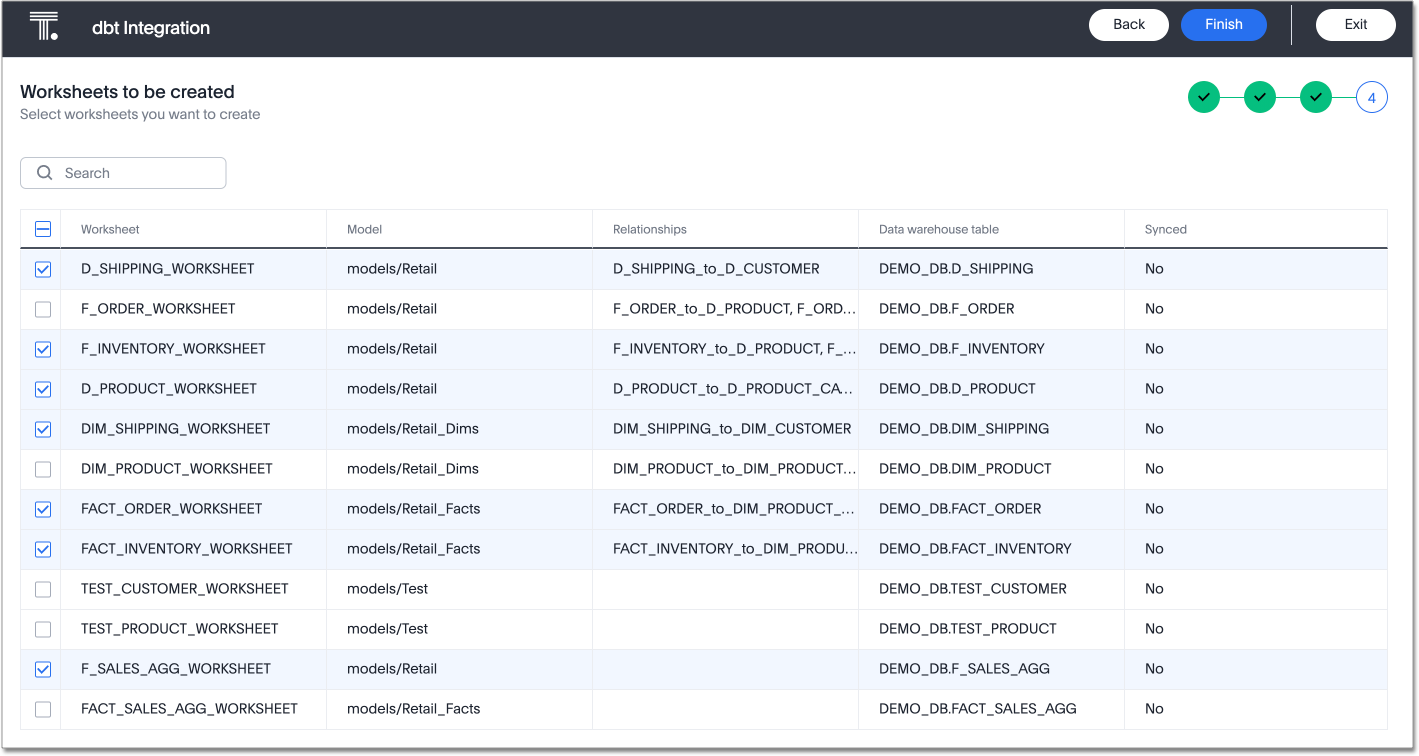
There is no minimum number of Worksheets to select in this step. -
Select Finish.
-
The Generated Tables, Worksheets and Liveboards page appears. ThoughtSpot generates several tables, Worksheets, and Liveboards from your dbt models.
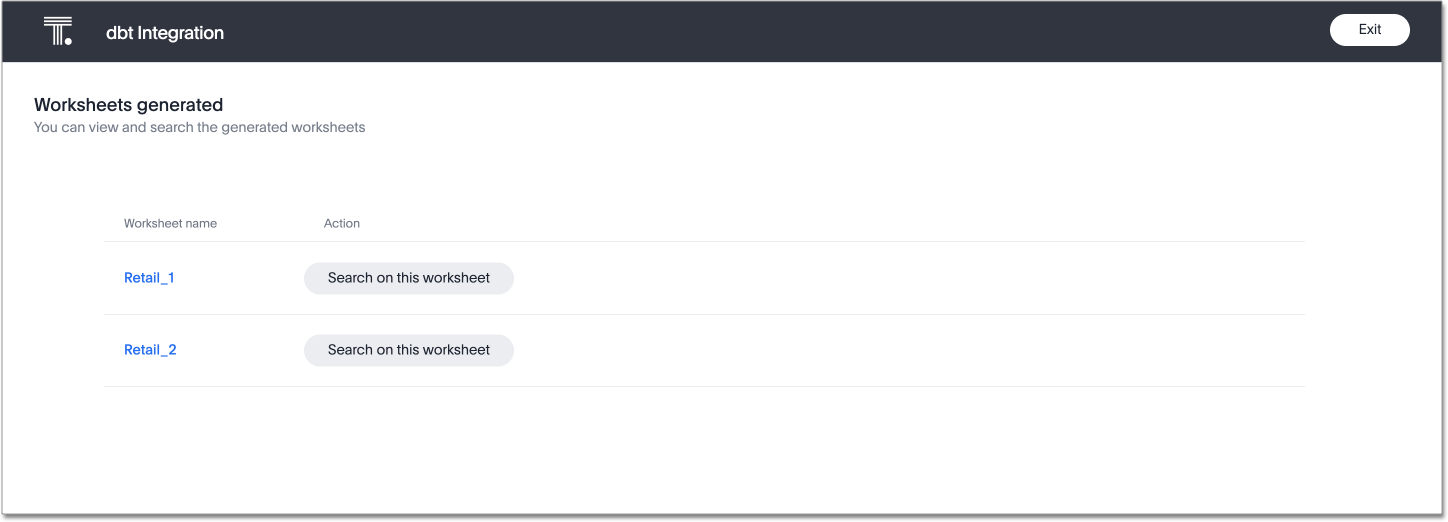
To inspect the table, Worksheet, and Liveboard details, select any of the table, Worksheet, or Liveboard names. You can view the joins created between the related tables in the Worksheets from the Joins tab for the Worksheet.
To search the data on the Worksheets, select Search worksheet next to any Worksheet.
-
Select Exit.
-
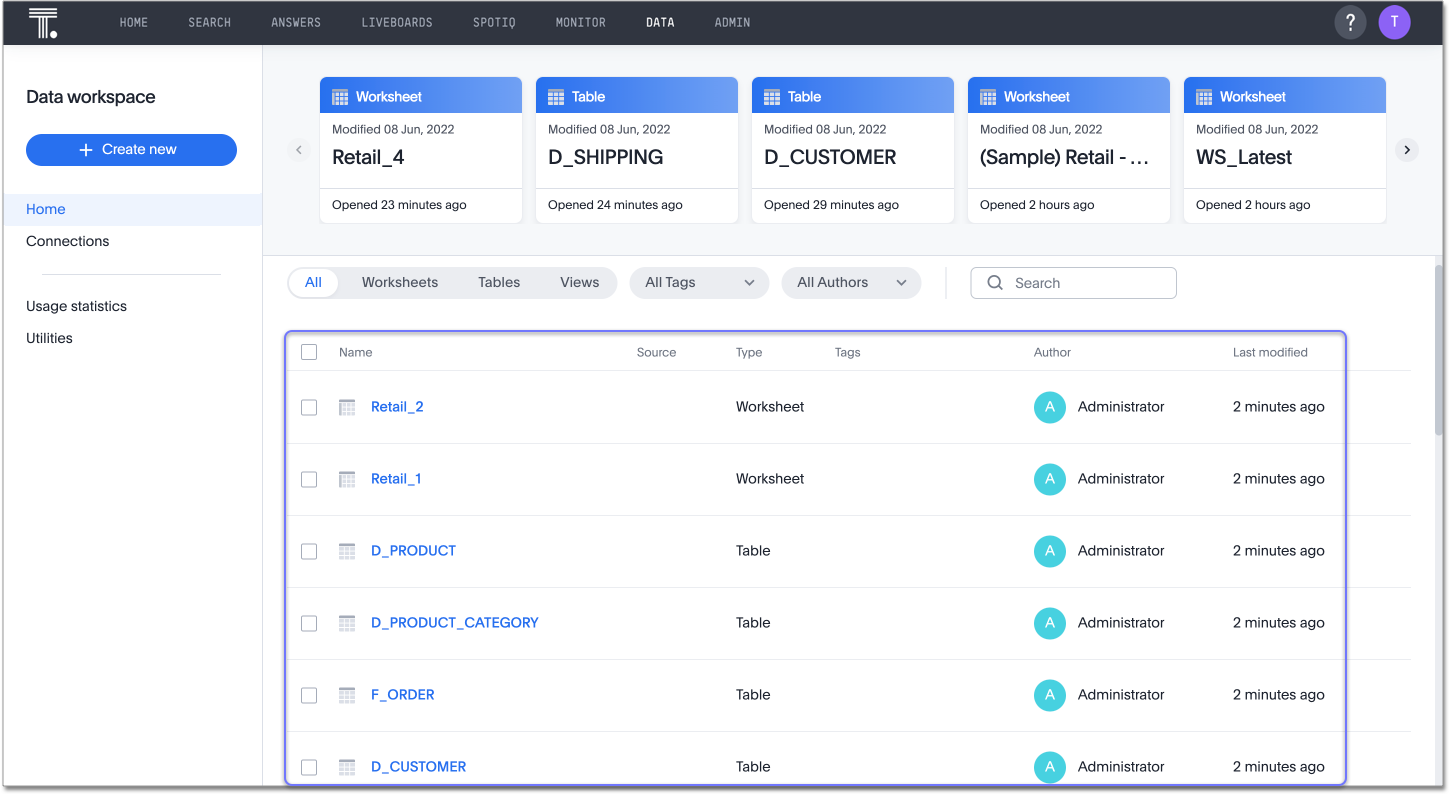
To see the objects that you just created from dbt, navigate to the Data > Home or Liveboards pages.
This process may replace existing dbt tables you imported into ThoughtSpot, but it will not replace existing Worksheets. -
If you select any of the tables or Worksheets you created, and then click Joins, you can see the joins ThoughtSpot created, based on the relationships in dbt.
How the dbt integration works
To integrate with dbt, ThoughtSpot reads information from the latest versions of the manifest.json and catalog.json files. In the prerequisites, you ensured that ThoughtSpot could find these files, either by enabling the generate docs on run setting in dbt cloud, or by creating a zip file with your manifest.json and catalog.json files for dbt core.
ThoughtSpot reads the following information from the manifest.json file. Make sure that the manifest.json file contains the latest details of your yml schema file.
-
Database name
-
Schema name
-
Model/Table name
-
Table description
-
Column name
-
Column description
-
Table relationships (joins)
ThoughtSpot reads the following information from the catalog.json file:
-
Column data types
How ThoughtSpot creates Worksheets from dbt
ThoughtSpot creates Worksheets based on the table relationships defined in a .yml schema file in the models directory.
The Worksheet creation follows these steps:
-
ThoughtSpot creates logical tables based on the model files. In the following example, ThoughtSpot creates a table for d_customer, d_product, d_product_category, and so on.
-
ThoughtSpot creates joins between the logical tables, based on the relationships defined in the .yml schema file. In the following example, ThoughtSpot creates joins between d_product and d_product_category, d_shipping and d_customer, and so on.
-
ThoughtSpot creates Worksheets made up of the logical tables, based on the relationships defined in the .yml schema file.
For example, based on the following .yml schema file, ThoughtSpot creates the following Worksheets:
Download the yml schema file here.
Click to view the yml schema file
models:
  - name: d_customer
    description: "Customer Dimension"
    columns:
      - name: customer_id
        description: "customer id"

      - name: first_name
        description: "First Name"

      - name: last_name
        description: "Last Name"

      - name: email
        description: "Email address"

      - name: gender
        description: "Gender - F/M"

      - name: dob
        description: "Date of birth"

  - name: d_product
    description: ""
    columns:
      - name: product_id
        description: ""

      - name: product_category_id
        description: ""
        tests:
          - not_null
          - relationships:
              to: ref('d_product_category')
              field: product_category_id

      - name: product_name
        description: ""

      - name: price
        description: ""

  - name: d_shipping
    description: ""
    columns:
      - name: shipping_id
        description: ""

      - name: customer_id
        description: ""
        tests:
          - not_null
          - relationships:
              to: ref('d_customer')
              field: customer_id

    - name: street
      description: ""

    - name: city
      description: ""

    - name: state
      description: ""

    - name: zipcode
      description: ""

  - name: d_product_category
    description: ""
    columns:
      - name: product_category_id
        description: ""

      - name: product_category_name
        description: ""

  - name: f_inventory
    description: ""
    columns:
      - name: product_id
        description: ""
        tests:
          - not_null
          - relationships:
              to: ref('d_product')
              field: product_id

      - name: product_category_id
        description: ""
        tests:
          - not_null
          - relationships:
          to: ref('d_product_category')
          field: product_category_id

      - name: quantity
        description: ""

      - name: last_shipped_quantity
        description: ""

      - name: last_order_date
        description: ""

      - name: as_of_date
        description: ""

  - name: f_order
    description: ""
    columns:
      - name: order_id
        description: ""

      - name: customer_id
        description: ""
        tests:
          - not_null
          - relationships:
              to: ref('d_customer')
              field: customer_id

      - name: shipping_id
        description: ""
        tests:
          - not_null
          - relationships:
              to: ref('d_shipping')
              field: shipping_id

      - name: product_id
        description: ""
        tests:
          - not_null
          - relationships:
              to: ref('d_product')
              field: product_id

      - name: product_category_id
        description: ""
        tests:
          - not_null
          - relationships:
            to: ref('d_product_category')
            field: product_category_id

      - name: units
        description: ""

      - name: price
        description: ""

      - name: order_date
        description: ""
metrics:
  - name: new_customers
    label: New Customers
    model: ref('d_customer')
    description: "The number of paid customers using the product"

    type: count
    sql: user_id # superfluous here, but shown as an example

    timestamp: signup_date
    time_grains: [day, week, month]

    dimensions:
      - plan
      - country

    filters:
      - field: is_paying
        operator: 'is'
        value: 'true'
      - field: lifetime_value
        operator: '>='
        value: '100'
      - field: company_name
        operator: '!='
        value: "'Acme, Inc'"
      - field: signup_date
        operator: '>='
value: "'2020-01-01'"| Model name | Relationship to | Worksheet created? |
|---|---|---|
d_customer |
none |
No. This model file only has relationships from other model files. It does not have relationships to other model files. |
d_product |
d_product_category |
Yes. The Worksheet consists of the 2 tables: d_product and d_product_category. |
d_shipping |
d_customer |
Yes. The Worksheet consists of the 2 tables: d_shipping and d_customer. |
d_product_category |
none |
No. This model file only has relationships from other model files. It does not have relationships to other model files. |
f_inventory |
d_product, d_product_category |
Yes. The Worksheet consists of the 3 tables: f_inventory, d_product, and d_product_category. |
f_order |
d_customer, d_shipping, d_product, d_product_category |
Yes. The Worksheet consists of the 5 tables: f_order, d_customer, d_shipping, d_product, and d_product_category. |
Editing a dbt project
If there are any changes to the dbt models that you would like the ThoughtSpot Worksheets, Liveboards, and tables to reflect, you must edit the dbt integration you created. This updates the existing Worksheets, Liveboards, and tables.
To edit a dbt project/ integration, follow these steps:
-
Select Data in the top navigation bar.
-
Select dbt in the side navigation bar.
When you edit a dbt integration, you often add columns and descriptions to your currently synced tables and worksheets. To simplify the process of editing a sync, ThoughtSpot pre-selects the folders, models, and worksheets you selected during your first sync. -
In the list of dbt projects, select the empty checkbox next to your project name. If necessary, use the search bar in the upper left corner to find your project.
-
Select Edit.
-
Run the dbt integration again, making any changes you would like. Follow the steps in Integrating with dbt. This updates your Worksheets, tables, and Liveboards, based on the changes in your dbt models.
You may generate an error if you have removed or renamed a column in dbt before re-syncing to ThoughtSpot. To handle this error, check your dbt models and tables to ensure every column maps correctly to the tables and models in ThoughtSpot.
Share a dbt connection
You can now select a dbt connection and click Share to share the connection with other users or groups. To share a dbt connection, follow these steps:
-
Navigate to the Data tab and select dbt from the left menu.
-
From the list of dbt connections, select the checkbox next to the connection you want to share.
-
Click Share. The Share dialog box appears.
-
Enter the name(s) of the users or groups you’d like to share with in the search bar.
Once selected, access will automatically be granted to the user or group. To remove access from a user or group, click the Remove dbt access option to the right of their name.
-
Users or groups you select automatically receive edit access to the dbt connection. To remove edit access, de-select the Grant edit access to <connection_name> option at the bottom of the dialog box.
-
Click Done.
Limitations
-
By default, you can only connect to a maximum of 4 dbt folders at a time. To increase this maximum, contact ThoughtSpot support.
-
You must import at least 1 table.
-
Integration with dbt is certified only for Amazon Redshift, Databricks, Google BigQuery, and Snowflake connections.
-
If you make changes to your dbt models in dbt, ThoughtSpot does not automatically reflect those changes. You must integrate with dbt again. This may affect changes you made to the tables and Worksheets in ThoughtSpot.
-
When you edit a dbt project in ThoughtSpot, you can’t remove table and Worksheet columns, or joins. You can only add them.
-
When you edit a dbt project in ThoughtSpot, you can’t change the column datatype.
Troubleshooting
For help troubleshooting issues with your dbt integration, see Common errors encountered during dbt integration.
For a full list of dbt errors, see the following table:
| Error ID | Error message |
|---|---|
ZIP_ERROR |
"manifest/catalog json files not found. Please verify " + "zip file and retry." |
SESSION_ERROR |
"Session expired, please re-import the json files." |
DBT_API_ERROR |
"Unable to connect to dbt project. Please verify the details." |
INVALID_CONNECTION_ERROR |
"Unable to fetch connection details, " + "please check the connection." |
DBT_JSON_MISMATCH_MESSAGE |
"Unable to import objects into " + "ThoughtSpot, missing table in catalog:" |
WORKSHEET_ERROR |
"Error occurred while generating Worksheet TML’s." |
TABLE_ERROR |
"Error occurred while generating Table TML’s." |
TML_ERROR |
"Error occurred while generating TML’s." |
TABLE_DETAILS_ERROR |
"Error while getting Table details." |
REQUEST_TIMEOUT |
"Request timeout." |
TML_IMPORT_ERROR |
"Error occurred during TML import." |
ZIP_FILE_ERROR |
"Error with the uploaded ZIP file." |
CONNECTIONLIST_ERROR |
"Error while fetching dbt connections list." |
CONNECTIONDELETE_ERROR |
"Failed to delete dbt connection." |
Related information


