Version control for Liveboards and Answers
With version control, every time a user saves changes to a Liveboard or Answer, a new version is created and stored in Github. Any user with edit access to the Liveboard or Answer can browse the version history in ThoughtSpot and restore any saved versions whenever needed. Version control must first be configured on your cluster or Org. After that, it can be enabled on specific Liveboards and Answers where version control is wanted.
There are two steps to enabling version control in ThoughtSpot, which must be done in the following order:
-
Enable version control for the cluster or Org.
-
Enable version control for specific Liveboards or Answers in the Org.
| Version control cannot be enabled by default for all Liveboards and Answers. |
Version control for a cluster or Org
Prerequisites
To enable version control for a cluster or Org, the following are required:
-
Administrator access to the cluster/Org
-
GitHub repository created in Github or GitHub Enterprise
-
Github user ID of admin who has access to the repository
-
Github repository configured with:
-
One commit branch for each Org where you are enabling version control
-
ThoughtSpot stores TML files here for each Liveboard and Answer enabled for version control.
-
-
One configuration branch
-
ThoughtSpot stores a set of configuration files here which are required for the GIT integration and CI/CD to work.
ThoughtSpot recommends not using the Main branch for either commits or configuration.
-
-
Personal access token from Github (Classic or fine-grained)
-
Under Select scopes, be sure to select the repo checkbox before clicking Generate token.
-
-
-
The https URL to the Github repository.
Enabling version control for a cluster or Org
To enable version control for a cluster or Org, do the following:
-
Go to the Admin tab.
-
If enabling for an Org, select the Org where you want to enable version control.
-
Under Application settings, select Version Control.
-
Under the message "Version control not configured", Click Configure.

-
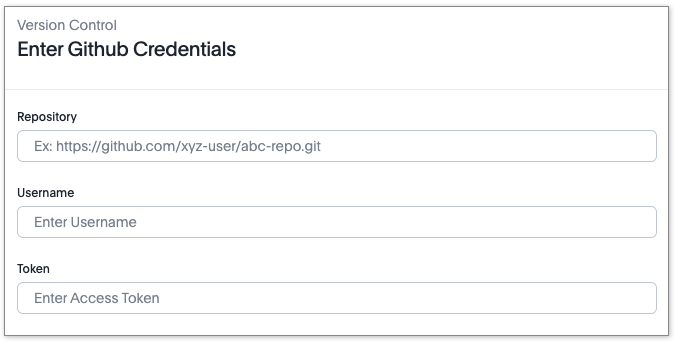
In the Enter Github Credentials window, do the following:
-
For Repository, enter the Github repository to store version control information.
-
For Username, enter your Github username.
-
For Token, enter or paste your personal access token associated with your Github username.
If you don’t a have personal access token yet, sign in to Github and create one of the following access tokens, and enter it in the Token field:
-
Under Select scopes be sure to select the repo checkbox before clicking Generate token.
-
-
Click Continue.
-
In the Select Branch window, do the following:
-
For Commit branch select the commit branch you created in your repository.
-
For Configuration branch select the configuration branch you created in your repository.
-
Make sure the Save version history checkbox is selected.
-
-
Click Enable.
Version control is now enabled for your Org. In order for version control to be available for any Liveboard or Answer, it must be enabled individually in the Liveboard or Answer.
Version control for a Liveboard or Answer
Editing the version control configuration
After you enable version control for a cluster or Org, you can edit the configuration. However, changing these settings will cause a service interruption for all users of a few minutes. Consider making your changes during a scheduled maintenance window.
-
Go to the Admin tab.
-
If editing for an Org, select the Org where you want to edit version control.
-
Under Application settings, select Version Control.
-
Click Edit.
-
In the Enter Github credentials window, Make any changes required to the Repository, Username, or Token and click Continue.
-
In the Select Branch window, make any changes required to the Commit and Configuration branches, make sure the Save version history checkbox is selected, and click Update.
Resetting the version control configuration
| Resetting your version control configuration, deletes the configuration completely, causing all version history from your GIT branches to be lost. |
To reset the version control configuration, do the following:
-
Click Reset Configuration.
The Reset Configuration message appears asking you if you really want to reset the configuration.
-
To proceed, click Yes.


