Edit a Snowflake connection
You can edit a Snowflake connection to add tables and columns, as well as manually invalidate refresh tokens from Snowflake for users who have refresh tokens that expired.
Editing a Snowflake connection
To edit a Snowflake connection:
-
Select Data in the top navigation bar.
-
Open the Connections tab in the left navigation bar.
-
Select the name of the connection you want to edit.
-
Select Edit connection at the upper-right side of the page.

-
On the Choose connection type page, change the connection name or description (if needed), and then select Continue.
-
On the Snowflake connection details page, make any changes needed, and then select Continue.
-
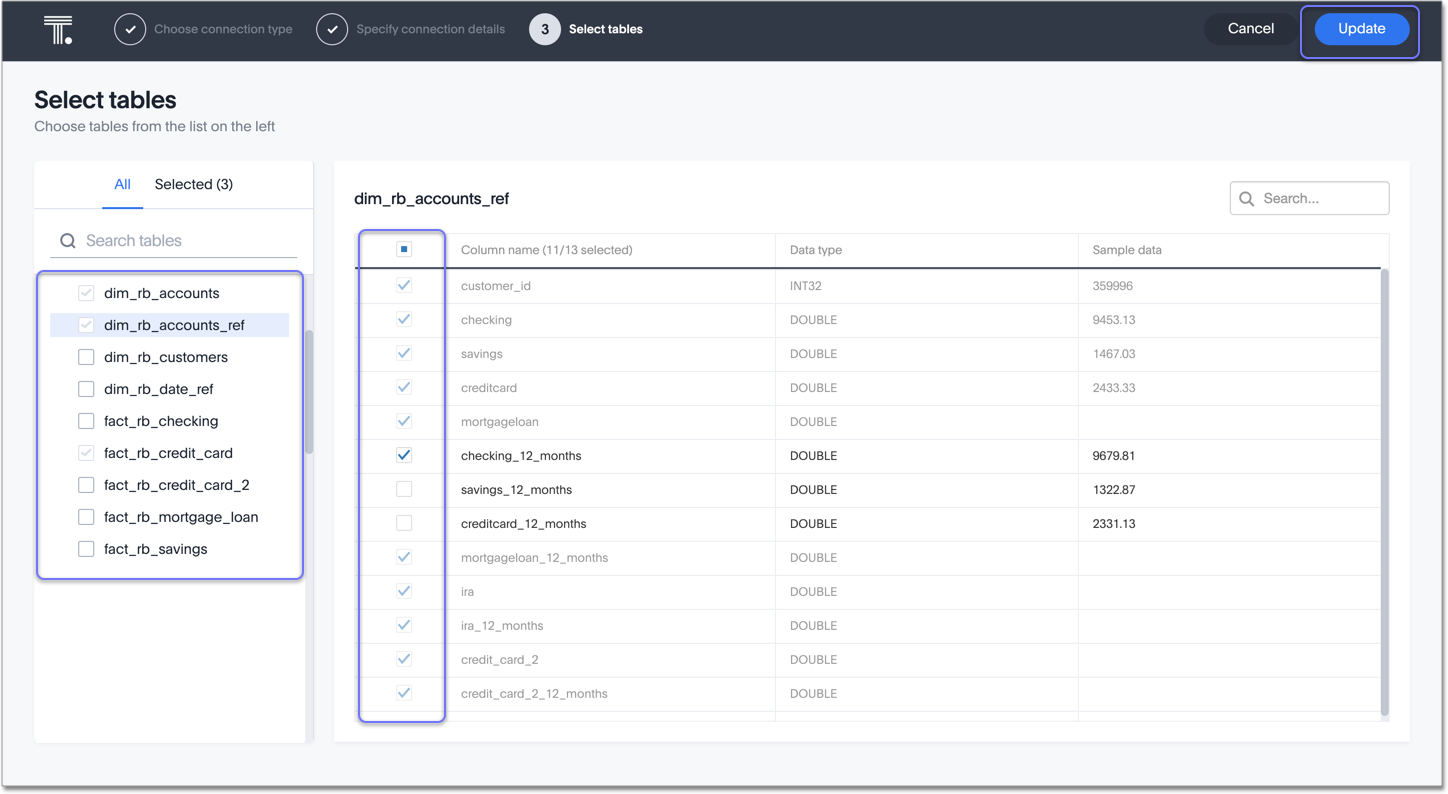
Expand the database table dropdown menu, and select the tables and columns you want to add.

-
Click Update, and then select Confirm to save the updated connection detail.
To remove a table from a connection, delete it from the connection details page. For more information, see: Delete a Snowflake connection.
See the Connection reference for details of connection parameters.
We also recommend that you review Best Practices for Snowflake connections.
Invalidating refresh tokens of a Snowflake connection configured with Snowflake OAuth or OAuth with PKCE
If a Snowflake user’s refresh token has been invalidated, the user will not be able to access insights from a Snowflake connection, or the connection itself. This can happen for the following reasons:
-
Their default role in Snowflake was changed.
-
Their token was obtained for a specific role in the connection and was later revoked.
In this case, it is necessary for the administrator or the author of the connection to use the Invalidate Tokens command, which will then allow the user to re-authenticate to regain access to the connection.
This can be done in two ways:
-
If the connection is edited, a message appears at the top of the connection screen indicating that the connection has been modified, and that users may have to re-authenticate. An Invalidate Tokens link appears next to the message. Selecting that link will allow the user to invalidate tokens.
-
The administrator or author of the connection, can use the Invalidate Tokens command in the Snowflake connection.
To invalidate refresh tokens of a Snowflake connection:
-
Select Data in the top navigation bar.
-
Open the Connections tab in the left navigation bar.
-
Select the name of the Snowflake connection you want to edit.
-
Click the More menu
 , and select Invalidate Tokens
After running the Invalidate Tokens command, logged-in users of the connection will have to re-authenticate to regain access to the connection.
| Invalidating tokens for a connection, invalidates the refresh tokens for all users of a connection, except the author. |
Validate metadata
You can now validate connections to discover any changes in metadata after the connection was created. When you validate a connection, ThoughtSpot provides a JSON file containing details on any metadata changes. Once alerted to a metadata change, you can use TML to update the connection.
To validate your connection:
-
Select Data in the top navigation bar.
-
Open the Connections tab in the left navigation bar.
-
Select the name of the connection you want to validate.
-
Select the more options menu icon
 and click Validate.
 -
If ThoughtSpot detects any changes to the connection’s metadata, the following message appears: "Your connection is not valid and requires metadata changes. You can download the list of changes affecting this connection by clicking on the button below."
To download the change log, click Download metadata change log. The change log automatically downloads to your browser’s Downloads folder in JSON format.
Editing additional configurations of your Snowflake connection
You can edit any of the additional configurations of a Snowflake connection.
To edit an additional configuration, do the following:
-
Select Data in the top navigation bar.
-
Open the Connections tab in the left navigation bar.
-
In the list of connections, find the connection where you want to edit a configuration.
-
At the far right of your connection, click the More menu
 , and select Edit configuration.
To edit the Default configuration of your Snowflake connection, see Edit a Snowflake connection.
Disabling additional configurations of your Snowflake connection
You can disable any of the additional configurations of a Snowflake connection.
To disable an additional configuration, do the following:
-
Select Data in the top navigation bar.
-
Open the Connections tab in the left navigation bar.
-
In the list of connections, find the connection where you want to disable a configuration.
-
At the far right of your connection, click the More menu
 , and select Disable.
The configuration is greyed out to indicate it is disabled.
To enable a disabled configuration, click the More menu  , and select Enable.
You cannot disable the Default configuration of a connection.
Deleting additional configurations of your Snowflake connection
You can delete any of the additional configurations of a Snowflake connection.
To delete an additional configuration, do the following:
-
Select Data in the top navigation bar.
-
Open the Connections tab in the left navigation bar.
-
In the list of connections, find the connection where you want to delete a configuration.
-
At the far right of your connection, click the More menu
 , and select Delete.
The configuration disappears from the list of additional configurations.
For information about how to create additional configurations for your Snowflake connection, see Creating additional configurations for your Snowflake connection


