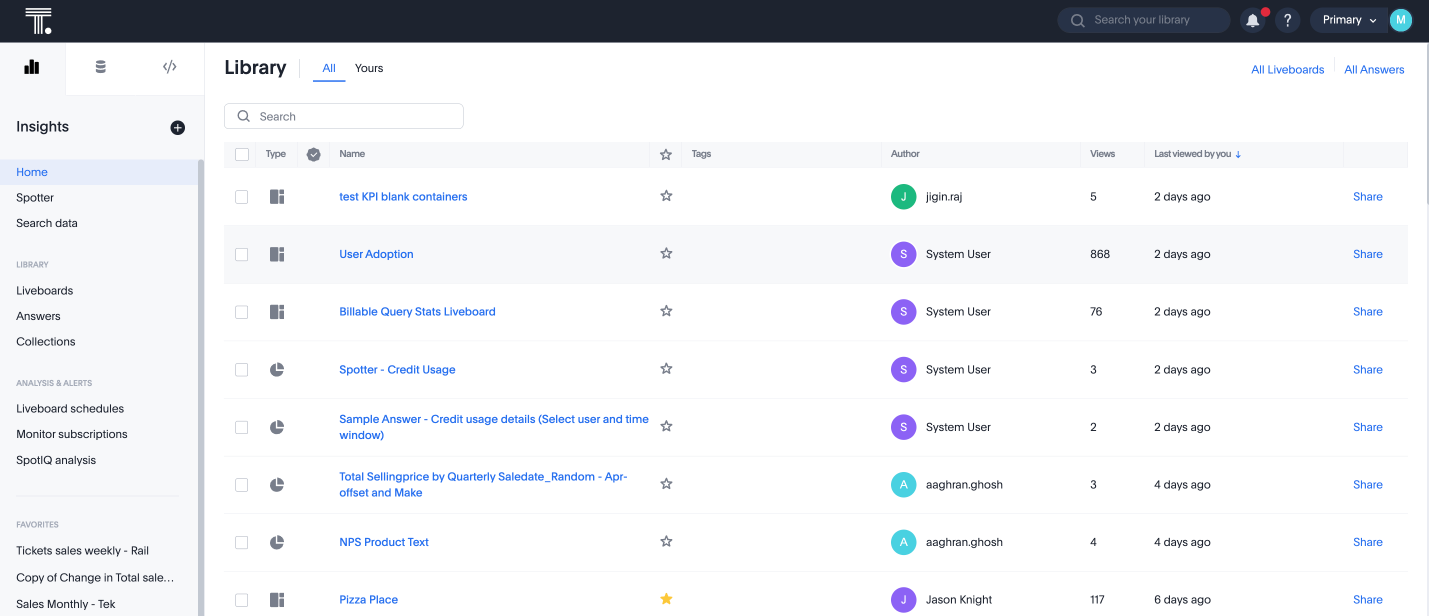
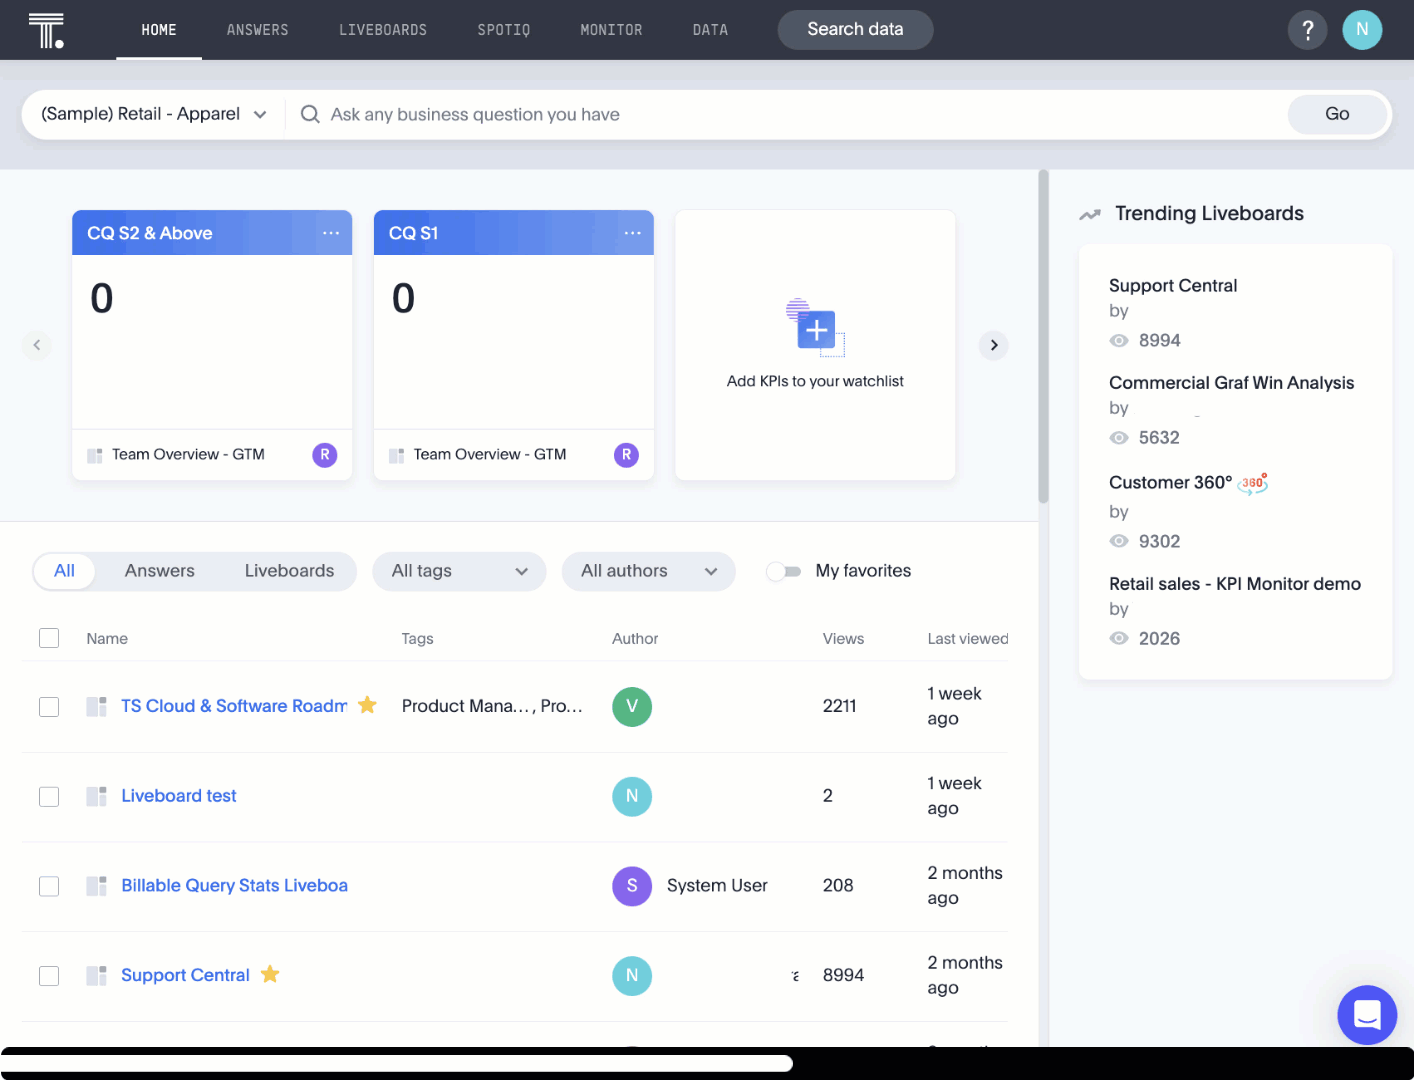
Home page
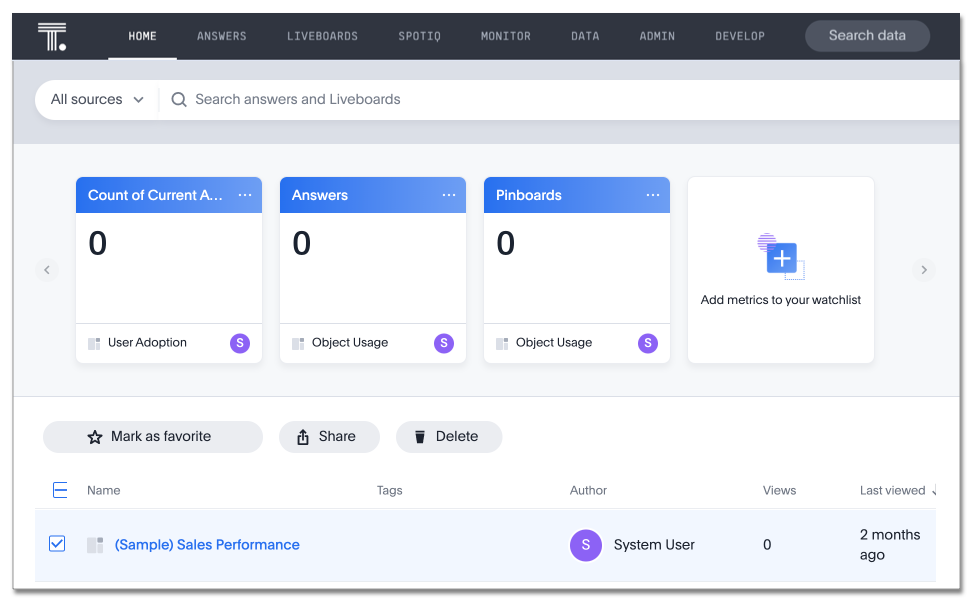
When you sign in to ThoughtSpot, you see the ThoughtSpot home page. It is accessible when you select Home or the ThoughtSpot logo from the top navigation bar.
The ThoughtSpot home page allows you to access all your essential actions as a business user.
From the home page, you can:
-
Export Answers or Liveboards to TML (New navigation and home page experience only)
Search across existing Answers and Liveboards
You can search across all existing Answers, Liveboards, and visualizations in Liveboards that are built on Models where you have access. Use this functionality if you cannot remember the exact name of a useful Answer, do not remember which Liveboard a visualization is on, or if you are simply wondering if someone else already created an Answer or Liveboard that would suit your needs.
The home page displays the Search Answers experience by default.
You can select a specific Model from the Sources dropdown menu to the left of the search bar, or search across all Models that you have access to.
Type your query into the search bar at the top of the screen.
Select Go or click Enter on your keyboard.
For example, search sales in the last year bob if you are looking for a particular Liveboard about sales that your coworker Bob made.
This type of search does not require you to be extensively familiar with your company’s data and how it is organized.
See Search Answers for more information on searching across existing objects.
Search your data
You can search directly on your data. Use this functionality if you would like to create your own Answers and Liveboards to answer questions about your data.
To search your data, select the Search data button in the top navigation bar. The Search data page appears.
Select a data source to search on, and type your query into the search bar at the top of the screen.
Select Go or click Enter on your keyboard.
For example, search sales last year store #103 bakery to see last year’s sales in the bakery department for store 103.
This type of search requires you to be familiar with your company’s data, to know which Models contain data that interests you, and the names of the columns and values within that Model.
See Searching data for more information on searching your data.
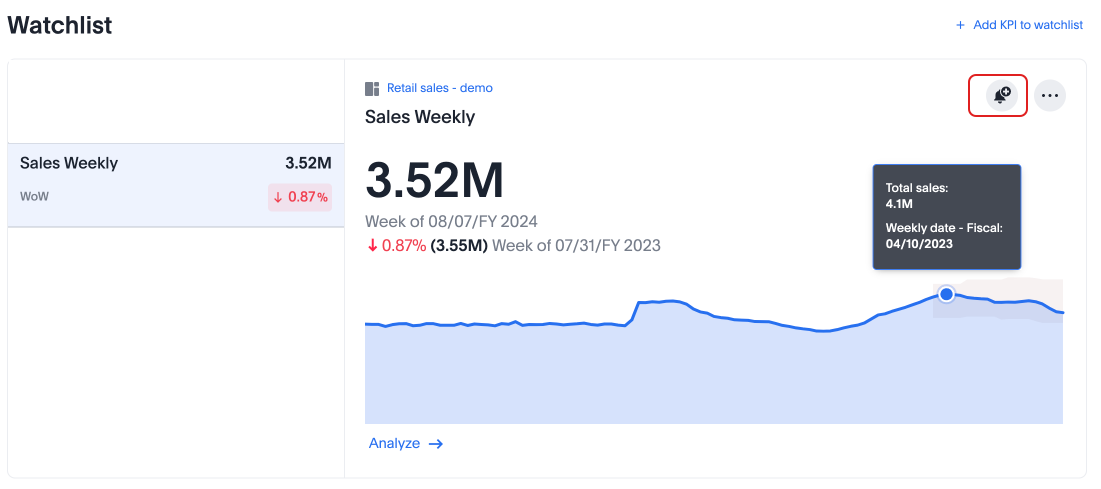
Track important KPIs
When you first view the ThoughtSpot home page, you may see a row of popular KPIs for your company just below the search bar. This watchlist may be empty, if your company is new to ThoughtSpot. Use this watchlist to view and track KPIs you reference often. For example, a VP of Sales might track Number of new deals this month, while a product manager might track NPS score. You can also select these KPIs to access the Liveboard they come from, either in the same tab or in a new tab. You can have any number of KPIs on your watchlist at a time.
To add KPIs to your watchlist, follow these steps:
-
Select Add KPIs to your watchlist.
-
The Add KPIs window modal appears, showing the KPIs on the Liveboard you most recently viewed. To find KPIs from another Liveboard you would like to add, search for that Liveboard using the search bar near the upper left of the Add KPIs window.
-
Select a KPI or multiple KPIs, and click Add KPIs.
When you add a KPI to your home page watchlist, ThoughtSpot automatically creates a scheduled alert, based on the KPI’s cadence. If you set a KPI to update weekly, you receive an alert on each Monday. If you set a KPI to update monthly, you receive an alert on the first of every month. All KPI alerts trigger at 9 AM PST for each cadence. You can edit all scheduled alerts from the Monitor tab or from the email alert.
You can arrange the KPI cards in 2 ways:
-
Drag and drop: Move the KPI cards to different positions in your watchlist using drag and drop.
-
More options
 icon: You can replace or delete a KPI, move it one spot to the left or right, make a card the first one in the row, or insert another card to the right or left of a specific card.
| If you can no longer access a KPI on your watchlist (because the KPI chart or Liveboard was deleted, or your access permissions changed), the system displays a note saying you cannot view that KPI. |
Track important KPIs enhancements
We’ve made some enhancements to help you add KPIs to your watchlist more easily and efficiently.
To add KPIs to your watchlist, follow these steps:
-
Select Add KPIs to your watchlist.
The Add KPIs window modal appears with a list of KPIs.

-
Scroll through the pages on the left pane, or use Search from library to find a KPI that you want to add to your watchlist.
-
Select a KPI from the list on the left.
-
Select the checkboxes on appropriate tiles in the right pane.
The KPI cards include checkboxes to indicate selections. The Deselect All option appears when you select a checkbox.

-
Select a KPI or multiple KPIs, and click Add KPIs.
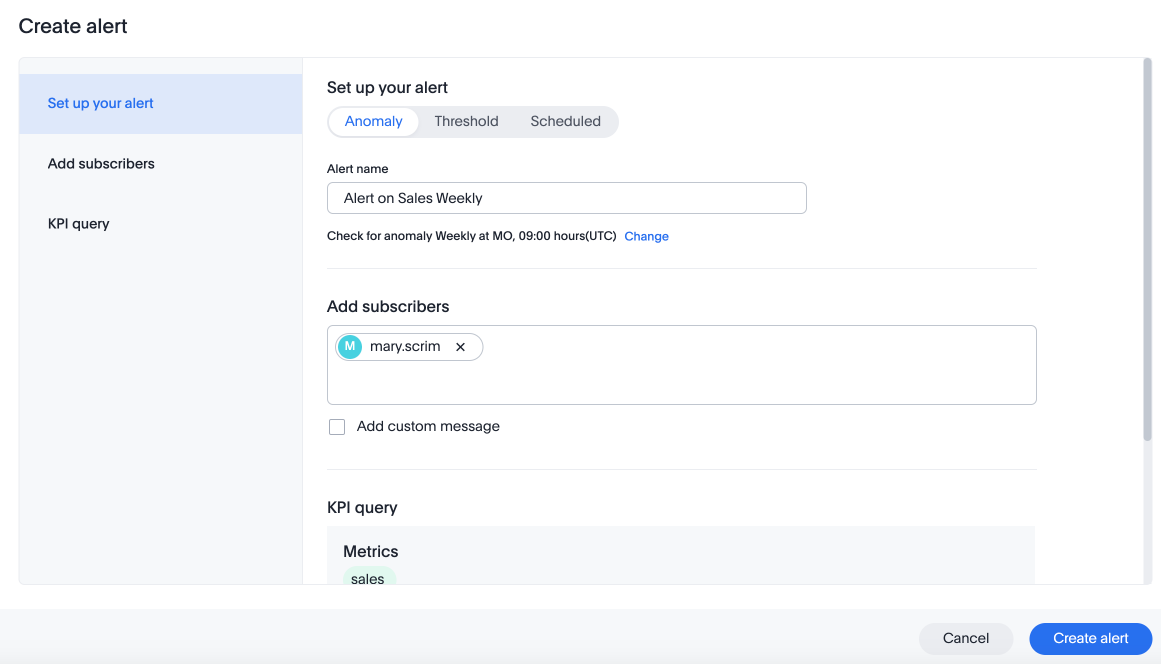
ThoughtSpot now supports alerts for changes in Key Performance Indicators (KPIs) in your data. Monitor Key Performance Indicators in your data to receive notifications when data in your KPI is anomalous, when your KPI satisfies a certain threshold condition, or to schedule notifications for your KPIs on an hourly, daily, weekly, or monthly basis.
You can create alerts directly from the Watchlist on the home page.
To add an alert to a KPI on your watchlist, follow these steps:
-
Click the Create alert button on the KPI you want to add the alert to.
-
On the Create alert page, under Set up your alert select either Anomaly, Threshold, or Scheduled and set the criteria for your alert.
-
Add subscribers to your alert.
-
Optionally, select Add a custom message to add a custom message to be sent to subscribers with the alert.
-
-
Review the KPI query and click Create alert.
Liveboards with mandatory filters
If you want to add a KPI from a Liveboard that has a mandatory filter, you must first navigate to the Liveboard and specify a value for the mandatory filter. If you do not specify a value, ThoughtSpot doesn’t let you add any of the KPIs from that Liveboard to your watchlist.
Recently viewed
By default, the ThoughtSpot home page shows you a list of all Answers and Liveboards you have access to, in order of how recently you viewed them. To view Answers and Liveboards in the opposite order, select Last viewed. Select it again to return to the original view.
This change does not persist across sessions. If you sign out and log back in, the view returns to the default.
To see more objects, scroll down to the bottom of the page and select Next. ThoughtSpot displays 20 objects on each page.
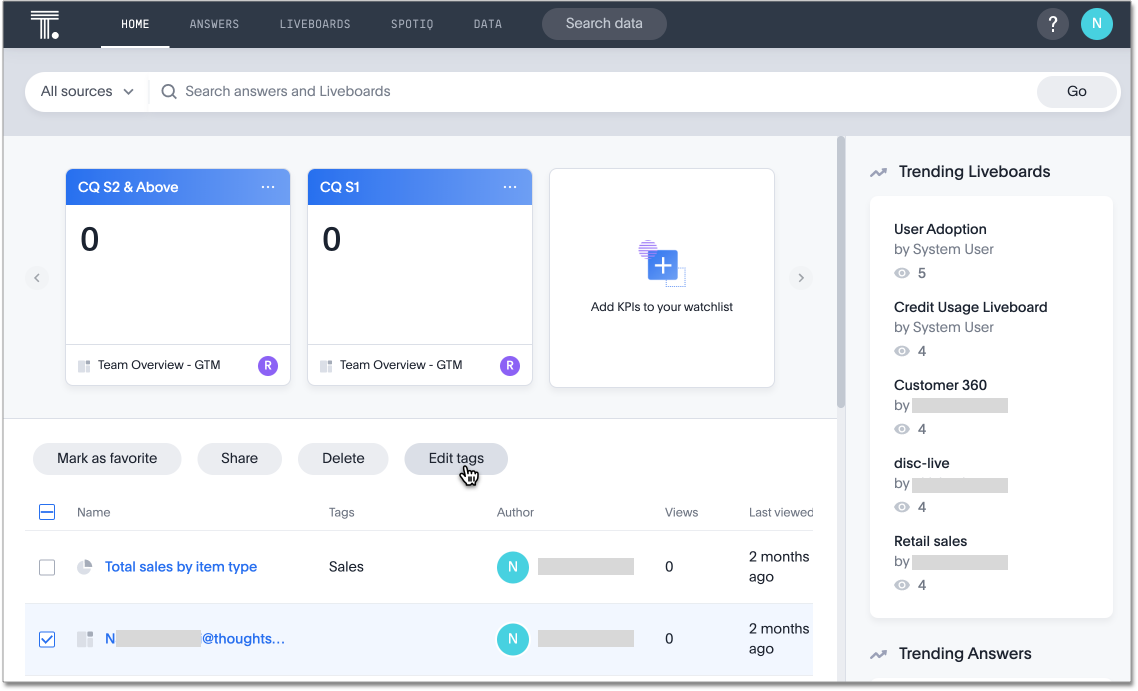
Trending Liveboards and Answers
The home page shows you the top 5 trending Liveboards and Answers among all users in your environment on the right panel of the screen. You can see how many views these trending objects have. Easily view and interact with these trending objects by selecting their name from the Trending panel. You can open them in a new tab by right-clicking on the link.
Filter existing objects
You can filter the objects that display on the home page in the following ways:
-
By object type: To see only one type of object, select Answers or Liveboards from the filter bar underneath the search bar. To see both Answers and Liveboards, select All.
-
By tag: Users can tag their objects with meaningful labels, such as Sales or C-suite. Select a tag in the list of objects on the home page, or choose an existing tag from the tag dropdown menu in the filter bar. To see objects with any tag or no tag, select All tags.
-
By author: To see objects created by a specific user, select an author from the authors dropdown menu in the filter bar, or click the author of an object in the list of objects on the home page. To see objects you created, select your username from the dropdown menu, right below All authors. To see objects any user created, select All authors.
-
By favorites: To see only objects you favorited, select the My favorites toggle on the filter bar. To see all objects, select the My favorites toggle again.
-
(New navigation and home page experience only) By All or Yours: To see Answers and Liveboards created by all users, select All and to see just the ones you created, select Yours.
To see more objects, scroll down to the bottom of the page and select Next. ThoughtSpot displays 20 objects on each page.
These changes do not persist across sessions. If you sign out and log back in, the view returns to the default, where you see all object types, all tags, and all authors.
Sort existing objects
You can sort the objects that display on the home page in the following ways:
-
Alphabetically by author: You can sort by author alphabetically, either ascending or descending. Select Author, above the list of recently viewed objects. To see ascending order, select Author again.
-
By number of views: You can sort by the number of views an object has, either ascending or descending. Select Views, above the list of recently viewed objects. To see ascending order, select Views again.
-
By how recently you viewed an object: You can sort by how recently you viewed an object, either ascending or descending. Select Last viewed, above the list of recently viewed objects. To see ascending order, select Last viewed again.
-
(New navigation and home page experience only) By the last time you modified an object: You can sort Answers and Liveboards by "last modified", either ascending or descending.
To see more objects, scroll down to the bottom of the page and select Next. ThoughtSpot displays 20 objects on each page.
These changes do not persist across sessions. If you sign out and log back in, the view returns to the default.
Bulk mark objects as favorites
To bulk mark objects as favorites, click the empty boxes next to the object names, and select Mark as favorite near the top of the page, under the KPI watchlist. You can also favorite each object on the page, by selecting the empty box next to the word Name at the upper left of the screen, under the filter bar. Select Mark as favorite.
Note that you cannot select multiple objects across pages. If you select an Answer on the first page, and then click Next to view more objects, ThoughtSpot discards your selection on the first page.
Bulk share objects with other users and groups
To bulk share the objects that appear on your home page with other users and groups, follow these steps:
-
Select the empty boxes next to the names of the objects you would like to share. Alternatively, you can select each object on the page, by clicking the empty box next to the word Name at the upper left of the screen, under the filter bar.
Note that you cannot select multiple objects across pages. If you select an Answer on the first page, and then select Next to view and share more objects, ThoughtSpot discards your selection on the first page.
-
Select Share
 , above the list of objects.
 -
After you select the Share icon, the sharing dialog appears.
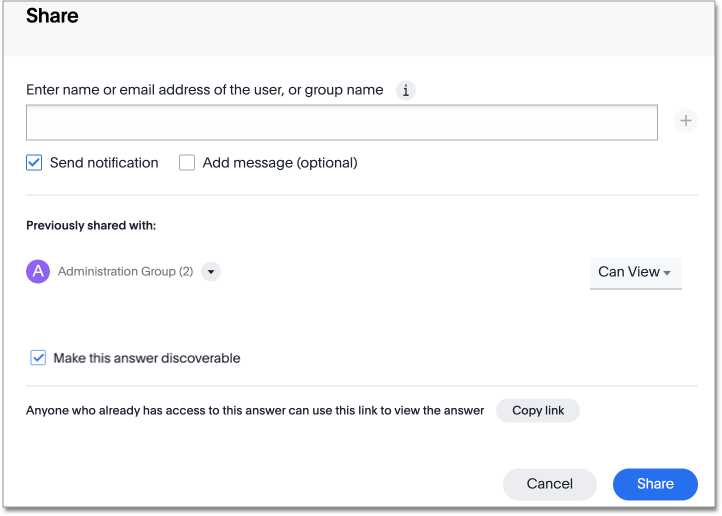
-
Enter users or groups with whom you want to share this object in the text box. To stop sharing with a user or group, select the x icon next to the Permissions dropdown menu for that user or group.
Note that you can only enter email addresses whose domains are in your list of allowed domains. These domains appear when you select the info button
 .
.If you want to hide the allowed email domains for your company, or otherwise customize them, contact ThoughtSpot support. -
Configure the level of access by selecting from the dropdown list. You can select:
-
Can View to provide read-only access. If the user doesn’t have access to the underlying Model, they can only view the shared object.
-
Can Edit to allow modification. Enables renaming or deleting the shared object. If a user with edit privileges modifies a shared object, the object saves their changes.
If a hidden column is used in an Answer pinned to a Liveboard, then the entire Liveboard becomes read-only to users. This limits Liveboard functionality, which means the ability to adjust filters and download data is restricted.
-
-
If the selected group or user does not have access to the underlying data, you must enable access to the Model, view, or table. A black warning symbol appears when you try to share with a user who does not have underlying data access. If you select it, it tells you to enable access:

If you own the underlying data source, you can enable access through the sharing dialog. If you do not own the data source, ThoughtSpot emails the owner of the data source or your ThoughtSpot administrator to ask them to share the data.
To enable access, select Give view access to underlying data sources at the bottom of the dialog. You can select the arrow to view the data sources.
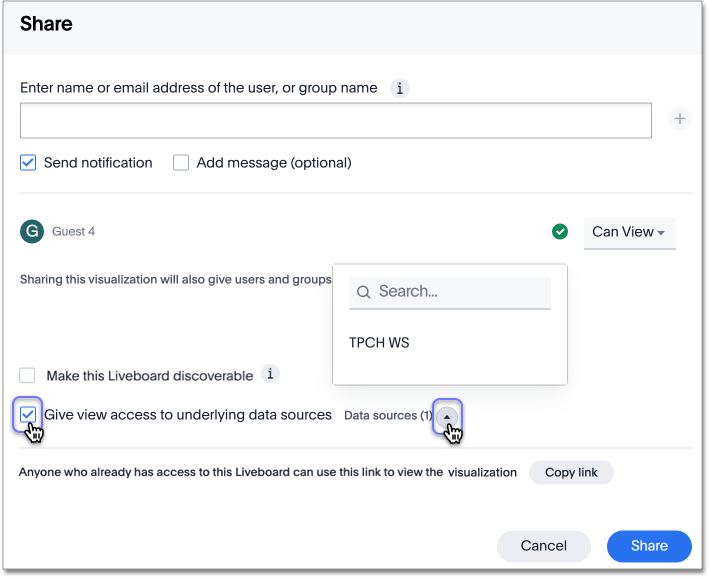
After you enable access, the warning symbol turns into a green checkmark.
-
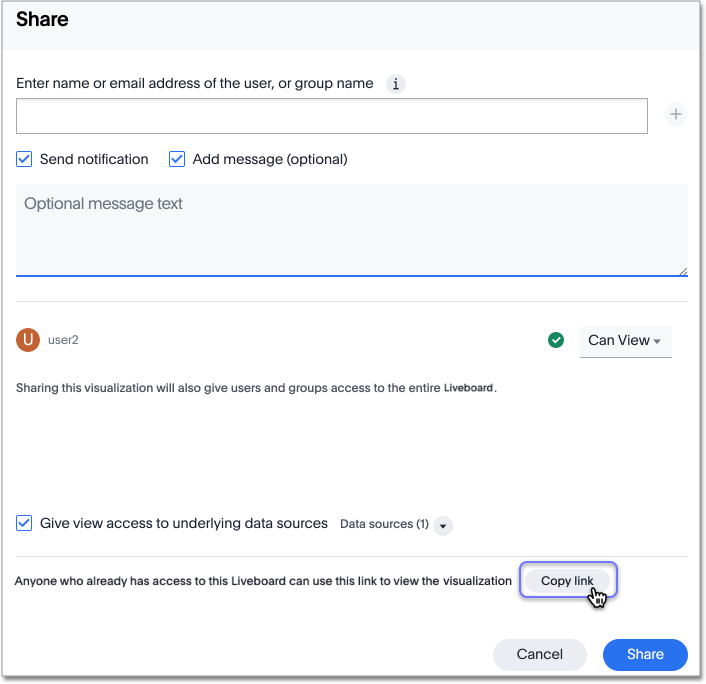
You can choose to send an email notification and an optional message.
-
You can also copy a direct link to the Answer, Liveboard, or visualization within a Liveboard that you are sharing, and separately send that link to users after you share the object with them. Simply select the Copy link button at the bottom of the sharing dialog.
Note that sending users this link does not share the object with them. You must also share the object by selecting the Share button at the bottom of the dialog.
-
Select Share.
Delete Answers and Liveboards
To delete objects from your home page, follow these steps:
-
Select the empty box next to the name of the object you would like to delete.
Note that you cannot select multiple objects across pages. If you select an Answer on the first page, and then click Next to view and share more objects, ThoughtSpot discards your selection on the first page.
-
Select Delete, and then select Delete again to confirm.
Apply tags
To apply tags to Answers and Liveboards from your home page, follow these steps:
-
Select the checkbox next to the name(s) of the Answer(s) or Liveboard(s) you would like to tag and select the Edit tags button that appears.
Note that you cannot select multiple objects across pages. If you select an Answer on the first page, and then click Next to view and tag more objects, ThoughtSpot discards your selection on the first page.
-
In the Edit tags pop-up window, enter the name(s) of the tag(s) you would like to apply, or select the x icon to remove a tag.
-
Select Save.
Export an Answer or Liveboard to TML
If you are using the new navigation and homepage expereience, you can export an Answer or Liveboard to TML.
| To confirm you are using the new navigation and homepage, go to your user profile and make sure Navigation and Homepage is set to New experience. |
To export an Answer or Liveboard to TML, follow these steps:
-
Select the checkbox next to the name(s) of the Answer(s) or Liveboard(s) you would like to export and select the Export TML button that appears.
-
In the Export TML pop-up window, select one of the following:
-
Export Answer or Liveboard
-
Export Answer or Liveboard and associated objects
-
-
(Optional) To export the fully qualified name of the Answer or Liveboard in the TML, select the Export FQNs of referenced objects checkbox.
-
Click Export.
-
Select Save.


