Connect the SMC appliance
Connect the SMC appliance before you can deploy ThoughtSpot.
After you rack and stack the appliance, it is time to configure it. If necessary, review the Hardware Appliance Overview.
Follow the steps in this checklist:
❏ |
|
❏ |
|
❏ |
|
❏ |
Step 1: Connect switches to 10GbE ports
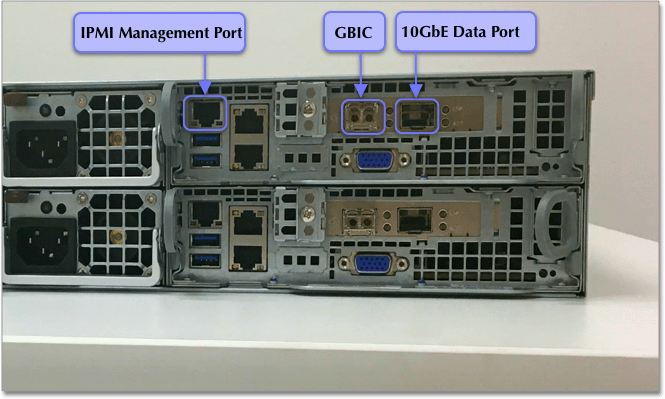
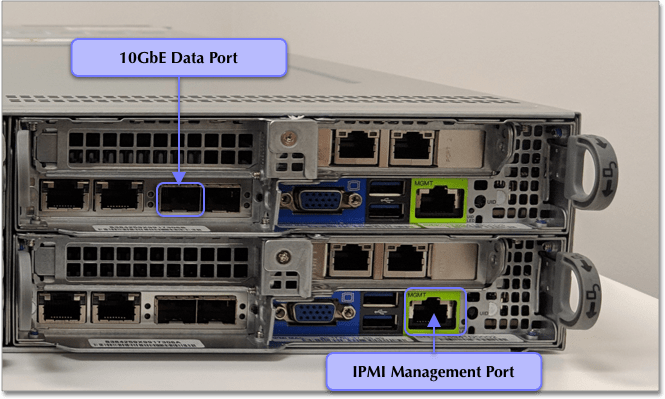
Connect the 10GbE port of each node, as illustrated in Haswell port location and Skylake port location, to the 10GbE switches on your own rack, using either fiber or DAC cables.
Refer to the Cable reference for information on the cable types:
| Ask your hardware vendor for more details about what they supply and what you need to buy. |
Depending on which version of the SMC appliance you have, Haswell or Skylake, your 10GbE ports are in a different spot on the back of the appliance. Here is a picture of the back of each appliance.


-
Connect to switches only the appliances (4 nodes each) that you plan to use in the cluster.
-
You must power off, or disconnect from the switch, all other appliances or nodes.
This prevents accidental configuration of incorrect nodes. -
Connect all the nodes that you plan to use in your cluster to a 10G switch.
Step 2: Connect IPMI ports
Connect the IPMI port of each node to the management switch.
See Haswell port location and Skylake port location.
Step 3: Turn on nodes
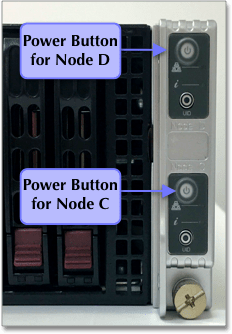
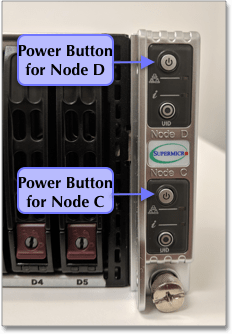
Turn on the power to the nodes by pressing the power button; see Appliance Power Button.
There is one power button for each node. The following images show two of the four power buttons.
| Haswell Appliance | Skylake Appliance | |
|---|---|---|
|
|
|
Check the health of the NIC by inspecting your appliance’s LEDs. There should be a steady green light for the 100MB/s or 1Gb/s management NIC connection, a steady amber or orange light for the 10G/s connection, and a blinking LED on both NICs to indicate live traffic.
After the LEDs are the correct colors, verify that the connection is valid and the nodes are on by pinging the gateway:
Enter ping <default-gateway-IP>.
Ask your network administrator for your default gateway IP if you have not already listed it in your ThoughtSpot site survey.
$ ping <default-gateway-IP>Step 4: Log in
-
Connect a keyboard and the mouse to each node on the appliance.
-
You should see a login prompt on the screen. If you don’t see one or the screen isn’t responsive, press the key combination control—alt—F2 or alt—F2 on your keyboard to bring up the login prompt.
-
Log in using the admin user credentials for the console. If you do not know the admin credentials, ask your network administrator.


