Create a custom calendar
Before you begin
You must have administrator-level permissions to create a table in the database of the cloud data warehouse of the connection.
Methods of creating a custom calendar
You can use one of the following methods to create a custom calendar:
-
Create a calendar
-
Upload a file
-
Use an existing table
Creating a custom calendar
You can create one of the following calendar types:
-
Month offset
-
Four Four Five
-
Four Five Four
-
Five Four Four
If you need to create a different type of calendar, including one that uses a different language for the names of months or days of the week, you must upload your custom calendar file. In this case, ThoughtSpot suggests you first create a calendar in one of the supported calendar types to use as a template, by following these steps. After that, you can download and update it to your specific requirements.
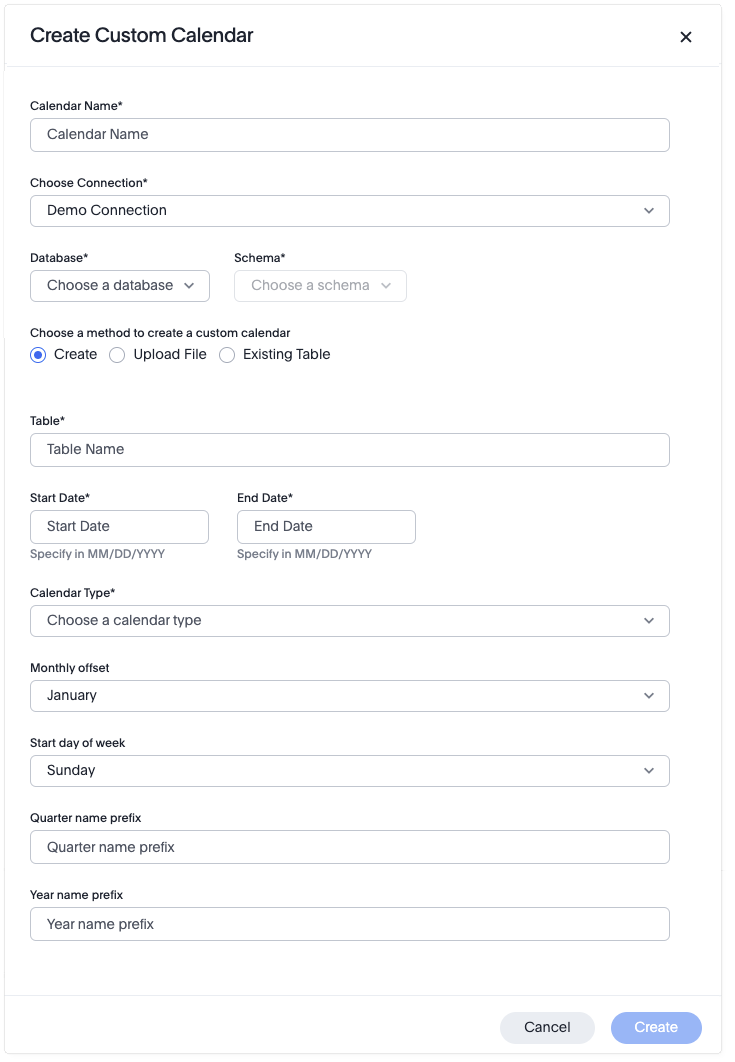
To create a custom calendar, do the following:
-
Click Data in the top navigation bar.
The Data workspace appears.
-
Select Utilities in the side navigation bar, and select Add/modify custom calendar.
The Custom calendar page appears.
-
Click Create Custom Calendar.
The Create Custom Calendar dialog appears.
-
For Calendar Name, enter a name for your calendar.
The calendar name must be unique in the cluster. -
Click the Choose Connection menu, and select the connection where you want to use your custom calendar.
-
For Database, click the Choose a database menu, and select the database you want to use with your custom calendar.
-
For Schema, click the Choose a schema menu, and select the schema you want to use with your custom calendar.
-
Make sure Create is selected.
-
For Table, enter a name for the table that will be created for your custom calendar.
-
For Start Date, enter the date you want your custom calendar to start.
Both Start Date and End Date must be in MM/DD/YYYY format. -
For End Date, enter the date you want your custom calendar to end.
-
For Calendar Type, click the Choose a calendar type menu, and select the type of calendar you want to create. Possible types include:
-
MONTH_OFFSET
-
FOUR_FOUR_FIVE
-
FOUR_FIVE_FOUR
-
FIVE_FOUR_FOUR
-
-
For Monthly offset, click the menu and select a month.
-
For Start day of week, click the menu and select a day.
-
For Quarter name prefix, enter the prefix you’d like to use for quarter numbers.
Example: Q
-
For Year name prefix, enter the prefix you’d like to use for years.
Example: FY
-
Click Create.
The Custom calendar page appears again, with the message "Custom calendar created successfully!"
Your custom calendar appears in the list of calendars.
Uploading a file for a custom calendar
This option provides you the ability to upload a calendar file.
You can update an existing calendar by downloading it, making changes to it, and then uploading it.
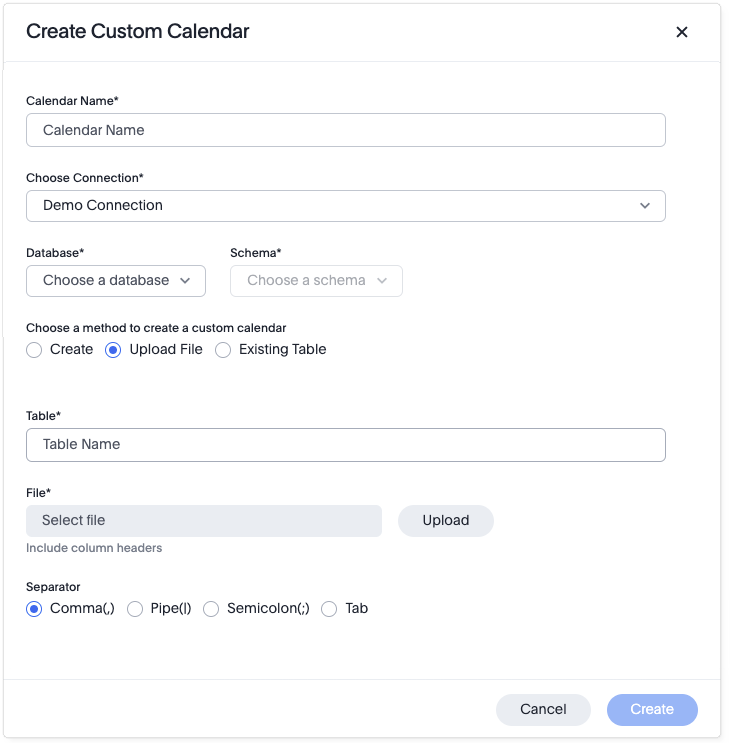
To upload a file to use as a custom calendar, do the following:
-
Click Data in the top navigation bar.
The Data workspace appears.
-
Select Utilities in the side navigation bar, and select Add/modify custom calendar.
The Custom calendar page appears.
-
Click Create Custom Calendar.
The Create Custom Calendar dialog appears.
-
For Calendar Name, enter a name for your calendar.
The calendar name must be unique in the cluster. -
Click the Choose Connection menu, and select the connection where you want to use your custom calendar.
-
For Database, click the Choose a database menu, and select the database you want to use with your custom calendar.
-
For Schema, click the Choose a schema menu, and select the schema you want to use with your custom calendar.
-
Select Upload File.
-
For Table, enter a name for the table that will be created for your custom calendar.
-
For File, click the Upload button, select the file, and click Open.
-
For Separator, select delimiter format used in your calendar file.
Supported delimiters include: Comma(
,), Pipe(|), Semicolon(;), and Tab. -
Click Create.
The Custom calendar page appears again, with the message "Custom calendar created successfully!"
Your custom calendar appears in the list of calendars.
Using an existing table for a custom calendar
This option provides you the ability to use an external table in your connection as a calendar.
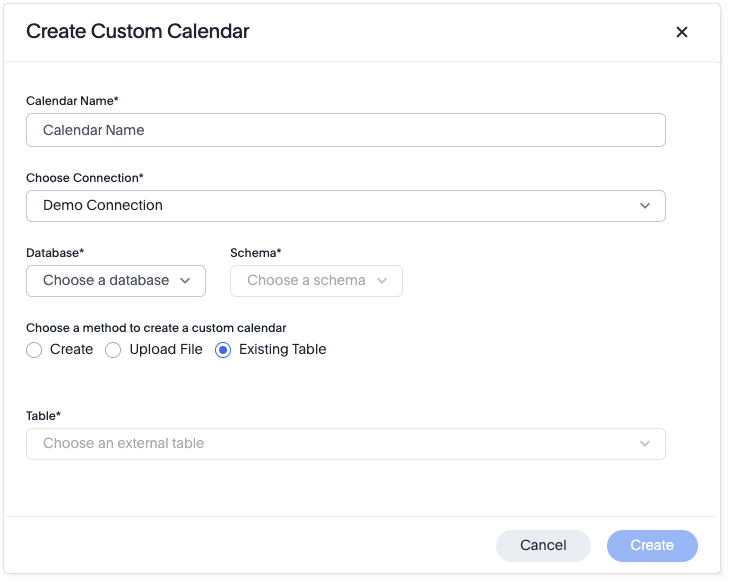
To use an external table as a custom calendar, do the following:
-
Click Data in the top navigation bar.
The Data workspace appears.
-
Select Utilities in the side navigation bar, and select Add/modify custom calendar.
The Custom calendar page appears.
-
Click Create Custom Calendar.
The Create Custom Calendar dialog appears.
-
For Calendar Name, enter a name for your calendar.
The calendar name must be unique in the cluster. -
Click the Choose Connection menu, and select the connection where you want to use your custom calendar.
-
For Database, click the Choose a database menu, and select the database you want to use with your custom calendar.
-
For Schema, click the Choose a schema menu, and select the schema you want to use with your custom calendar.
-
Select Existing Table.
-
For Table, select an external table to use for creating your custom calendar.
-
Click Create.
The Custom calendar page appears again, with the message "Custom calendar created successfully!"
Your custom calendar appears in the list of calendars.
Using your custom calendar in your connection
After you create your custom calendar, you must specify where to use it in your connection.
To use your custom calendar, do the following:
-
Sign in to your ThoughtSpot cluster and click Data > Connections.
-
Click the name of the connection where you want to use your calendar.
-
Click the name of the table where you want to use your calendar.
-
Find the column where you want to use your calendar.
The column must use the DATE or DATE_TIME data type. -
Refresh the page to make sure your custom calendar is available.
-
Scroll horizontally to the CALENDAR TYPE column.
-
In the CALENDAR TYPE column for the column(s) you chose, double-click the existing calendar name (example: "None"), and then select your custom calendar.
-
Click Save Changes.
Now, date-related searches in the selected table use your custom calendar.
After creating a custom calendar, you easily look at it to confirm it is set up the way you want. For details, see View a custom calendar.
Set a custom calendar as the default calendar for your cluster
(Optional) To set your custom calendar as the default calendar for your cluster, contact ThoughtSpot Support.
| If your ThoughtSpot cluster has multiple connections, you cannot set a default custom calendar for your cluster because each connection must have a unique custom calendar. |
View a custom calendar
After creating a custom calendar, you can easily open it from the ThoughtSpot UI to look at its configuration.
To view a custom calendar, do the following:
-
Sign in to your ThoughtSpot cluster.
-
Click Data in the top navigation bar.
The Data workspace appears.
-
Select Utilities in the side navigation bar, and select Add/modify custom calendar.
The Custom calendar page appears.
-
Click the name of the custom calendar you want to view.
Your custom calendar opens in a window displaying all columns and rows. You can scroll through these to verify your calendar is set up the way you want.
-
When you’re done viewing your calendar, close the window by clicking Done.
Related information


