Spotter Analysts
You can now create Spotter Analysts-- focused, governed Analysts that tailor Spotter to a specific team, use case, or domain. Instead of accessing the general Spotter experience, configure the context once: which data models the agent can see, custom instructions that shape its behavior, the connectors it can use, and who the workspace is shared with. Open a Spotter Analyst and you enter a pre-configured experience the moment you start.
| To enable Spotter Analysts, contact ThoughtSpot support. |
Spotter Analysts are not separate AI bots. They configure context in the Spotter experience, defining which data, tools, and behaviors Spotter uses when a user is inside that workspace.
Prerequisites
Before you start, you will need:
-
At least one data model you want Spotter to use when consumers ask questions inside this Analyst.
-
A clear statement of the job — what the consumers of this Analyst will be doing day-to-day.
-
(Optional) the MCP connectors you want to allow or block.
-
A draft of the Analyst instructions — see Writing good Analyst Instructions for guidance.
Create a Spotter Analyst
Users with Spotter privileges can create Spotter Analysts easily. To create a Spotter Analyst:
-
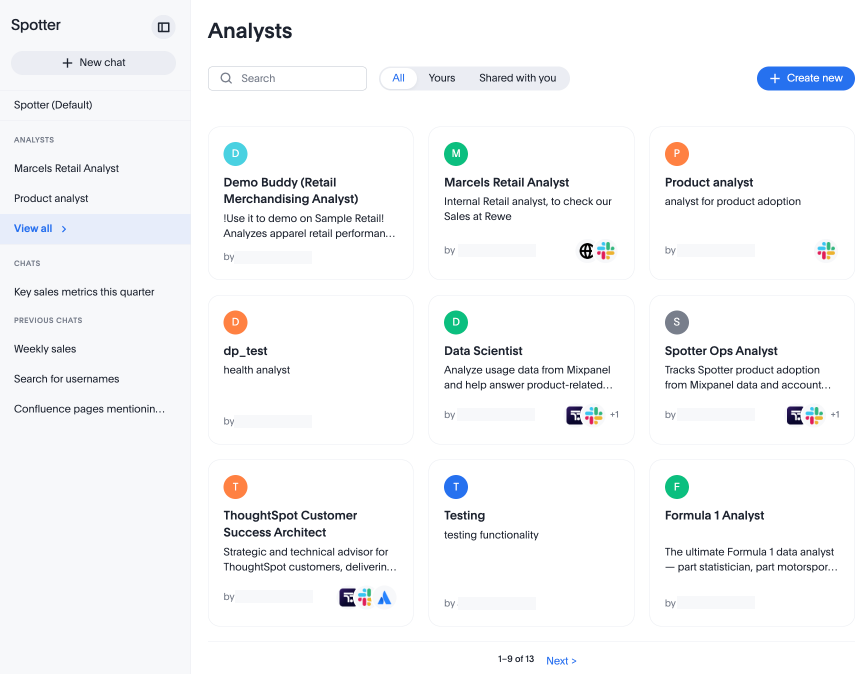
Open Spotter and click the sidebar icon in the left-side pane to open the Spotter sidebar. Under the Analysts section, click View all.
-
The Analysts page appears. Click + Create new.
-
The Create Analyst page appears. Here, you can name your Analyst, write the description that appears when you open it in Spotter, give it instructions on how to answer your questions, and specify which data source(s) and connectors it can access. You can select up to five data models for your Analyst. Note that for instructions, you are limited to 5000 characters.
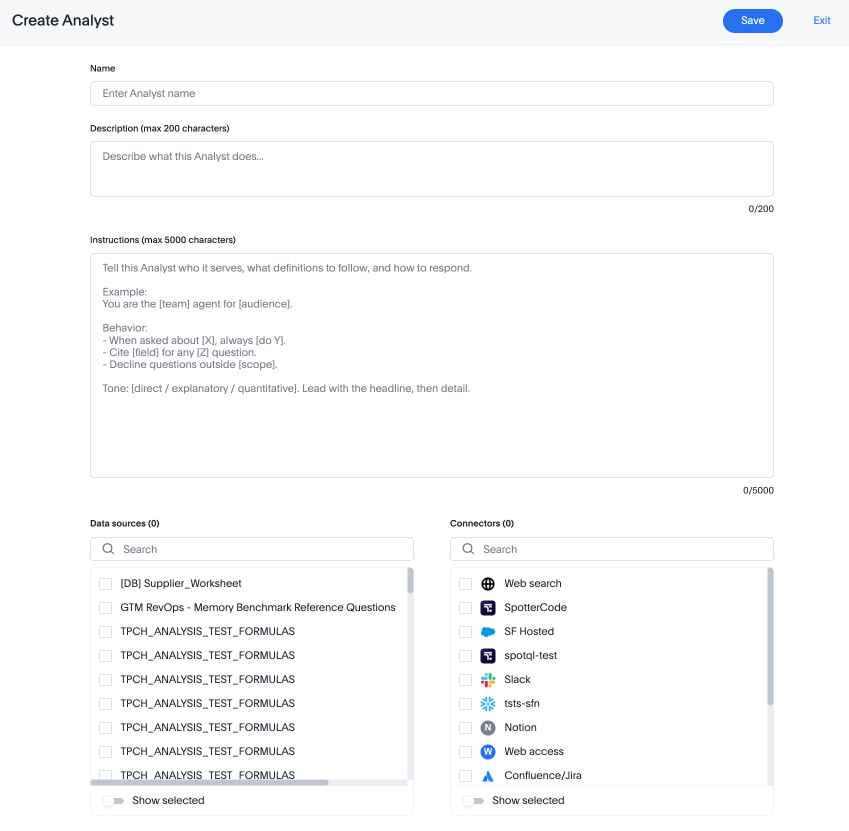
-
Instructions are the building blocks that tell the Analyst what tone to take, how to answer questions, how to think of the user in conversation, and what hard rules to obey. For a customer success team, for example, you can write instructions like the following:
You are the agent for the Customer Success team. Use the Customer Success Health Model as the source of truth for account health. Definitions: - "Account health" means the Health Score column on the certified model (range 0–100). Do not infer health from other fields. - "At risk" means Health Score < 60 AND last_engagement > 30 days. Exclusions: - Exclude test accounts (account_type = 'internal' or 'sandbox'). - Exclude accounts in the "Churned" stage unless the user explicitly asks about churned accounts. Handling ambiguity: - If the user asks "how is X doing" without naming a dimension, ask whether they mean Health Score, support load, or renewal risk before answering. - For multi-account questions ("how are my Enterprise accounts doing"), ask which segment if not specified. Tone: - Be direct. Cite the source model in every answer. Do not speculate about reasons for changes in health score. -
Click Save to create your Analyst.
Note that Analyst instructions override the agent-level instructions set by your Org.
Test an Analyst
To test your Analyst:
-
Select your Analyst from the Analyst library and click Chat.
-
Ask the questions you expect your team members to ask.
-
Confirm Spotter is using the right data, honoring the instructions, and respecting the tool restrictions.
-
Select the More menu icon on the Analyst tile and click Edit to make any necessary changes.
Edit a Spotter Analyst
You can edit your Analysts as your use cases change, or as you learn Spotter’s capabilities better. To edit an Analyst, you must either be the creator of the Analyst, a user with Can manage Spotter privileges, or an admin user. To edit a Spotter Analyst:
-
Navigate to the Analyst section of the left sidebar in Spotter and click the More options menu icon
 that appears when you hover over the name. If your desired Analyst does not show in the sidebar, click View all and search its name.
 -
From the More menu, select Edit. The Edit Analyst page appears. You can edit the name, the description, the instructions, and change its access to data models and connectors, just as you can when creating a new Analyst. Changes to the Analyst’s metadata (name, description, or icon) are reflected in any past conversations with the Analyst.
-
Click Save.
Delete a Spotter Analyst
The creator of an Analyst, or any user with Can manage Spotter privileges or admin access, can delete that Analyst. Deletion removes the Analyst from the library for everyone with access. To delete a Spotter Analyst:
-
Navigate to the Analyst section of the left sidebar in Spotter and click the More options menu icon
that appears when you hover over the name. If your desired Analyst does not show in the sidebar, click View all and search its name. -
From the More menu, select Delete. In the pop-up, click Delete again.
Share a Spotter Analyst
Any user with access to an Analyst can share it. Once you share an Analyst with a user or group, they see the Analyst under the Shared to me tab in the library, they can chat with the Analyst or make a copy of it, and they automatically receive view access to any data models used by the Analyst. When you share an Analyst with a user, they do not have access to edit it. Only the creator, an admin, or anyone with Can manage Spotter privileges can edit Spotter Analysts.
To share an Analyst:
-
Navigate to the Analyst library and click the More menu icon on the Analyst tile.
-
Click Share.
-
Select the user(s) or group(s) from the dropdown.
-
Select Share.
You cannot share with users by email account– only by user or group from your Org’s directory. Sharing an Analyst does not grant users edit access– edit access is granted by role (creator, Can manage Spotter privilege holder, or admin). You cannot share with users in other organizations or Orgs.
Copy a Spotter Analyst
Anyone with access to an Analyst can copy it. Once you have your own copy of an Analyst, you can make any desired changes to it.
To copy an Analyst:
-
Navigate to the Analyst library and click the More menu icon on the Analyst tile.
-
Click Make a copy. Make any desired changes to the fields in the copy window.
-
Click Save.
Use a Spotter Analyst
When searching for an Analyst to converse with, you can either choose from Analysts you created in the Yours page, or those shared with you in the Shared with you page. From opening Spotter, all you have to do is click on the name of an Analyst in the left sidebar, or open the Analyst page and select one from the available options in order to start searching. You do not need to specify which data model to search, as accessible data models are defined when creating the Analyst. All RLS rules are respected– Spotter will not release data to users who should not be able to access it.
Reference the table below to see the difference in data access between the common Spotter experience and Spotter Analysts:
Behavior |
Basic Spotter experience |
Inside an Analyst |
Data the agent can see |
Whatever you have access to |
Only the data models the Analyst’s author selected |
How the agent behaves |
Default Spotter behavior and your Org’s agent-level instructions |
Custom instructions written by the Analyst’s author override Org-level defaults |
Tools the agent can call |
All MCP connectors you have access to |
Only the connectors the author allowed for this Analyst |
You can select an Analyst from the Spotter left-hand sidebar, or from the Analyst library. Once you begin a conversation, Spotter highlights your current Analyst in the sidebar. Then you can ask any questions of the Analyst, with no need for further configuration. You can switch Analysts at any time, at which point your past conversation is archived and you begin a new conversation.
Best practices
- Name Analysts clearly
-
Include the team, scope, or use case. Q3 Pipeline Review (NA Sales) beats Sales Stuff.
- Use the description field well
-
Describe who this is for and what it scopes. Consumers see this on their library card.
- Document your data models in the instructions
-
This way, team members reading the instructions can see what’s in scope.
- Keep Analysts focused
-
Set one job per Analyst. If an Analyst is doing two jobs (sales pipeline and customer health), it’s probably best to create two Analysts.
- Delete unused Analysts
-
Manual cleanup keeps the library navigable.
FAQ
- How do I know what data this Analyst can see?
-
The author lists the data models in the Analyst’s description. If it’s unclear, ask the Analyst. Spotter itself will tell you when it can’t answer something because the data isn’t in scope.
- Can I see the instructions the author wrote?
-
No — no the instructions are not visible in the Analyst details.You can ask Spotter, it will mention the instructions but not the exact text verbatim.
- What happens if my question needs data the author didn’t include?
-
Spotter will tell you it can’t answer that question inside this Analyst, and (depending on the instructions) may suggest using a different Analyst or the basic Spotter experience.
- Can I add my own data to a shared Analyst?
-
No — only the author (or someone with edit permission) can change the data fence. You can ask the author to add a Model, or you can copy the Analyst into your own workspace (if you have permission) and customize the copy.
- Can I share my conversation with a teammate?
-
You cannot currently share the conversation.
- Does an Analyst replace base Spotter?
-
No. The basic Spotter experience remains available. Spotter Analysts are a layer on top — a way to scope and govern Spotter for specific use cases. Users can switch between Analysts and base Spotter freely.
- How many Analysts can I create?
-
There is no hard cap. In practice, environments with more than ~25–50 Analysts may benefit from waiting for later releases with improvements to tags, filtering, and tiered governance.