Local file
Analyst Studio’s local file integration allows you to upload data directly from your computer into Analyst Studio datasets.
This is the fastest way to perform ad hoc analysis on .csv, .tsv, and .xlsx files without requiring a cloud-based connection.
You can then refine the data in the Spreadsheet view and publish it to the Data workspace for use in Liveboards and Spotter.
Requirements
Before you get started, ensure your file meets the following criteria:
- Supported formats
-
.csv,.tsv, and.xlsx - File size
-
Files must be under 250 MB.
Prepare your local data
Following these guidelines ensures a clean, successful import:
- Clean your data
-
Remove any empty rows or columns at the end of your file before uploading.
- Date formats
-
Ensure date columns follow a consistent format (for example,
YYYY-MM-DD) for accurate auto-detection. - Encoding
-
For
.csvand.tsvfiles, use UTF-8 encoding to avoid character display issues.
Create a local file dataset
To create a new dataset:
-
Click Create in the top right corner of your Analyst Studio home screen and choose Upload external data in the Datasets section.
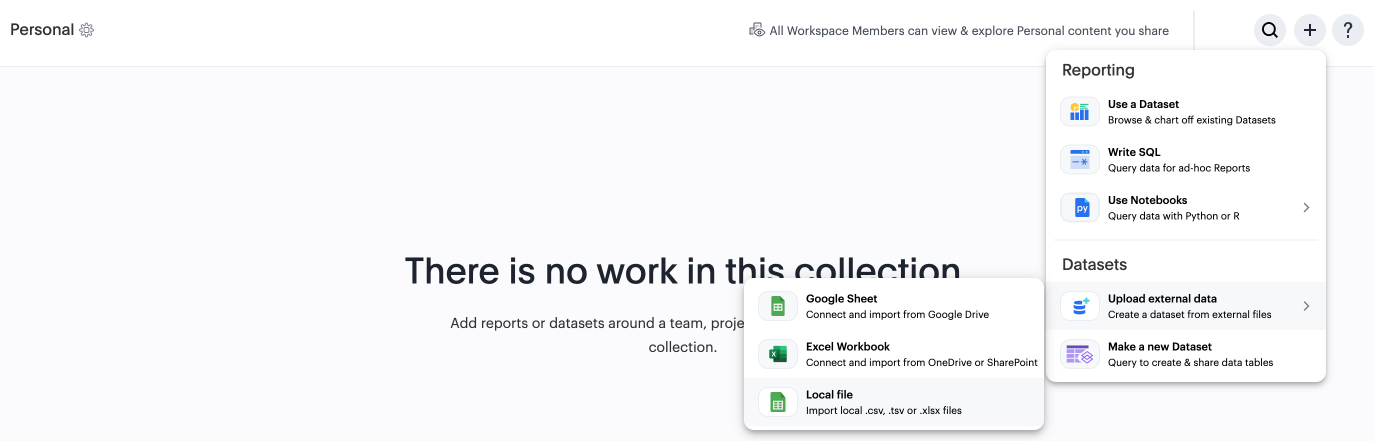
Alternatively, navigate to My Work, click Create in the top right corner, and choose Upload external data.
Define headers
Once you select a file, you are prompted to declare the header structure.
- Are column names defined in first line?
-
If the first row contains column names, select Yes. If your file starts directly with data, select No.
|
If you select No, Analyst Studio automatically identifies data types from the first row and generates generic column headers (for example, |
Review and refine columns
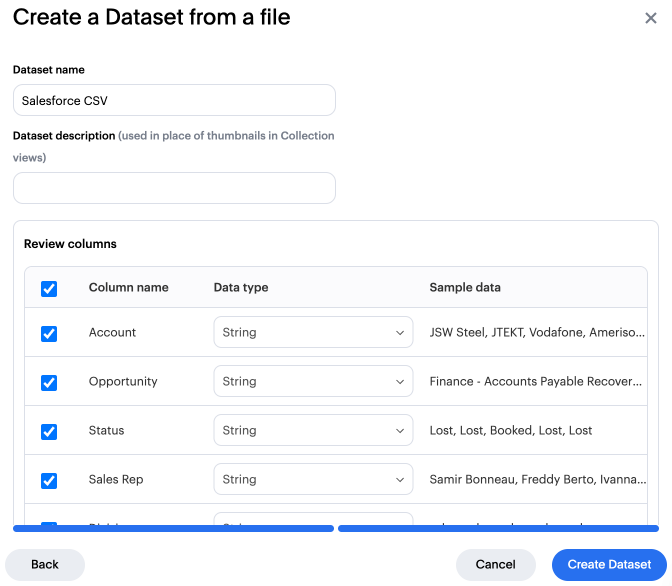
After the file is processed, a configuration modal appears. This allows you to verify the data before the dataset is created.
- Dataset name
-
Enter a unique name for your dataset.
- Dataset description
-
Add a description.
- Data preview
-
View the first five rows of your data as a sample.
- Column selection
-
Uncheck any columns you do not want to include in your dataset to save on processing and storage.
- Data type assignment
-
Analyst Studio automatically parses and assigns data types (String, Number, Date, and so on).
Modify data types and typecasting
You can override the auto-detected data types using the dropdown menu in the review modal. Changes must follow valid typecasting logic:
- Compatible casting
-
You can change a Number to a String, or a Date to a Datetime.
- Incompatible casting
-
You cannot cast String data (for example,
Product A) to a Numerical or Boolean type. If a type change is invalid, an error message appears explaining the reason.
Edit your local file dataset
After your file data is uploaded, you can do the following from the Data view:
-
View the columns generated from the file in the Data tab.
-
View a list of all available fields in the Fields tab.
-
Open the dataset in the Spreadsheet view to manipulate the data — cleaning, formatting, and adding calculated fields — before publishing.
Publish your local file dataset
To publish the dataset to the Data workspace:
-
Click Publish in the top right corner.
-
In the Publish to the Data workspace window, enter the dataset name and click Publish.
The dataset is published as a table and can be consumed by Liveboards and Spotter.
|
Any manual or scheduled sync automatically republishes the dataset to the Data workspace. |
For detailed publish and republish dependency behavior, see Reusable datasets.
Describe the fields in your dataset
Adding field descriptions helps build shared understanding around business logic, especially for ad hoc data where context can be lost.
To add a description:
-
Open the dataset and navigate to the Fields tab.
-
Double-click the row (field) you want to edit and add the description.
Descriptions support up to 350 characters and basic text formatting.
View source information
To see details about the original file used for the dataset, navigate to the Source tab. This displays the file name, file type, upload date, and the user who performed the upload.
Update your dataset’s name and description
You can change the dataset name or description at any time by clicking the name in the header area of the Dataset view. This does not affect the underlying data.
Schedule a local file dataset
Local files are point-in-time snapshots from your computer and do not support automated refresh scheduling. To update the data, you must perform a manual refresh by re-uploading the file.
Move a local file dataset to a Collection
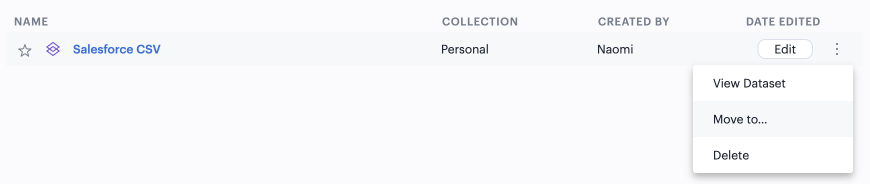
By default, new datasets are saved to your My Work area. To share your analysis with others:
-
Open the dataset, click Move to a Collection, and select the appropriate team folder.
-
Alternatively, click the More icon, select Move to…, and select the Collection.
View a local file dataset
You can view your dataset at any time from the Datasets tab in My Work. The view provides a summary of the row count, column count, and last updated timestamp.
Use your local file dataset in a Report
Once the upload is complete, a success notification appears. Click Start Analysis to immediately open the Chart Builder and begin visualizing your data in a new Report.
Refresh data in a dataset-based Report
To update a Report built on a local file:
-
Navigate to the dataset source.
-
Select Refresh data.
-
Upload the new version of your file.
|
The new file must have the same column structure (names and types) as the original to prevent Report breakage. If the dataset is published to the Data workspace, a successful sync also automatically republishes the data to the Data workspace. |
Dataset permissions
Access to the dataset is determined by where it is stored:
- Personal
-
Only you can view or edit datasets in your private workspace.
- Collection
-
If the dataset is moved to a Collection, access is governed by the Collection’s permission settings (Viewer, Editor, or Manager).