Sync data from ThoughtSpot to Salesforce
Sync to Salesforce from an Answer
To create a sync to Salesforce from an Answer, follow these steps:
-
Select the desired Answer from the Answers tab or the ThoughtSpot homepage. You must have Can manage sync permissions and view access to an Answer to create a sync.
-
In the upper-right corner of the Answer, click the more options menu icon
 . From the dropdown menu, select Sync to other apps, then choose Salesforce.
 -
If this is the first sync you have created for Salesforce, a pop-up authorization window appears. To give ThoughtSpot permission to send data to your Salesforce account, select your account from the pop-up window.
-
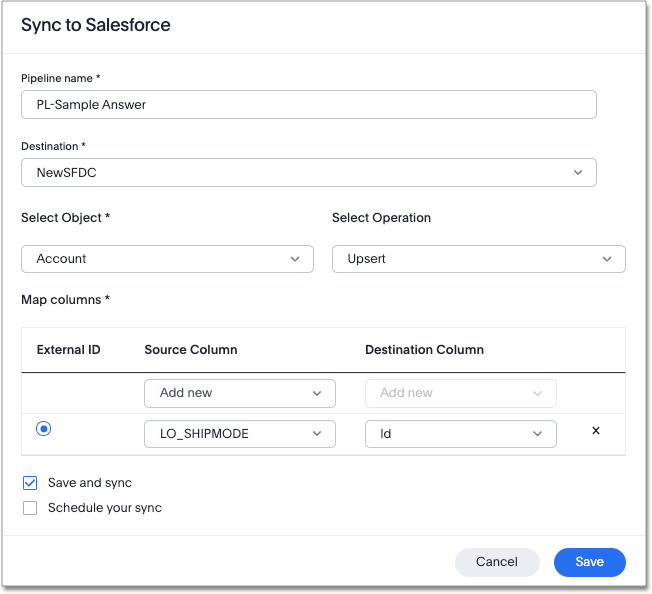
Within ThoughtSpot, fill in the following parameters:
-
Edit the Pipeline name if needed. By default, this field populates with PL-[Answer Name].
-
If you have more than one Salesforce destination set up, then the Destination field appears, and you will have to select a Salesforce destination from the dropdown menu available. However, if no destinations have been set up before or if you have only one Salesforce destination, the Destination field will not appear.
-
Select your Salesforce Object from the dropdown menu.
-
Select Operation from the dropdown menu. You can choose between Insert and Upsert.
-
Map the Source and Destination columns from the dropdown menus provided. Note that the Source column refers to the column in ThoughtSpot, while the Destination column refers to the column in Salesforce.
If you select Upsert as the operation, the External ID option appears as well, to the left of the Source and Destination columns. This option is only clickable if the Destination column is unique (for example, ID). For the external ID column, the source column values will be looked up against the destination column values. For matches on that column, the existing records in Salesforce will be updated with the new source columns while records that don’t exist yet will be created and populated using the source column data.
-
-
By default, "Save and sync" is selected. Select Save to send your data to Salesforce. Your data immediately appears in Salesforce.
-
[Optional] To set up a repeated sync, click Schedule your sync and select your timezone. From the options provided, choose whether the sync will occur every:
-
n minutes. You can choose to schedule a sync every 5, 10, 15, 20, 30, or 45 minutes.
-
n hours.
-
n days at a selected time. Note that you can choose not to send an update on weekends.
-
week at a selected time and day.
-
n months at a selected time and date.
-
| Any sync over 50,000 rows may result in an execution timeout. For optimal performance, keep your sync to below 50,000 rows. If you’re syncing a large number of rows and the sync fails, try applying filters like date filters to make your dataset smaller and then sync. |
Sync to Salesforce from a Custom SQL View
To sync to Salesforce from a custom SQL view, follow these steps:
-
Navigate to your SQL view by selecting the Data tab and searching from the Data workspace home page. Select the SQL view name.
-
In the upper-right corner, click the more options menu icon
 and select Sync to Salesforce.
 -
If this is the first sync you have created for the selected app, an authorization page appears. To give ThoughtSpot permission to send data to your Salesforce account, click Sign in with Salesforce, select your account, and click Allow.
-
Fill in the following parameters:
-
Edit the Pipeline name if needed. By default, this field populates with PL-[Answer Name].
-
If you have more than one Salesforce destination set up, then the Destination field appears and you have to select a Salesforce destination from the dropdown menu available. However, if no destinations have been set up before or if you have only one Salesforce destination, the Destination field will not appear.
-
Select Object from the dropdown menu.
-
Select Operation from the dropdown menu. You can choose between Insert and Upsert.
-
Map the Source and Destination columns from the dropdown menus provided.
If you select Upsert as the operation, the External ID option appears as well, to the left of the Source and Destination columns. This option is only clickable if the Destination column is unique (for example, ID). For the external ID column, the source column values will be looked up against the destination column values. For matches on that column, the existing records in Salesforce will be updated with the new source columns while records that don’t exist yet will be created and populated using the source column data.
-
-
By default, "Sync and save" is selected. Select Save to send your data to Salesforce. Your data immediately appears in Salesforce.
-
[Optional] To set up a repeated sync, click Schedule your sync and select your timezone. From the options provided, choose whether the sync will occur every:
-
n minutes. You can choose to schedule a sync every 5, 10, 15, 20, 30, or 45 minutes.
-
n hours.
-
n days at a selected time. Note that you can choose not to send an update on weekends.
-
week at a selected time and day.
-
n months at a selected time and date.
-
| Any sync over 50,000 rows may result in an execution timeout. For optimal performance, keep your sync to below 50,000 rows. If you’re syncing a large number of rows and the sync fails, try applying filters like date filters to make your dataset smaller and then sync. |
Sync to Salesforce from the Data workspace
To create a sync to Salesforce from the Data workspace, follow these steps:
-
Select the Data tab.
-
On the left menu bar, select Sync.
-
Under the Pipelines tab, select "Create new pipeline". Note that if you do not already have a destination created to the intended destination app, you first need to create one in the Destinations tab.
-
Fill in the following parameters:
-
Edit the Pipeline name if needed. By default, this field populates with PL-[Answer Name].
-
All destinations available appear in the Destination dropdown menu.
-
Select your Source data. Here you will pick an Answer or a custom SQL view to send through sync.
-
Select Object from the dropdown menu.
-
Select Operation from the dropdown menu. You can choose between Insert and Upsert.
-
Map the source and destination columns from the dropdown menus provided.
If you select Upsert as the operation, the External ID option appears as well, to the left of the Source and Destination columns. This option is only clickable if the Destination column is unique (for example, ID). For the external ID column, the source column values will be looked up against the destination column values. For matches on that column, the existing records in Salesforce will be updated with the new source columns while records that don’t exist yet will be created and populated using the source column data.
-
-
By default, "Save and sync" is selected. Select Save to send your data to Salesforce. Your data immediately appears in Salesforce.
-
[Optional] To set up a repeated sync, click Schedule your sync and select your timezone. From the options provided, choose whether the sync will occur every:
-
n minutes. You can choose to schedule a sync every 5, 10, 15, 20, 30, or 45 minutes.
-
n hours.
-
n days at a selected time. Note that you can choose not to send an update on weekends.
-
week at a selected time and day.
-
n months at a selected time and date.
-
| Any sync over 50,000 rows may result in an execution timeout. For optimal performance, keep your sync to below 50,000 rows. If you’re syncing a large number of rows and the sync fails, try applying filters like date filters to make your dataset smaller and then sync. |
Failure to sync
A sync to Salesforce can fail due to multiple reasons. If you experience a sync failure, consider the following causes:
-
The underlying ThoughtSpot object was deleted.
-
The underlying Salesforce object was deleted.
-
The column name was changed in either ThoughtSpot or Salesforce, making it different to the column name setup in the mapping.
-
There are data validation rules in Salesforce which only allow data with only a certain data type to be populated in the Salesforce fields, but the columns being mapped onto Salesforce from ThoughtSpot do not have the same or allowable data type.
-
There is a mandatory field in Salesforce which has not been mapped onto as a destination column when setting up the mapping in ThoughtSpot.
Manage pipelines
While you can also manage a pipeline from the Pipelines tab in the Data workspace, accessing the Manage pipelines option from an Answer or view displays all pipelines local to that specific data object. To manage a pipeline from an Answer or view, follow these steps:
-
Click the more options menu icon
 and select Manage pipelines.
 -
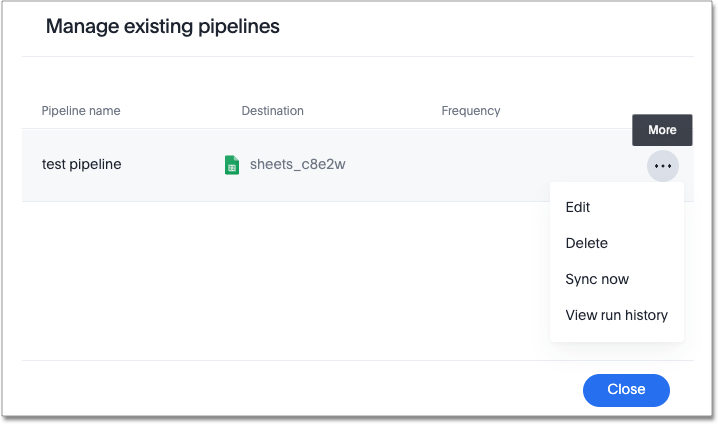
Scroll to the name of your pipeline from the list that appears. Next to the pipeline name, select the more options icon
 . From the list that appears, select:
-
Edit to edit the pipeline’s properties. For example, for a pipeline to Google Sheets, you can edit the pipeline name, file name, sheet name, or cell number. Note that you cannot edit the source or destination of a pipeline.
-
Delete to permanently delete the pipeline.
-
Sync now to sync your Answer or view to the designated destination.
-
View run history to see the pipeline’s Activity log in the Data workspace.

-
Related information


