Upload custom geo maps
ThoughtSpot supports rendering of many countries and subdivisions by default. In addition, you can upload your own custom maps and visualize data on geo charts with regions that are specific to you and your organization. For example, upload a map of the United States with regions such as Southwest, Northeast, and so on.
To view the countries and subdivisions that ThoughtSpot supports by default, refer to Geo map reference.
Upload up to 50 custom map files. To increase this limit, contact ThoughtSpot support.
Prerequisites
-
To upload custom maps, you must have admin privileges.
-
Your custom map must be a
TopoJSONfile. It can’t be more than 100 MB. -
In 9.0.1.sw, this feature is Early Access. Your ThoughtSpot administrator must enable it.
-
If you use a remote URL to upload your custom map, you must add the base URL of the custom map to your CSP override list. For example, if the remote URL for your custom map is https://raw.githubusercontent.com/bmesuere/belgium-topojson/master/belgium.json, you must add https://raw.githubusercontent.com to your CSP override list. See Add the remote URL to your CSP override list.
Upload your own custom maps
To upload your own custom maps, follow these steps:
-
Select Admin from the top navigation bar.
-
Select Custom maps from the side navigation bar that appears. If you do not see the Custom maps option, ThoughtSpot support must enable it in your environment.
-
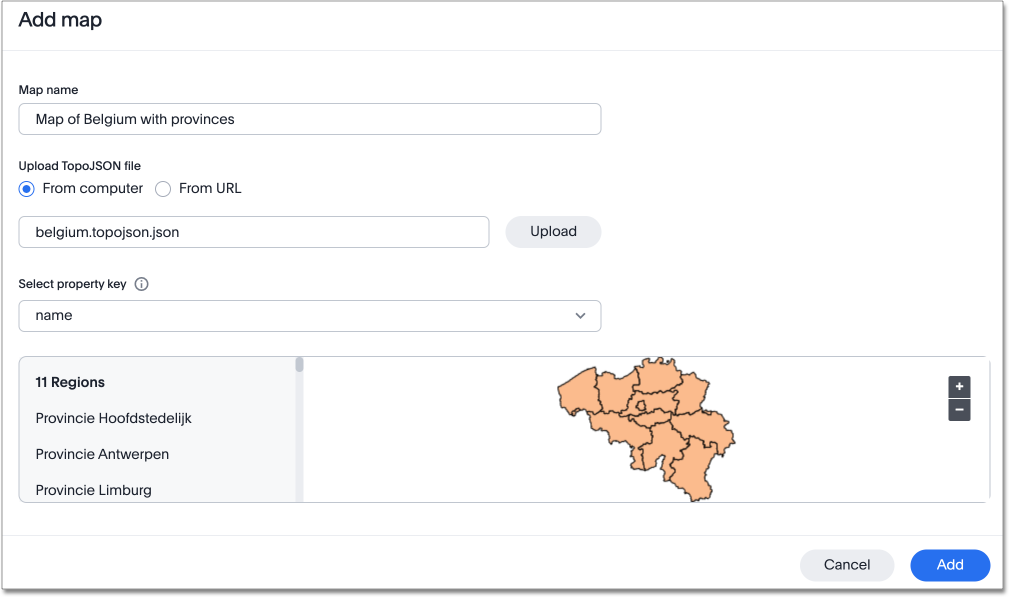
Select Add map.
-
Enter a name for the map in the Map name text box. Make sure it is a unique name so that you can find it later.
-
Under Upload TopoJSON file, select either From computer or From URL.
-
If you select From computer, select Upload. Select a file from your computer’s file picker when it appears.
-
If you select From URL, enter the URL for the file in the Remote URL text box, and select Upload.
If you use a remote URL to upload your custom map, you must add the base URL of the custom map to your CSP override list. See Add the remote URL to your CSP override list.
-
Under Select property key, use the dropdown to select the property key that defines the region names in your TopoJSON file. If you select the correct key, a preview of the map and a list of the regions it defines appears in the preview box. If you do not select the correct key, it returns an error, and does not show a preview.
-
Select Add.
Add the remote URL to your CSP override list
If you use a remote URL to upload your custom map, you must add the base URL of the custom map to your CSP override list. Use the tscli csp add-override command. To add your remote URL to your CSP override list, follow these steps:
-
sshinto your ThoughtSpot cluster as an admin.ssh admin@<IP-address> -
Run the tscli csp add-override command, using the remote URL you added when you uploaded your custom map.
tscli csp add-override -source 'connect-src' --url <base-url>Replace
<base-url>with your remote URL’s base URL. For example, if the remote URL for your custom map is https://raw.githubusercontent.com/bmesuere/belgium-topojson/master/belgium.json, your base URL is https://raw.githubusercontent.com.tscli csp add-override -source 'connect-src' --url https://raw.githubusercontent.com
Use your custom map to visualize data
After you upload your custom map, use it to visualize your geographical data. You must designate the column(s) in your data source as Geo columns, and specify the custom map you created. To learn how to designate columns as Geo data and specify a custom map, refer to Add a geographical data setting.
Edit a custom map
If you must make changes to the custom map you uploaded, you can edit it from the Admin Console. To edit your custom map, follow these steps:
-
Select Admin from the top navigation bar.
-
Select Custom maps from the side navigation bar that appears.
-
In the list of custom maps, find the name of the map you would like to edit.
-
Select Edit.
-
Edit the map name or upload a new TopoJSON file.
-
If the map has any dependents, a warning appears at the top of the Edit map dialog: Changes to the map will update n objects. View all. To view the dependents that will change if you edit the map, select View all.
-
Select Save.
When you edit a custom map, ThoughtSpot expects your data to be in sync with the new map. For example, if you add a new region to the file you upload, ThoughtSpot expects that region to be present in your data.
Delete a custom map
Delete a custom map from the Admin Console. To delete your custom map, follow these steps:
-
Select Admin from the top navigation bar.
-
Select Custom maps from the side navigation bar that appears.
-
In the list of custom maps, find the name of the map you would like to delete.
-
Select Delete.
-
If the custom map has any dependents, a Fix dependent objects dialog appears, warning you that you can’t delete the custom map while it has dependents. To delete the map, you must first remove it from the dependent objects' geo configuration. See How to edit geographic columns.
If the custom map does not have dependents, a confirmation dialog appears. Select Delete again.


