Join a table, View, or Worksheet to another data source
Learn how to define joins between a table, View, or Worksheet and another table, View, or Worksheet.
A join combines columns from one or more sources in your data by using matching values. By defining relationships between your sources, you create a new, richer set of data that you can use to answer your business questions. Choose a column to join on that both tables contain (for example, employee ID or product key). This process creates a generic join between the table or view and the other table, view, or worksheet on the column you specify.
| If you want to create a primary key/foreign key relationship, you need to use TQL rather than the web interface. |
Join types
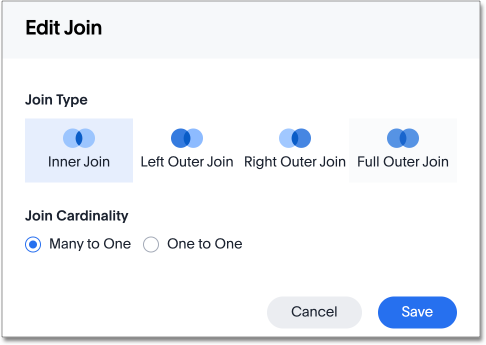
ThoughtSpot supports the following join types: Inner, Left Outer, Right Outer, and Full Outer. You can choose a join type when creating or editing a join through the ThoughtSpot web interface.
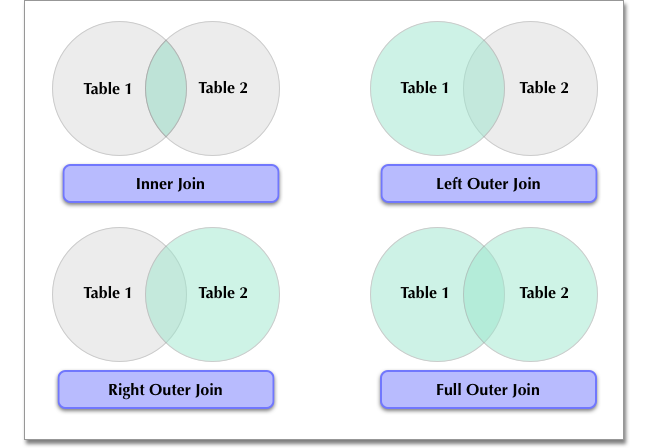
ThoughtSpot defaults to the inner join type, which returns results for data with matching values in both the origin table (Table 1) and the target table (Table 2).
Left outer joins return results for all values from Table 1, and any matching values from Table 2.
Right outer joins return results for all values from Table 2, and any matching values from Table 1.
Full outer joins return results for all values from either Table 1 or Table 2.
Join cardinality
When creating the join, you must also identify its cardinality: Many:1, 1:Many, or 1:1.
A Many:1 cardinality defines a join where multiple values in the origin table (Table 1) correspond to one value within the target table (Table 2). A join between a product table and a product category table shows multiple products that match each category.
A 1:Many cardinality defines a join where one value in the origin table corresponds to multiple values within the target table.
A 1:1 cardinality defines a join where one value in the origin table corresponds to a single value within the target table (e.g. employee name and employee ID).
You must create a join between columns in two data sources that contain the same data type, with the same meaning. That is, they must represent the same data. Normally, you can make this kind of link from a fact table column to a column in a dimension table that uniquely identifies a logical entity in your data such as Employee ID for a person, Product ID for a product, or Date Key for a specific date in a date lookup table.
Possible joins
You must have either the Can administer ThoughtSpot or the Can manage data privilege to create a join relationship. If you’re not an administrator, you also need edit permissions on the table, View, or Worksheet.
You can join any data object to another object, with the following 2 restrictions:
-
You can only join a worksheet to a user-uploaded CSV table.
-
You cannot join objects across connections. This means that you cannot join an object that is part of one connection to an object in a different connection.
| If you create joins at the table level, and then create a Worksheet that uses the columns from the table, the settings are inherited from the table at the point in time that the Worksheet is created. If you then go back and change the settings at the table level, your changes will not be reflected in the Worksheet. If you want the Worksheet to have the changes you made at the table level, you must drop those columns from the Worksheet and re-add them. |
Creating join relationships
Creating a join from a table
To create a table join through the Web interface:
-
Click Data in the top menu, and choose Tables.
-
Find your table through browsing, Search, or selecting the appropriate Tag(s).
-
To select the table for adding joins, click its name in the list. You will see the Columns view of the table.
-
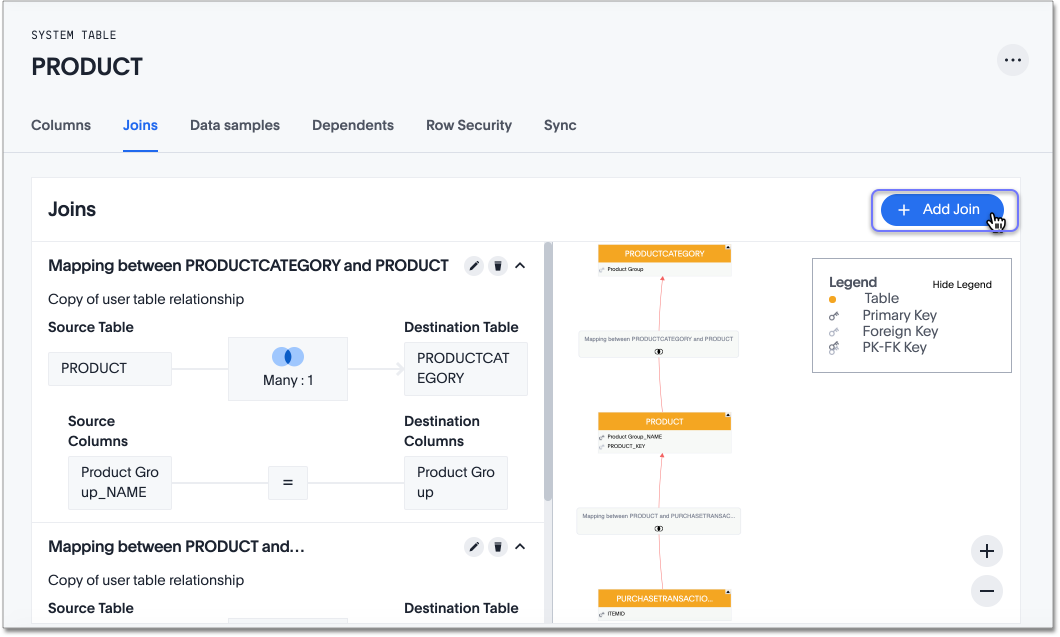
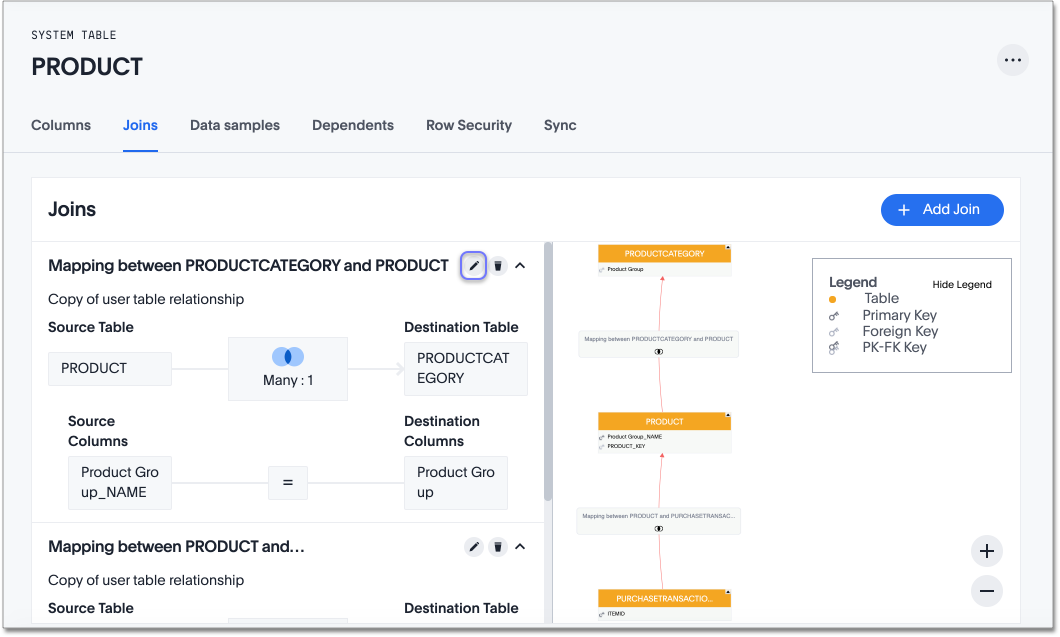
Click the Joins tab. The list of existing joins from the table appears.
-
Click the + Add Join button on the upper right side of the screen. The Create Join page appears.
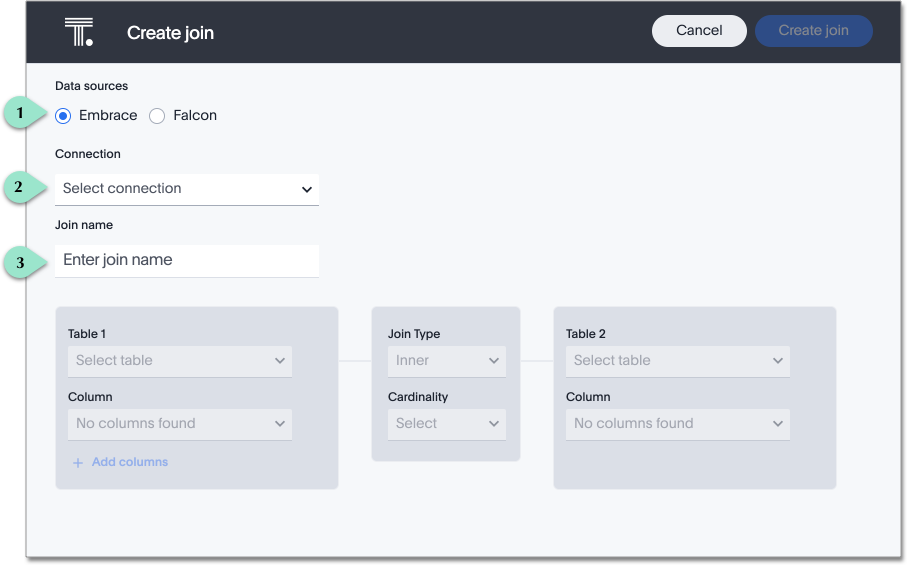
Legend Action 1.
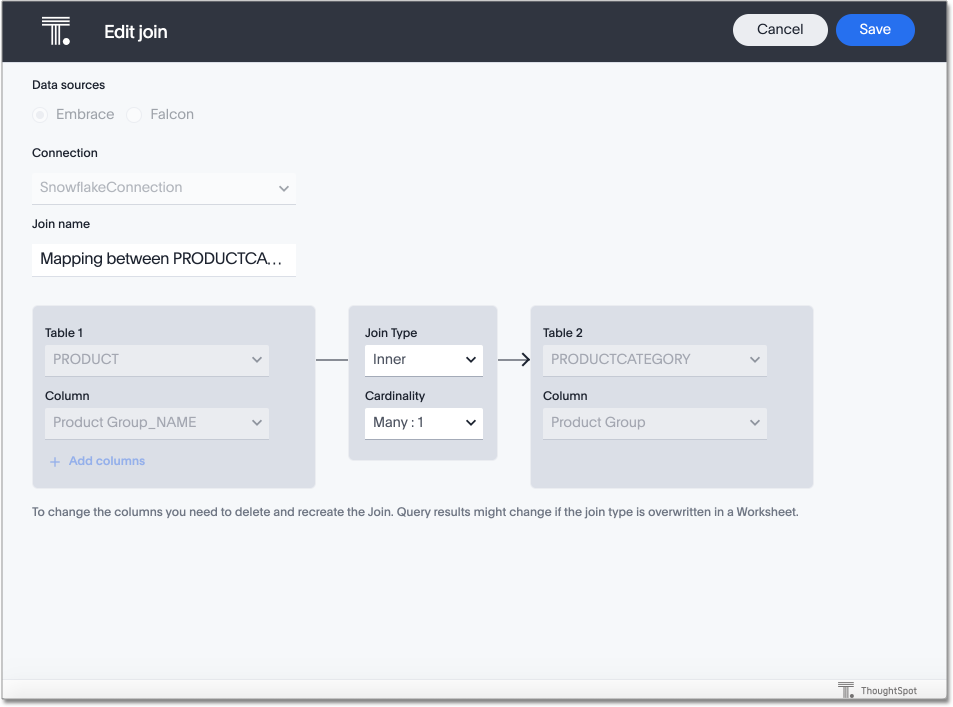
Select the data source of your table, either Embrace, or Falcon.
2.
Choose your connection from the dropdown Connection menu. You can only create joins between data sources uploaded through the same connection.
3.
[Optional] Click Enter join name to name your join. Note that ThoughtSpot automatically names joins using the following syntax: [OriginDataSourceName] to[DestinationDataSourceName]. You can always enter a more meaningful join name, either when creating, or when editing the join.
-
Under Table 1, choose the table you want to create a join from (origin table).
-
Under Table 2, choose the destination table or View for the other end of the join.
-
Choose the matching columns under each table. These columns must use the same data type. [Optional] You can select multiple columns for the same join. To add another pair of matching columns to the join definition, click +Add columns.
-
Specify the join type; see Join types.
-
Specify the join cardinality; see Join cardinality.
-
Click Create join.
Creating a join from a Worksheet or View
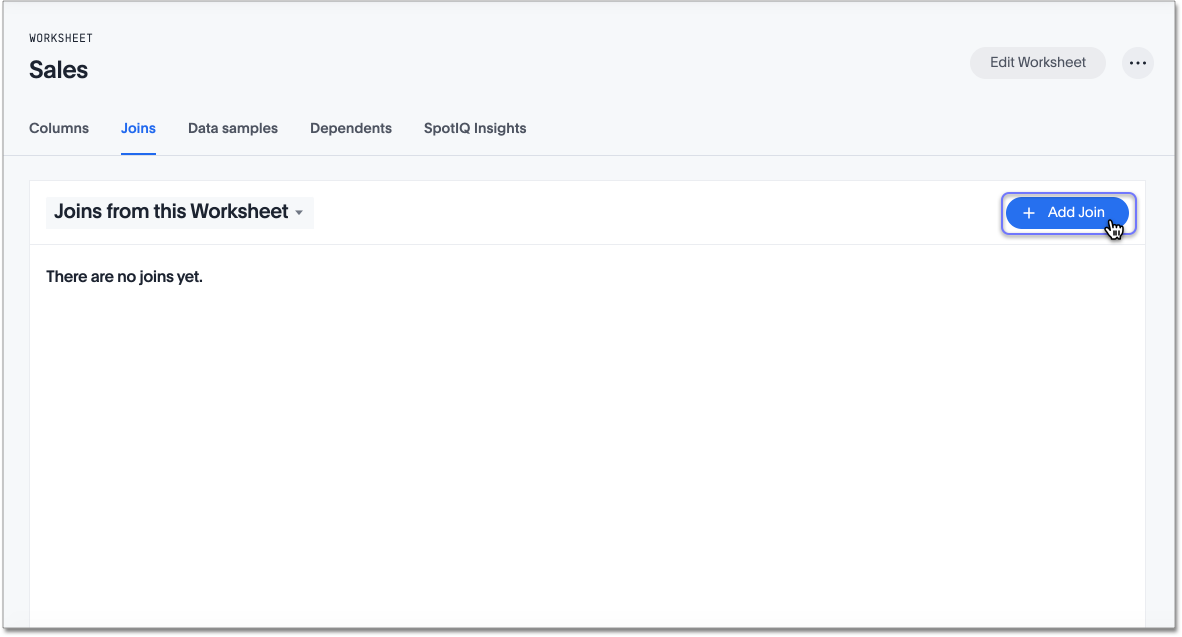
To create a join from a worksheet:
-
To find your worksheet, click Data on the top menu, and choose Worksheets.
-
Find your Worksheet through browsing, Search, or selecting the appropriate Tag(s).
-
To select the Worksheet for adding joins, click its name in the list.
-
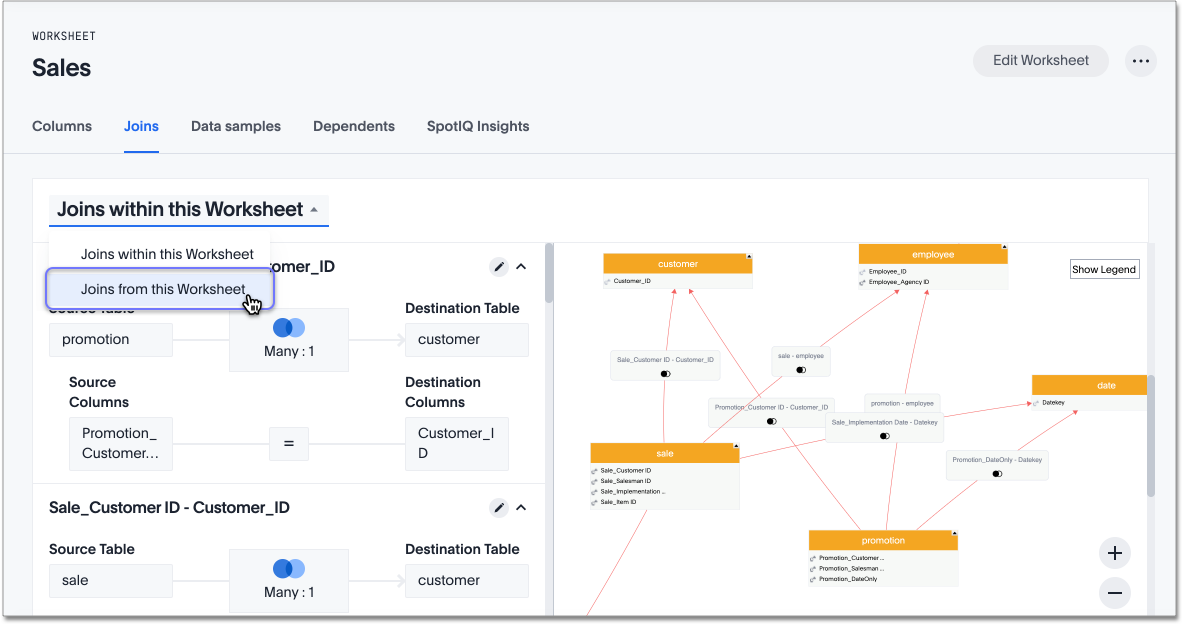
Click the Joins tab. The list of existing joins within the worksheet appears.
-
To view the joins between this Worksheet and other data sources, click Joins within this worksheet, and choose Joins from this worksheet.
-
To start creating a join, click + Add Join on the upper right side of the screen.
-
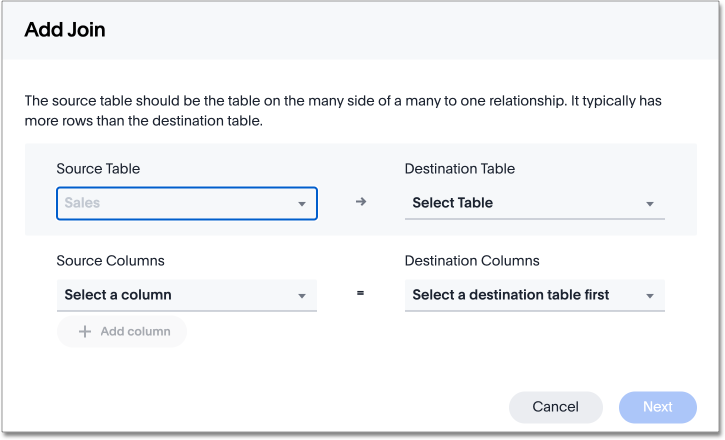
In the Add Join dialog, choose the destination table or View for the other end of the join.
-
Choose the matching columns under each table. These columns must use the same data type. [Optional] You can select multiple columns for the same join. To add another pair of matching columns to the join definition, click + Add columns.
-
Specify the join type; see Join types.
-
Specify the join cardinality; see Join cardinality.
-
Click Create join.
Modifying joins
ThoughtSpot allows you to edit the name, join type, and cardinality through the Web interface. To change the columns that define a join, you must delete the join and create a new one.
Editing a join from a table
To edit a join between tables:
-
Click Data in the top menu, and choose Tables.
-
Find your table through browsing, Search, or selecting the appropriate Tag(s).
-
To select the table for adding joins, click its name in the list. You will see the Columns view of the table.
-
Click the Joins tab. The list of existing joins from the table appears.
-
Click the edit icon to the right of the name of the join you want to modify. The Edit join page appears.
-
Make the desired changes to the name, type, or cardinality of the join.
-
Click Save.
Editing a join from a Worksheet or View
To edit a join from a Worksheet or View:
-
Click Data in the top menu, and choose Worksheets.
-
Find your Worksheet through browsing, Search, or selecting the appropriate Tag(s).
-
To select the Worksheet, click its name in the list.
-
Click the Joins tab. The list of existing joins within the worksheet appears.
-
To view the joins between the worksheet and other data sources, click Joins within this worksheet, and choose Joins from this worksheet.
-
Click the edit icon to the right of the name of the join you want to modify. The Edit join window appears.
-
Make the desired changes to the join type or cardinality.
-
Click Save.
Deleting a join
To delete a join:
-
Click Data in the top menu.
-
Find the origin table, Worksheet, or View of the join you want to delete through browsing, Search, or selecting the appropriate Tag(s).
-
Click the name of your origin table, Worksheet or View in the list.
-
Click the Joins tab. The list of existing joins from the table, Worksheet, or View appears.
If you want to delete an external join from a Worksheet, you must click Joins within this worksheet under the Joins tab and select Joins from this worksheet. 
-
Click the delete icon to the right of the join name. The Confirm delete window appears.
-
Click Delete.
If existing Answers or Pinboards depend on the join you are deleting, you will see the Cannot delete window listing all dependents of the join. You must delete all dependents before you can delete the join. 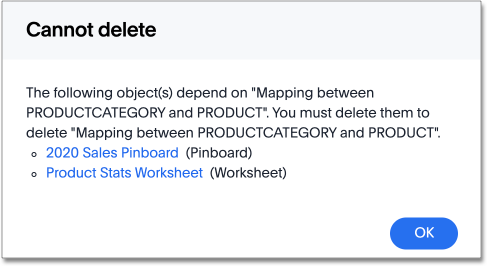
Related information


