Set up custom calendars
With a custom calendar, you can choose when the year, quarter, or week starts, and search using date-related keywords.
You can create custom calendars for different purposes within your company, including:
-
Retail calendars, like 4-4-5, 4-5-4, or 5-4-4
-
Fiscal calendars, where the year or quarter starts on a different date each year
-
Pharmaceutical calendars, where the week runs from Friday through Thursday
-
Calendars in different languages
Options
In a custom calendar, you can set the following:
-
The starting date of a year
-
The starting dates of quarters
-
The starting day of the month
-
The starting day of the week
-
The words used for the days of the week, months and quarters
Search features
You can use your custom calendar to search the following ways:
-
Using date keywords, like
this quarterandq3 -
Using date formulas with the
fiscaloption specified (See fiscal and gregorian calendars) -
Overriding the calendar used in the search bar by typing your custom calendar’s name
Limitations
-
Maximum scope of the date dimension is 90 years
-
Maximum length of a calendar year is 12 months
Setting up a custom calendar
To set up a custom calendar for your cluster, you must do the following:
-
Enable the custom calendar feature.
-
Generate a calendar template.
-
Edit the calendar template.
-
Add the custom calendar to your cluster.
Enable the custom calendar feature
To enable the custom calendar feature for your cluster, contact ThoughtSpot Support.
Generate a calendar template
Using a calendar template as your starting point ensures that you use a format that is compatible with ThoughtSpot.
To generate a calendar template, do the following:
-
SSH as admin into your ThoughtSpot cluster:
ssh admin@<cluster-ip-address or hostname>. -
Run the
tscli calendar generatecommand using the following syntax:tscli calendar generate --name <calendar_name> --start_date <MM/DD/YYYY> --end_date <MM/DD/YYYY> --username tsadminExample:
tscli calendar generate --name my_calendar --start_date 07/01/2019 --end_date 06/30/2020 --username tsadminThis generates a calendar template file in .csv format. In the previous example: my_calendar.csv.
-
Exit your SSH session.
Edit the calendar template
To use the template you generated as your custom calendar, some editing is required.
-
Download the .csv file to your computer using following syntax:
scp admin@<cluster-ip-address>:/home/admin/<calendar_name>.csv /<Local directory on your computer>/.Example (on Mac OS):
scp [email protected]:/home/admin/my_calendar.csv /Users/john.smith/Desktop/. -
Open the .csv file in a text editor or spreadsheet program and edit the file to ensure the date and quarter columns are formatted correctly:
-
The Date column must use the format: MM/DD/YYYY. No other formats are supported.
-
The Quarter column must display the correct quarter number for each day of the year.
By default, a generated calendar displays quarter numbers based on the Gregorian calendar (which starts on January 1st). If your custom calendar begins any other date, you must adjust the quarter numbers to align with your calendar. For example: If your custom calendar begins on April 1st, the calendar would incorrectly show April, May and June as quarter 2. You would need to correct this to indicate those months are quarter 1 and correct the subsequent months to have the correct quarter. -
(Optional) To enhance searchability, ThoughtSpot recommends adding a “Q” before each quarter number. Example: Q1. If adapting the calendar to different language, use the appropriate letter in place of "Q".
-
Make any other changes needed to the calendar (like translating months or days into a different language.)
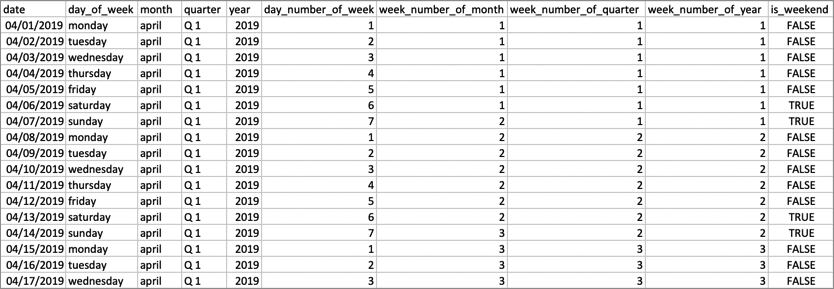
Example calendar with the fiscal year beginning on April 1:
-
-
Save your calendar template as a UTF-encoded .csv file with UNIX line breaks.
Saving the file with UNIX line breaks, ensures there are no carriage returns (^M characters) in the file which prevent you from using your calendar in ThoughtSpot. Microsoft Excel, for example, adds carriage returns. The easiest way to remove carriage returns is to open your .csv file in a text editor, and save it as a .csv with UNIX line breaks.
Add the custom calendar to your cluster
To use your edited calendar template as a custom calendar, you must upload it to your cluster and use it to create a calendar in ThoughtSpot.
-
Upload the .csv file to your ThoughtSpot cluster using the following syntax:
scp /<Local directory on your computer>/<calendar_template_name>.csv admin@<cluster-ip-address>:/home/admin/Example (on Mac OS):
scp /Users/john.smith/Desktop/my_calendar.csv [email protected]:/home/admin -
SSH as admin into your ThoughtSpot cluster:
ssh admin@<cluster-ip-address or hostname>. -
Run the
tscli calendar createcommand using the following syntax:tscli calendar create --file_path /home/admin/<calendar_template_name>.csv --name <calendar name> --username tsadminExample:
tscli calendar create --file_path /home/admin/my_calendar.csv --name my_calendar --username tsadmin
(Optional) Set a custom calendar as the default calendar for your cluster
To set your custom calendar as the default calendar for your cluster, contact ThoughtSpot Support.
Setting a worksheet, table or view to use your custom calendar
If you don’t set your custom calendar as the default for your cluster, you must do the following to use your calendar:
-
Sign in to your ThoughtSpot cluster and click DATA.
-
On the DATA page, click the name of a Worksheet, table or View in which you want to use your custom calendar.
-
Under COLUMN NAME, find a column that uses the DATE or DATE_TIME data type where you want to use your custom calendar and scroll right until you see the CALENDAR TYPE column.
The column must use the DATE or DATE_TIME data type. -
In the CALENDAR TYPE column for the column(s) you chose, double-click the existing calendar name, and then select your custom calendar.
-
Click Save Changes.
Now, date-related searches in the selected Worksheet, table or View use your custom calendar.


