Set up ThoughtSpot in Azure
After you determine your configuration options, you must set up your virtual machines using a ThoughtSpot image for Azure.
About the ThoughtSpot image
To provision ThoughtSpot in the Azure portal, access the ThoughtSpot Virtual Machine in the Azure Marketplace.
The ThoughtSpot Virtual Machine comes provisioned with the custom ThoughtSpot image to make hosting simple. A virtual machine is a preconfigured template that provides the information required to launch an instance of ThoughtSpot. It includes a root disk for the instance, which contains an operating system, application server, and other necessary software.
The ThoughtSpot Virtual Machine has the ThoughtSpot software installed and configured, on a CentOS-based image. Check with your ThoughtSpot contact to learn about the latest version of the ThoughtSpot Virtual Machine.
Due to security restrictions, the ThoughtSpot Virtual Machine does not have default passwords for the administrator users. When you are ready to obtain the password, contact ThoughtSpot Support.
This guide explains how to deploy ThoughtSpot on Microsoft Azure, using ThoughtSpot’s CentOS-based image. Starting with version 6.0.4, you can also deploy ThoughtSpot on Azure using Red Hat Enterprise Linux (RHEL), allowing you to run ThoughtSpot on an RHEL image that your organization manages internally. To install ThoughtSpot using RHEL, refer to the RHEL deployment guide.
Set up ThoughtSpot in Azure
Follow these steps to provision and set up the VMs and launch ThoughtSpot.
Prerequisites
Complete these steps before launching your ThoughtSpot Virtual Machine:
-
Obtain an Azure login account.
-
Set up usage payment details with Microsoft Azure.
-
Find your company’s Resource Group. (optional—you can also create one while creating your virtual machines.)
-
Download and fill out the ThoughtSpot site survey to have a quick reference for any networking information you may need to fill out. Ask your network administrator if you need help filling out the site survey.
Create an instance
Create your virtual machines based on the ThoughtSpot Virtual Machine.
-
Log in to the Azure portal.
In a browser, go to https://portal.azure.com/#home, and log in to your Azure account.
-
On the Azure portal homepage, hover over Virtual machines, and click Create.

-
Specify information under Basics.
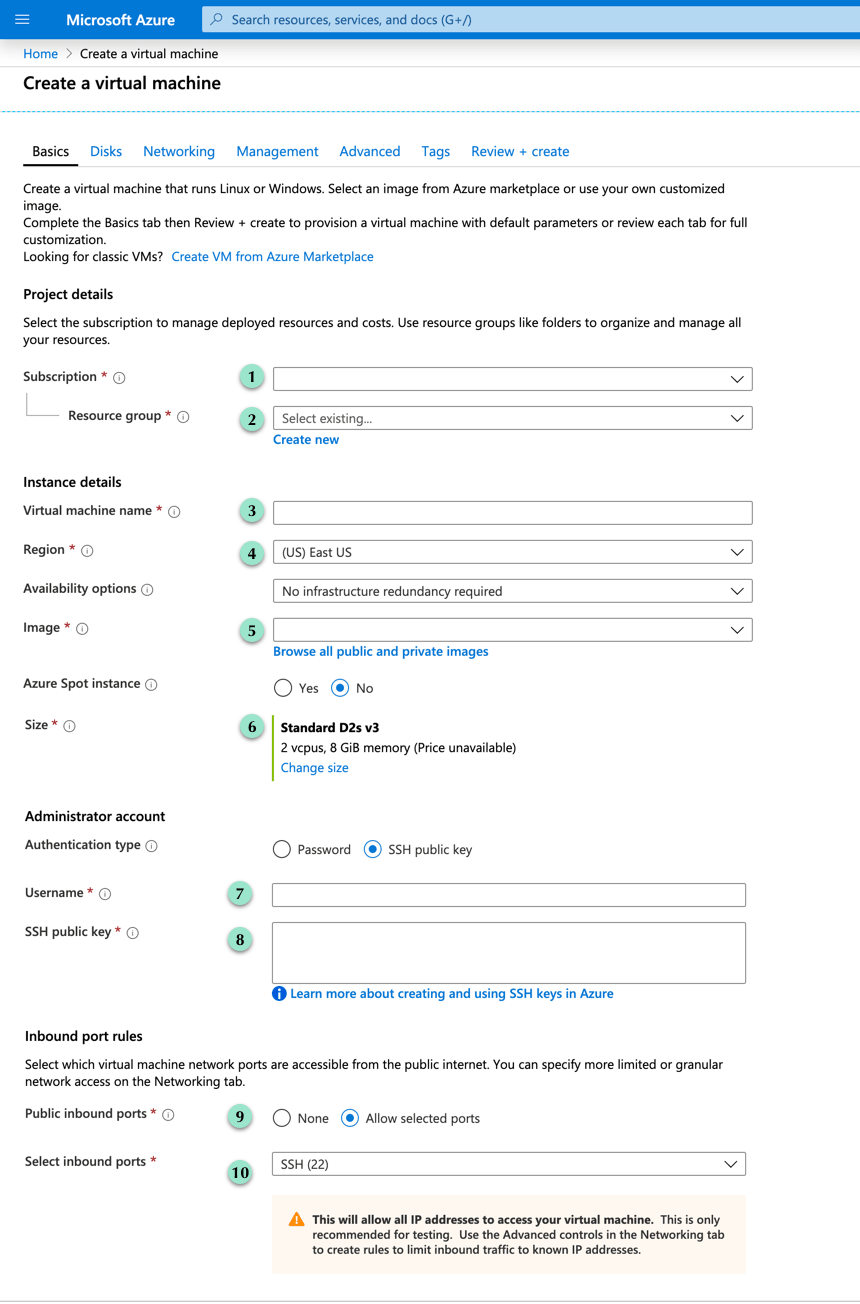
1
Choose a subscription type from the dropdown menu.
2
If your company already has a resource group, select existing. If not, create new.
3
Specify a name for your virtual machine.
4
Specify the region in which you are creating the VM.
5
Click Browse all public and private images, and search for the ThoughtSpot image. Choose the ThoughtSpot Search & AI-driven Analytics (BYOL) image.
6
Refer to Azure configuration options to choose a size for your VM that works for your cluster needs.
7
Select SSH public key and specify a username.
8
Enter your SSH public key. Contact ThoughtSpot support to obtain a public key, if you do not have one. Note that this SSH public key is different from the SSH private key you use later, to ssh into your VM from the command line.
9
Choose allow selected ports.
10
Open the necessary Inbound and Outbound ports to ensure that the ThoughtSpot processes do not get blocked. See the minimum port requirements.
-
Specify information under Disks.
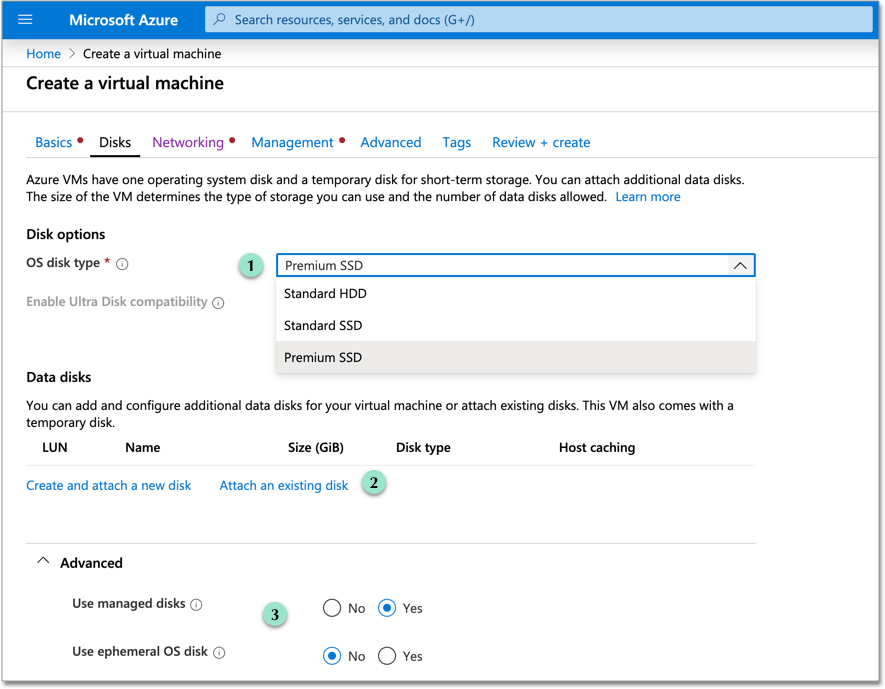
1
Choose a disk type from the dropdown menu. ThoughtSpot recommends the Premium SSD disks.
2
Click Create and attach a new disk. Add two data disks. Refer to Azure configuration options to see what size they should be.
3
Under Advanced, click yes to use managed disks.
The new Standard SSD disk types are only available for particular regions. Make sure this disk type is supported in the region you chose for your VM before selecting it. See Standard SSD Disks for Virtual Machine workloads for more on SSD disks. ThoughtSpot recommends the Premium SSD disks.
-
Specify information under Networking.
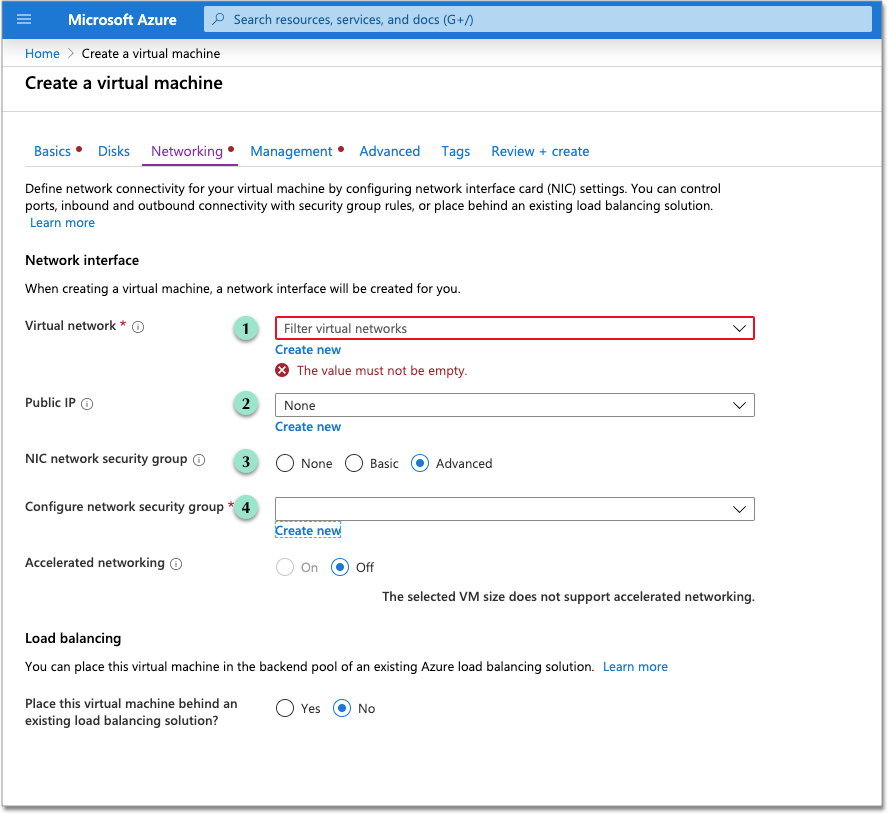
1
Find your company’s virtual network and select it, or create new.
2
Find your company’s public IP, or create new.
3
Select Advanced for NIC network security group.
4
After you select Advanced, the Configure network security group option appears. Find your company’s security group, or create new. When creating your security group, ensure that the required ports are open. Refer to the minimum port requirements.
-
Under Management, configure your monitoring and management preferences. If you have no preferences, you can leave them at their default settings.
-
Under Advanced, configure your advanced settings preferences. If you have no preferences, you can leave them at their default settings.
-
Under Tags, tag your virtual machine with a human-readable string to help you identify it.
-
Click Review + create in the bottom left corner of your screen.
-
Review your changes, and click create. Azure does the final validation check.
Minimum required ports
Open the following ports between the User/ETL server and ThoughtSpot nodes. This ensures that the ThoughtSpot processes do not get blocked.
The minimum ports needed are:
| Port | Protocol | Service |
|---|---|---|
22 |
SSH |
Secure Shell access |
443 |
HTTPS |
Secure Web access |
12345 |
TCP |
ODBC and JDBC drivers access |
| Nodes purchased from Azure must be reachable to each other so that they can communicate and form a distributed environment. ThoughtSpot requires that these ports be accessible between nodes within a cluster. Use your discretion about whether to restrict public access or not for all nodes and all ports. |
Refer to network policies for more information.
Prepare for starting up ThoughtSpot
Prerequisite: To log in to the VM, you need the private key that is available in the image. You can obtain this from your ThoughtSpot contact.
-
Obtain the VM’s public and private IP addresses.
-
To see the public IP, click the VM name link. This will show the public IP of the VM.
-
To see the private IP, select more services from the Microsoft Azure homepage. Select Networking from the list on the left side of the screen.
-
-
In a terminal application, connect to the VM through SSH. Enter the private key provided for the admin user.
-
You must file a support ticket to obtain this private key; it is necessary for the first login.
-
This key is different from the credentials, or the public keys supplied in earlier steps, which do not work in this context.
$ ssh -i <path_to_private_key> admin@<public_VM_IP>
-
-
Update the password for both the
adminand thethoughtspotusers.The command prompts you to type in a new password, and then to confirm the password.
$ sudo passwd admin
Changing password for user admin
$ sudo passwd thoughtspot
Changing password for user thoughtspot
If you do not change the password, you cannot log back into your Azure VMs. Your private key does not work after initial installation. -
Update the file
/etc/hostswith all the node IP addresses for the other VMs that will be part of the ThoughtSpot cluster.
Verify storage disks
Verify the existence of your data disks, created in Step 4 of create an instance, by issuing lsblk in your terminal application:
$ lsblkYour result may look something like the following:
   NAME    MAJ:MIN RM  SIZE RO TYPE MOUNTPOINT
   fd0       2:0    1    4K  0 disk
   sda       8:0    0  200G  0 disk
   ├─sda1    8:1    0    1G  0 part /mntboot
   ├─sda2    8:2    0   20G  0 part /
   ├─sda3    8:3    0   20G  0 part /update
   └─sda4    8:4    0  159G  0 part /export
   sdb       8:16   0    1T  0 disk
   └─sb1     8:17   0    1T  0 part /mnt/resource
   sdc       8:32   0    1T  0 disk
   sdd       8:48   0    1T  0 disk
   sr0      11:0    1  628K  0 rom
-
Unmount the temporary disk by issuing the following command:
$ sudo umount /mnt/resourceThe /mnt/resourcedisk, which is mounted on the/dev/sdbdisk, is temporary. Any data on it will be wiped if the VM is shut down. You must unmount the/mnt/resourcedisk. -
Prepare the disks /dev/sdc and /dev/sdd for ThoughtSpot by issuing the following command:
Do not use the disk /dev/sdb(the ephemeral disk). Any data on it will be wiped if the VM is shut down.$ sudo /usr/local/scaligent/bin/prepare_disks.sh /dev/sdc /dev/sdd -
Check the disks' status by issuing the following command:
$ df -h -
Repeat the steps in this section for each node in your cluster.
Create network support settings
| All changes in this section must be re-applied each time after a cluster is created or updated. If these changes are not present, a reboot of the VMs will not have network access. So when updating these files, keep a backup to copy after any subsequent cluster creation or update. |
-
SSH into one of your VMs, using the new password you created for the admin user in step two of Prepare for starting up ThoughtSpot.
ssh admin@<VM-IP> -
Update the VM’s hostname:
$ sudo hostnamectl set-hostname <HOSTNAME>If you are using a static name, you can issue:
$ sudo hostnamectl set-hostname <HOSTNAME> --static -
Update
/etc/sysconfig/network-scripts/ifcfg-eth0with the IP and hostname:$ sudo vi /etc/sysconfig/network-scripts/ifcfg-eth0 DEVICE=eth0 ONBOOT=yes BOOTPROTO=dhcp HWADDR=<Add eth0 MAC> TYPE=Ethernet USERCTL=no PEERDNS=yes IPV6INIT=no -
Modify permissions for
/etc/sysconfig/network-scripts/ifcfg-eth0. This command allows the root user to retain read/write permissions, and grants read-only permissions to other users.$ sudo chmod 644 /etc/sysconfig/network-scripts/ifcfg-eth0 -
Repeat this process (steps 1 through 4) for each node.
Additional resources
As you develop your expertise in Azure VM creation, we recommend the following ThoughtSpot U course:
See other training resources at ThoughtSpot U


