Managing authentication with OIDC using IAMv2
ThoughtSpot integrates with OpenID Connect (OIDC) for authentication.
OIDC SSO authentication
ThoughtSpot supports the Single Sign-On (SSO) authentication method with the OpenID Connect (OIDC) authentication. With OIDC, users can authenticate to the identity provider (IdP) at your organization to access the ThoughtSpot application, or the embedded ThoughtSpot content in an external web application. It also allows them to navigate seamlessly between different application interfaces with their existing credentials.
By default, local authentication is enabled. After you configure OIDC authentication, you can configure the ThoughtSpot login page to default to SSO login by contacting ThoughtSpot Support. Note that if you change the default login experience to SSO, local users cannot authenticate.
Use this article to learn how to configure an OIDC integration with an external IdP.
OIDC authentication with multiple IdPs
You may have multiple groups of users who need to sign in to ThoughtSpot but are managed by separate IdPs. You can configure SAML SSO login for more than one Identity Provider. To configure this, contact ThoughtSpot Support.
About OIDC authentication
OIDC authentication involves several entities and components.
OIDC entities
OIDC is an json standard that allows secure exchange of user authentication and authorization data between trusted partners. It enables the following entities to exchange identity, authentication, and authorization information:
-
Identity Provider (IdP)
The Identity Management system that maintains the user identity information. IdP acts as an authority and authenticates SSO users. ThoughtSpot supports OIDC authentication framework with popular Identity Providers such as Google, Amazon, and Microsoft. This is not an exhaustive list. To determine if ThoughtSpot supports your preferred IdP, talk to your ThoughtSpot contact.
After you complete the configuration in ThoughtSpot that this article describes, refer to your Identity Provider’s documentation for specific information on setting up authentications with that IdP.
-
Service Provider (SP)
The provider of a business function or application service; for example ThoughtSpot. The SP relies on the IdP to authenticate users before allowing access to its services.
-
Federated user
A user whose identity information is managed by the IdP. The federated users have SSO credentials and authenticate to IdP to access various application services.
Enable OIDC authentication
You need admin privileges to enable OIDC authentication.
-
Configure the ThoughtSpot application instance on your IdP server.
-
For the Single sign on URL and the Audience URI in your IdP provider, you must enter dummy values. You return to these fields after completing OIDC configuration in ThoughtSpot.
-
Make a note of the names you use when you map your IdP’s version of the
mailandusernameattributes. You must use these names to map the email and username attribute in ThoughtSpot later. Thedisplay nameattribute is optional; if you would like to map it as well, make a note of the name you use.
-
-
Sign in to your ThoughtSpot application instance.
-
From the top navigation bar, select the Admin tab.
-
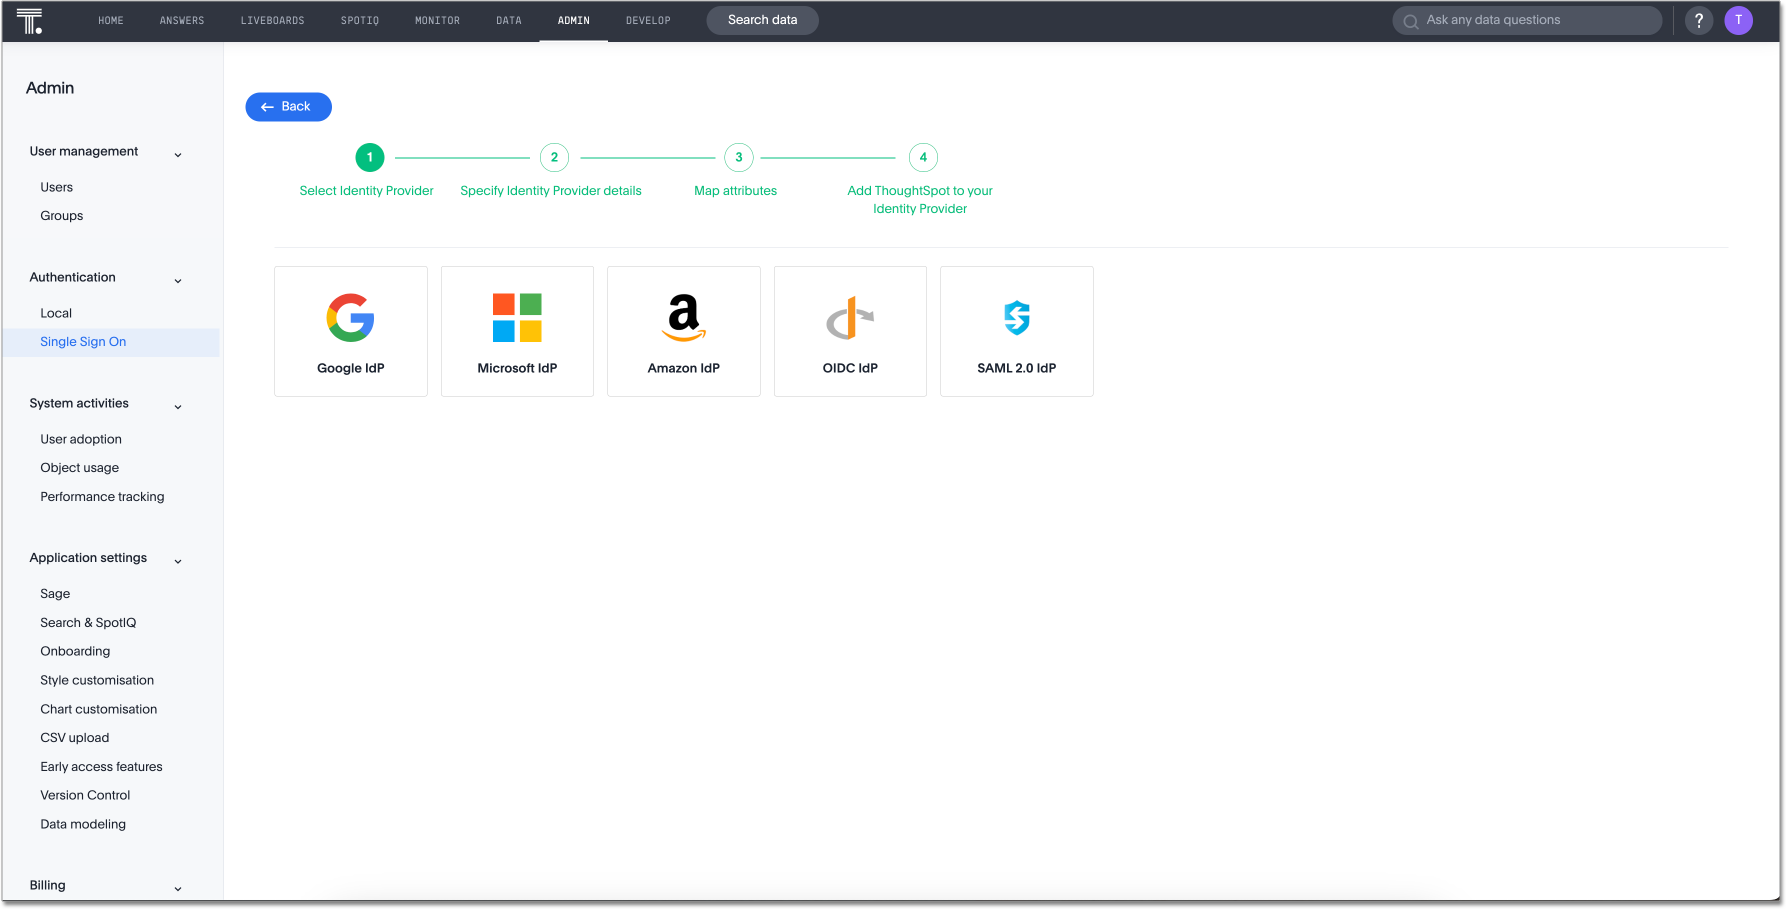
Expand Authentication and select Identity Providers from the side navigation bar.
-
Click the + Add Identity Provider button.
-
Select the tile that corresponds to your identity provider. The available options are Google IdP, Microsoft IdP, or Amazon IdP. If you are connecting to another OIDC IdP, select the OIDC IdP tile.

-
Under Specify identity provider details, fill in the following parameters:
- Connection name
-
Provide a name for the configuration of the connection to your identity provider. This appears as the connection name on the Admin Console.
- Client Secret
-
Enter the Client Secret associated with the Client ID for secure communication.
- Client Id
-
Enter the Client ID provided by the OIDC IdP when you registered your application.
- Scopes
-
Define the OAuth 2.0 scopes required for authentication and authorization. Separate multiple scopes with spaces.
The following fields only appear if you selected OIDC IdP in Step 6:
- Authorization Endpoint
-
URL where users authenticate and grant permissions to access protected resources.
- Token Endpoint
-
URL where authorization codes are exchanged for access tokens and ID tokens.
- Issuer
-
Typically represented as a URL, that issues identity tokens and validates user authentication.
- User Info Endpoint
-
URL for retrieving additional user information after authentication, providing user details.
- Jwks Endpoint
-
URL for obtaining a JSON Web Key Set, used to verify the authenticity of tokens issued by the IdP.
-
Enable JIT user creation to automatically create user accounts if they don’t exist in the system during authentication, by toggling on Auto create user (JIT).
-
Click Continue.
-
Under Map attributes, map the following ThoughtSpot user attribute to the corresponding identity provider’s OIDC attribute assertion:
- Username
-
Map the ThoughtSpot username to the corresponding username from the IdP.
-
Map the email to the email associated with the user in the IdP.
- Display name
-
Enter the display name.
- roles
-
Enter the roles associated with the user.
-
Click Save and continue.
-
Under Add ThoughtSpot to your identity provider, collect the information required to add the ThoughtSpot application to your IDP. The Callback URI is required to add the ThoughtSpot application to your IdP.
-
To copy and paste the Callback URI directly from this page, select the copy icons next to the parameter, and paste the information into a separate document.
-
-
Click Enable to enable the connection immediately, or Later to complete the configuration without enabling the connection. Your IdP is now configured in ThoughtSpot. You must also add the ThoughtSpot application to your IdP.


