Salesforce and ThoughtSpot integration setup guide
Follow these steps to configure your integration between Salesforce and ThoughtSpot, including all supported authentication configurations and required Content Security Policy (CSP) settings.
Prerequisites
For Salesforce, this setup requires:
-
Salesforce admin access.
-
A Salesforce domain (for example,
mydomain.my.salesforce.com). -
Access to manage connected apps.
Alternatively, you can create a new developer edition account.
For ThoughtSpot, this setup requires:
-
Admin access to ThoughtSpot.
Configure your Content Security Policy (CSP)
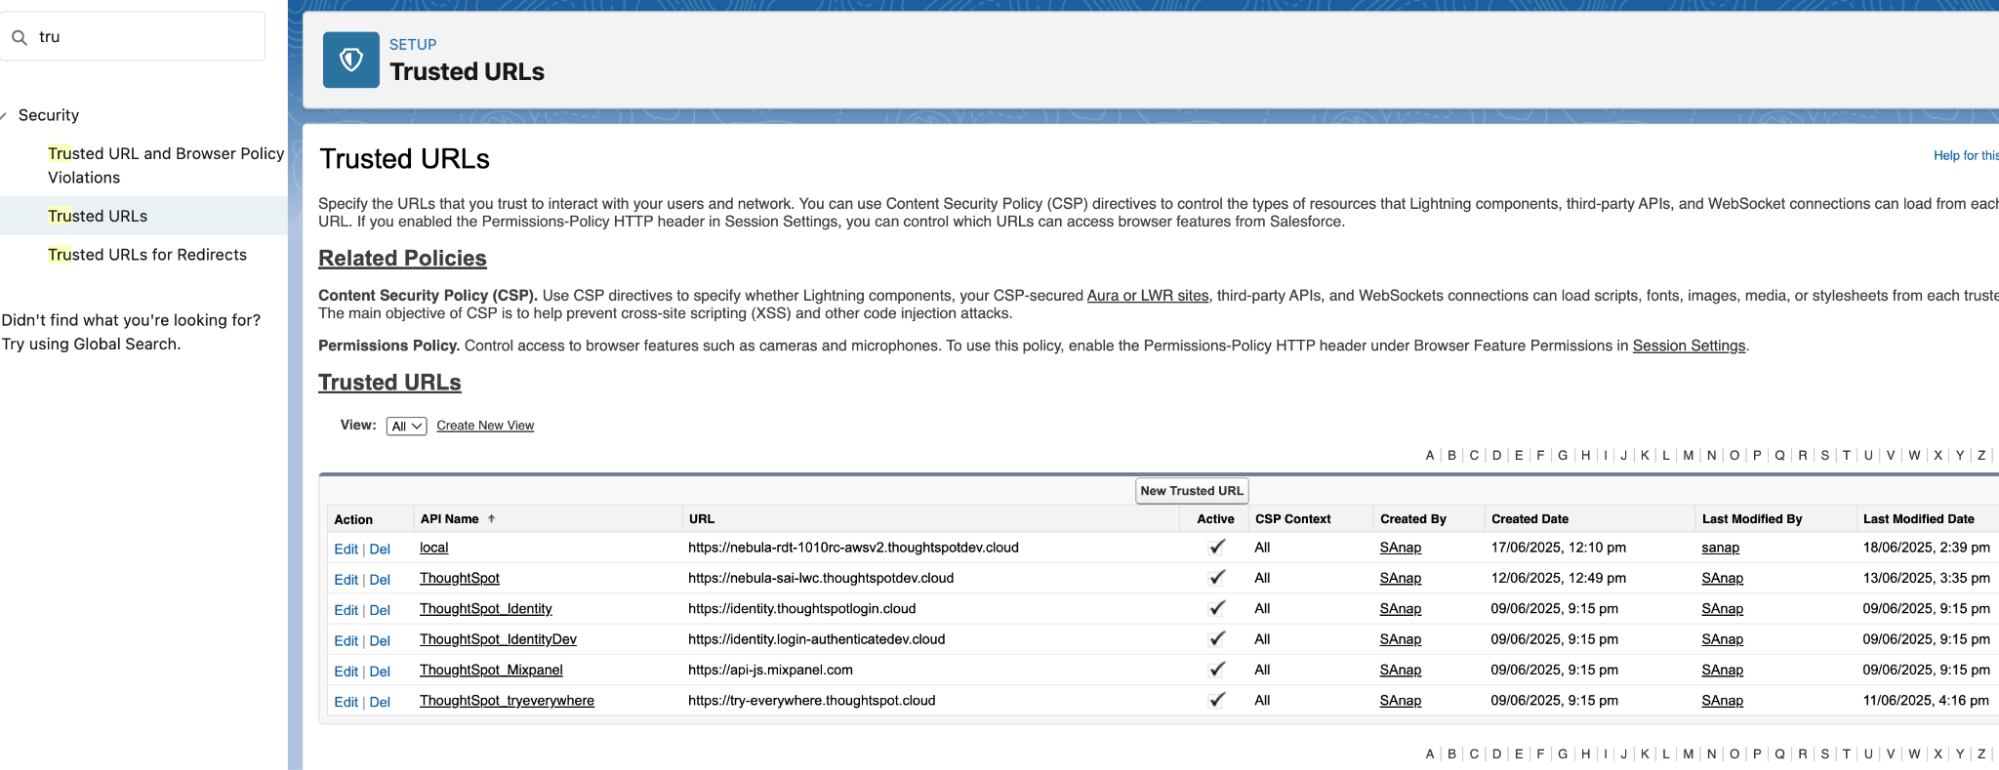
Trusted URLs
-
From Setup, in the Quick Find box, search for and select Trusted URLs.
-
Add the required trusted sites:
-
ThoughtSpot
-
Trusted Site Name: ThoughtSpot
-
Trusted Site URL: `https://<your-thoughtspot-domain>
-
Allow all CSP Directives
-
-
Mixpanel
-
Trusted Site Name: ThoughtSpot_Mixpanel
-
Trusted Site URL:
https://api-js.mixpanel.com -
Allow all CSP directives
-
-
Identity Service (environment-specific ThoughtSpot Identity URL)
-
Trusted Site Name: ThoughtSpot_Identity
-
Trusted Site URL: (choose based on your environment
-
Allow all CSP Directives
-
-
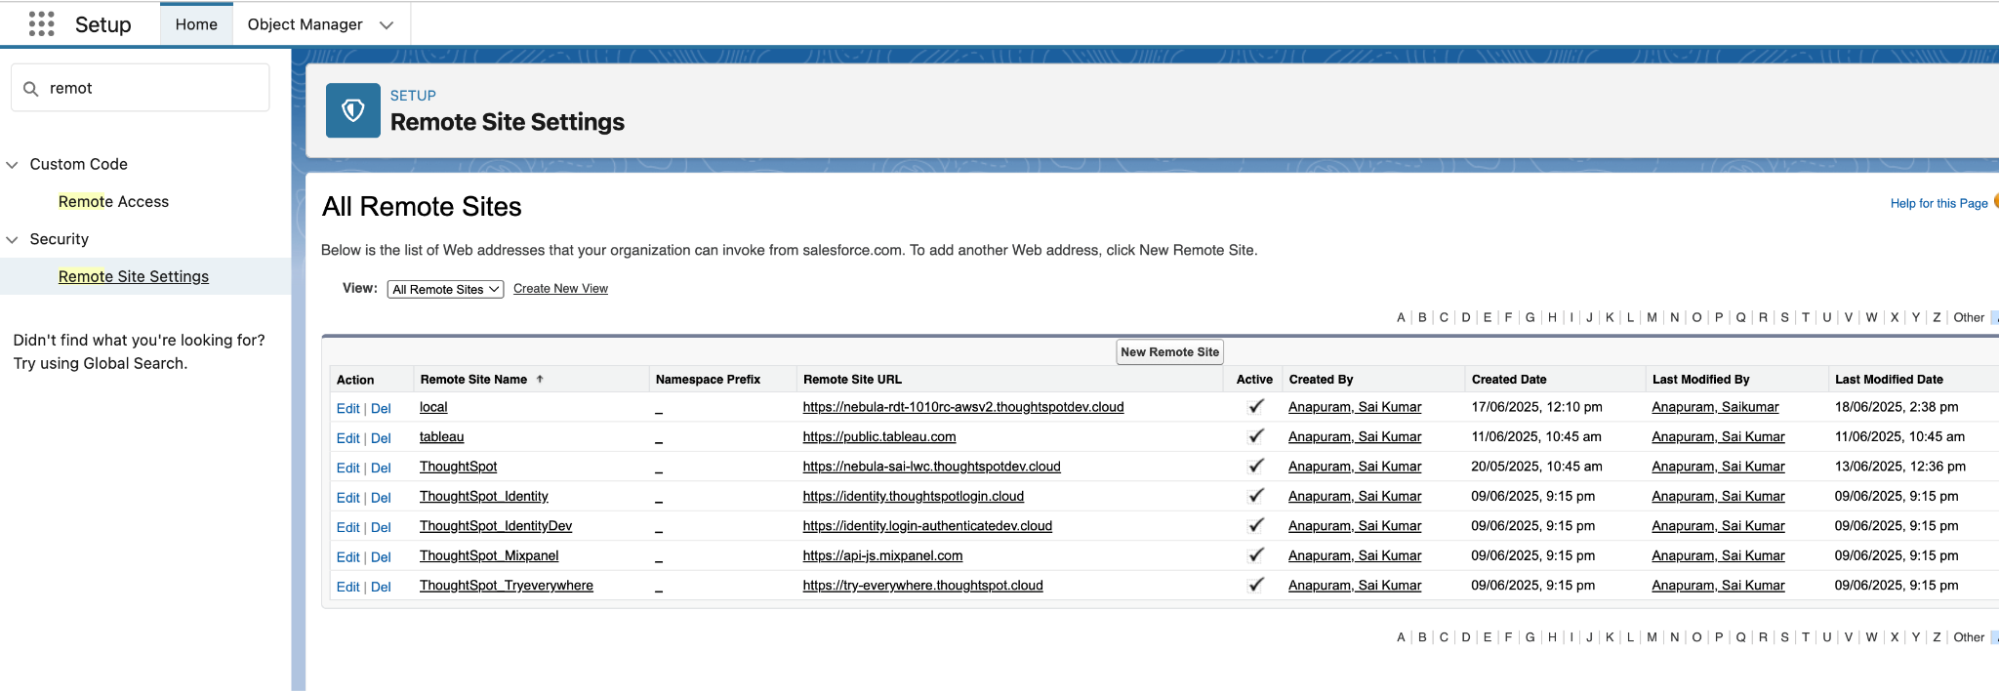
Remote site settings
-
From Setup, in the Quick Find box, search for and select Remote Site Settings.
-
Search for a credential named ‘ThoughtSpot’. If you find it, update the URL with your ThoughtSpot instance URL. If you don’t find it, create a new one.
-
Repeat the step above for ‘Mixpanel’ and ‘Identity Service’ credentials.
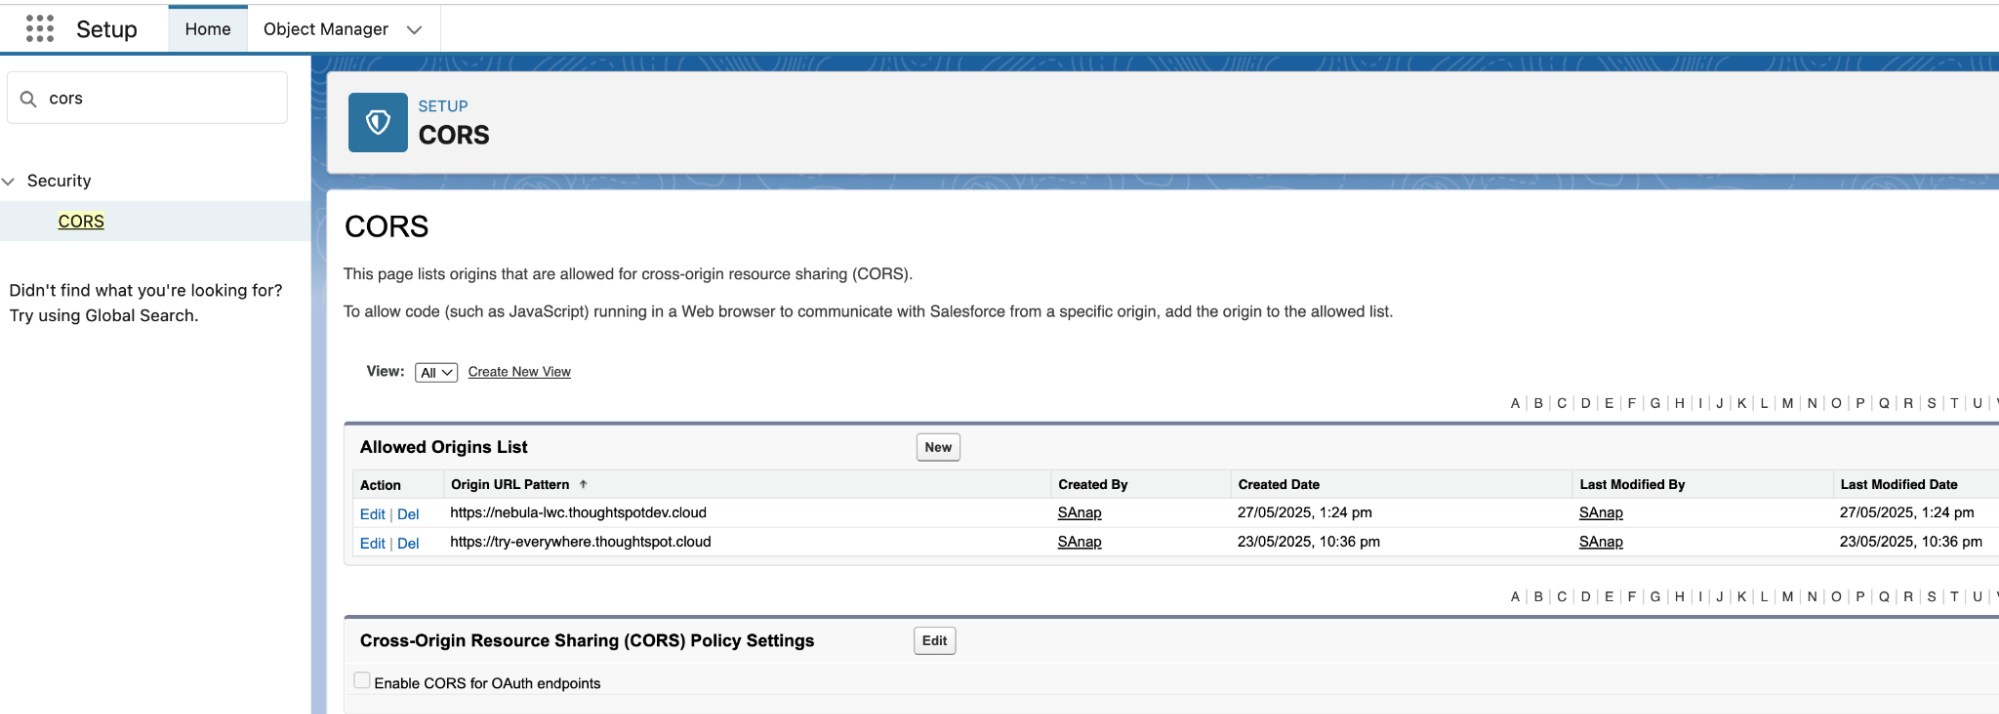
CORS
-
From Setup, in the Quick Find box, search for and select CORS.
-
Add the required sites as ThoughtSpot URL, Mixpanel URL, and Identity Service URL.
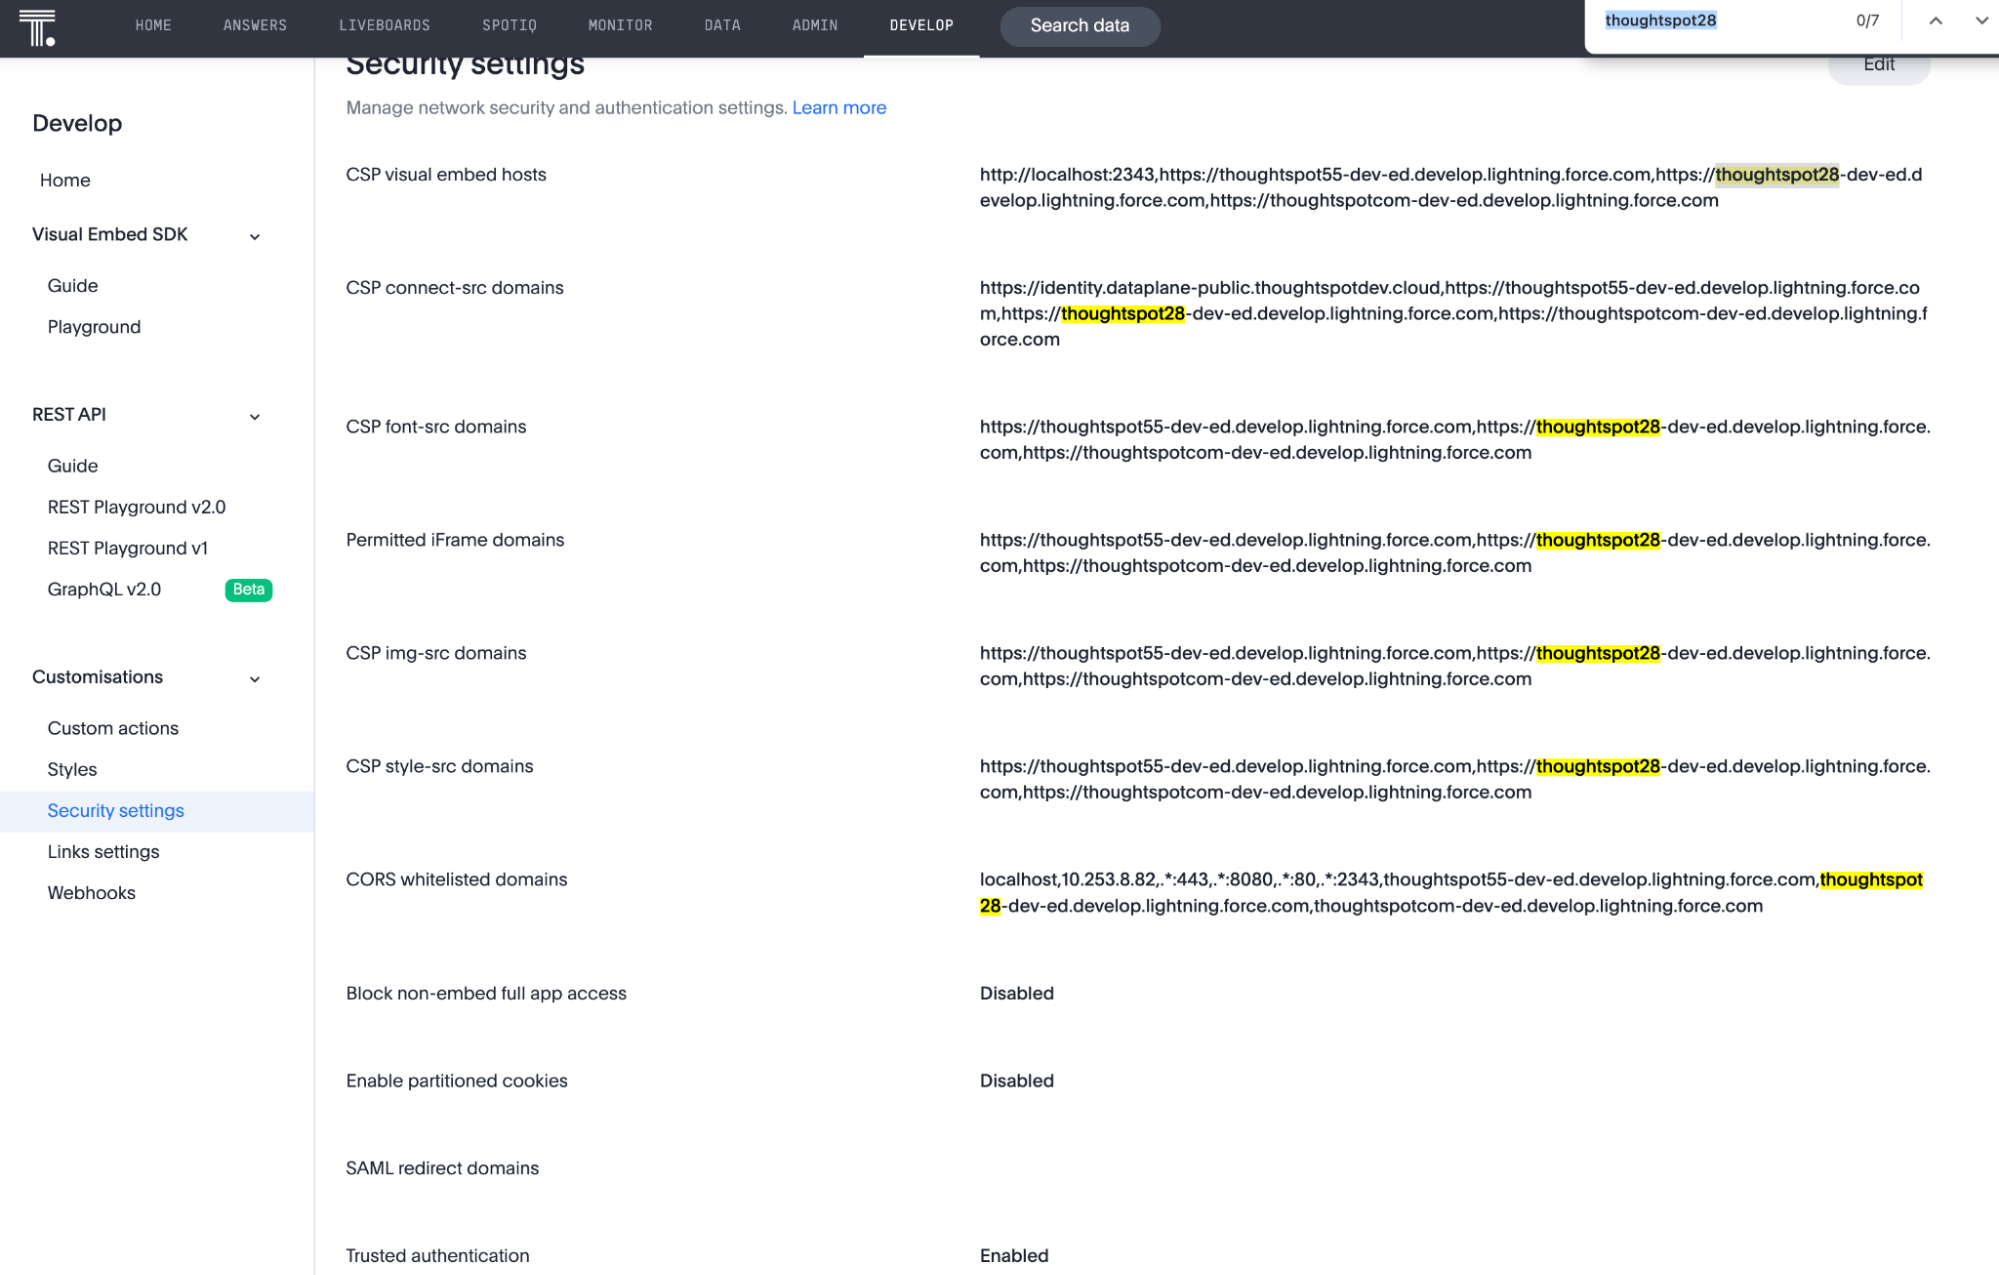
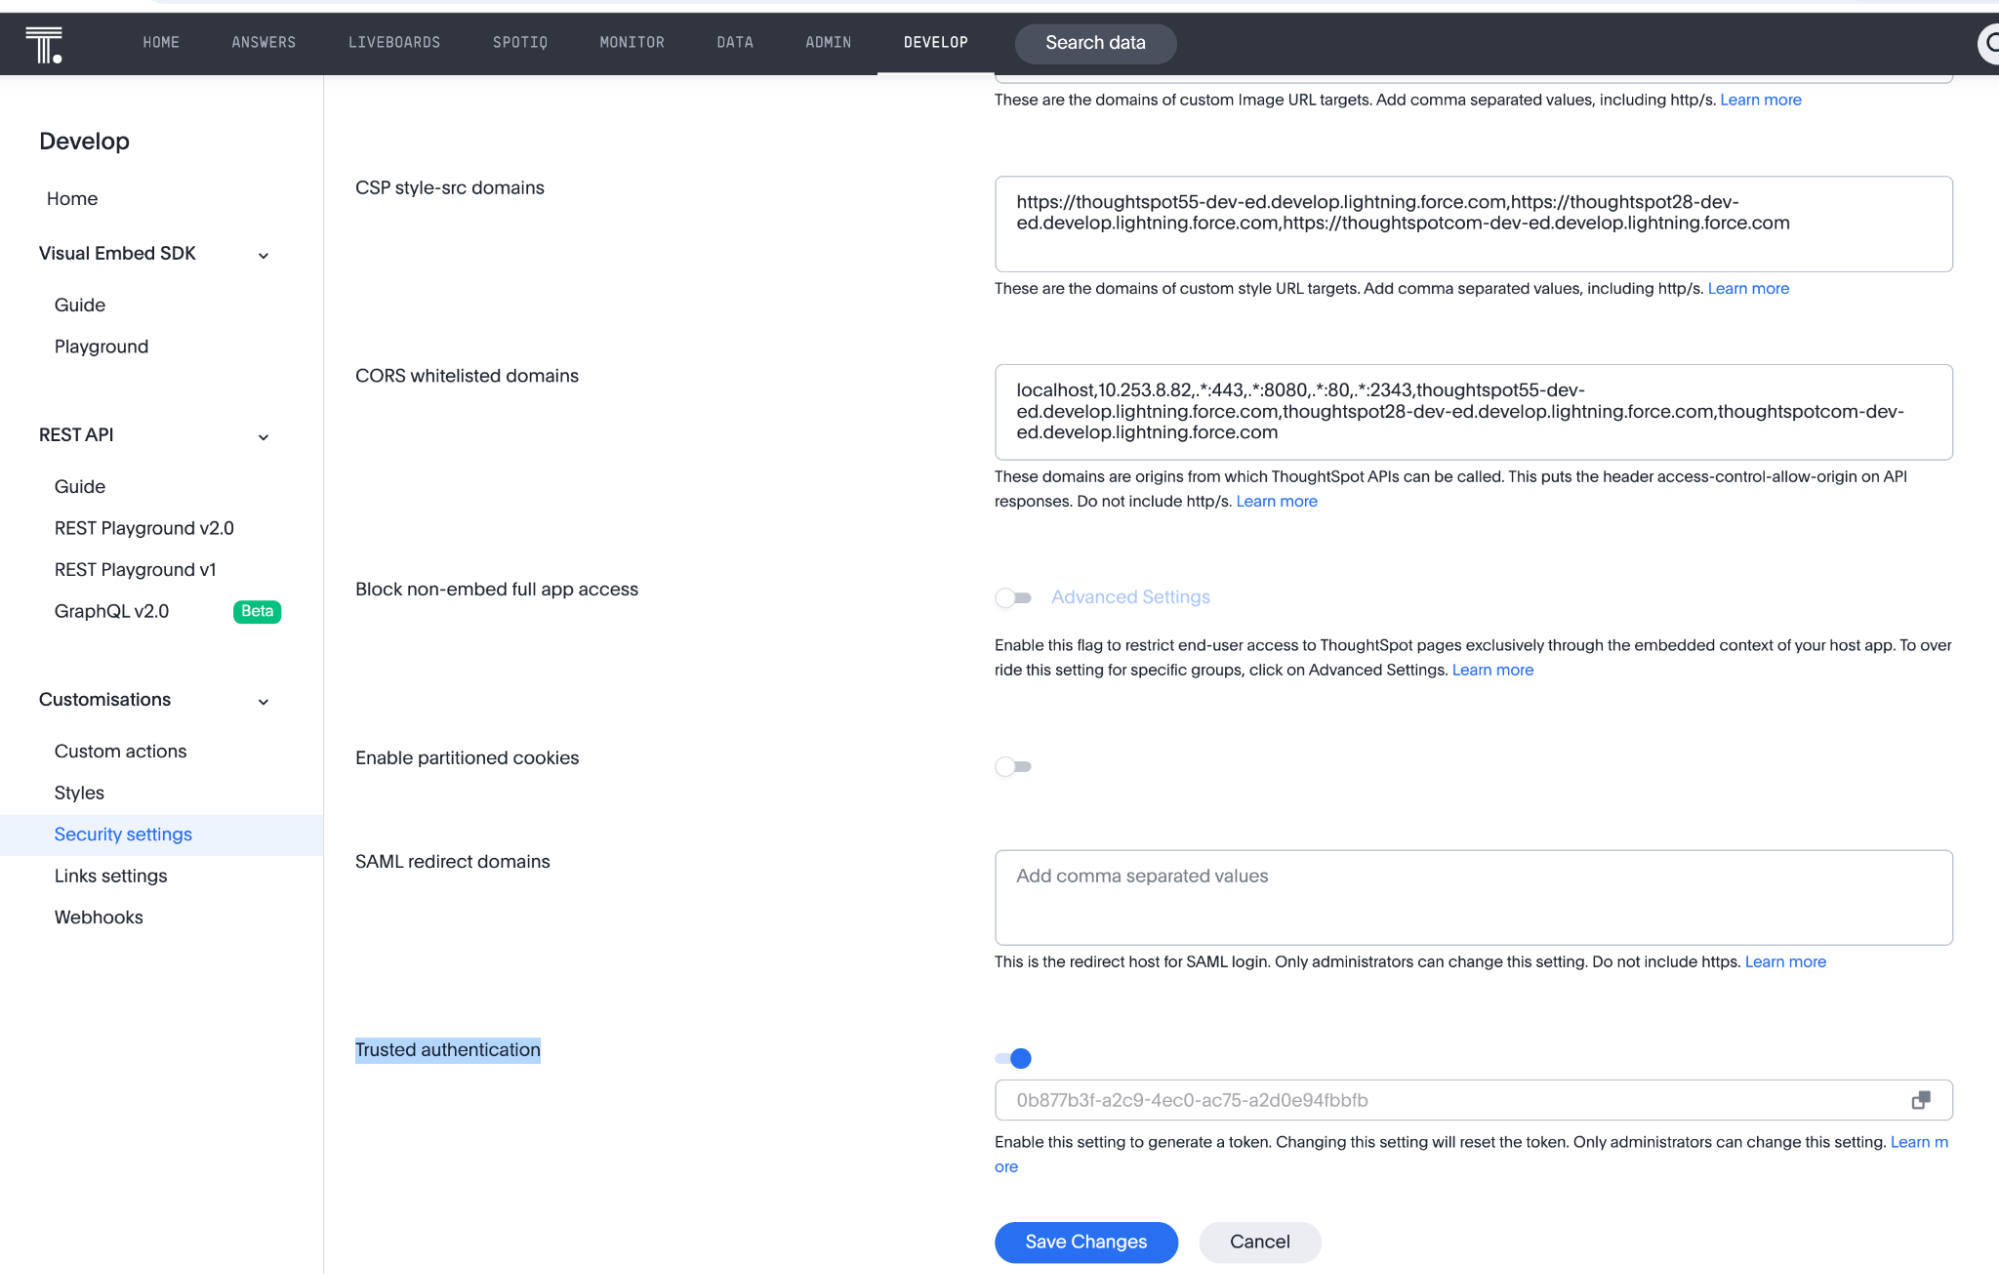
ThoughtSpot security settings
-
Navigate to the ThoughtSpot Develop tab and click Security settings.
-
Click Edit. Add your Salesforce domain URL to:
-
CSP visual embed hosts
-
CSP connect-src domains
-
CSP font-src domains
-
Permitted iFrame domains
-
CSP img-src domains
-
SCP style-src domains
-
CORS whitelisted domains
-
Configure your User Access Policy in Salesforce
User Access Policies allow automated assignment of permission sets based on defined user attributes such as profile, role, or status. This helps streamline access control for integrations like ThoughtSpot.
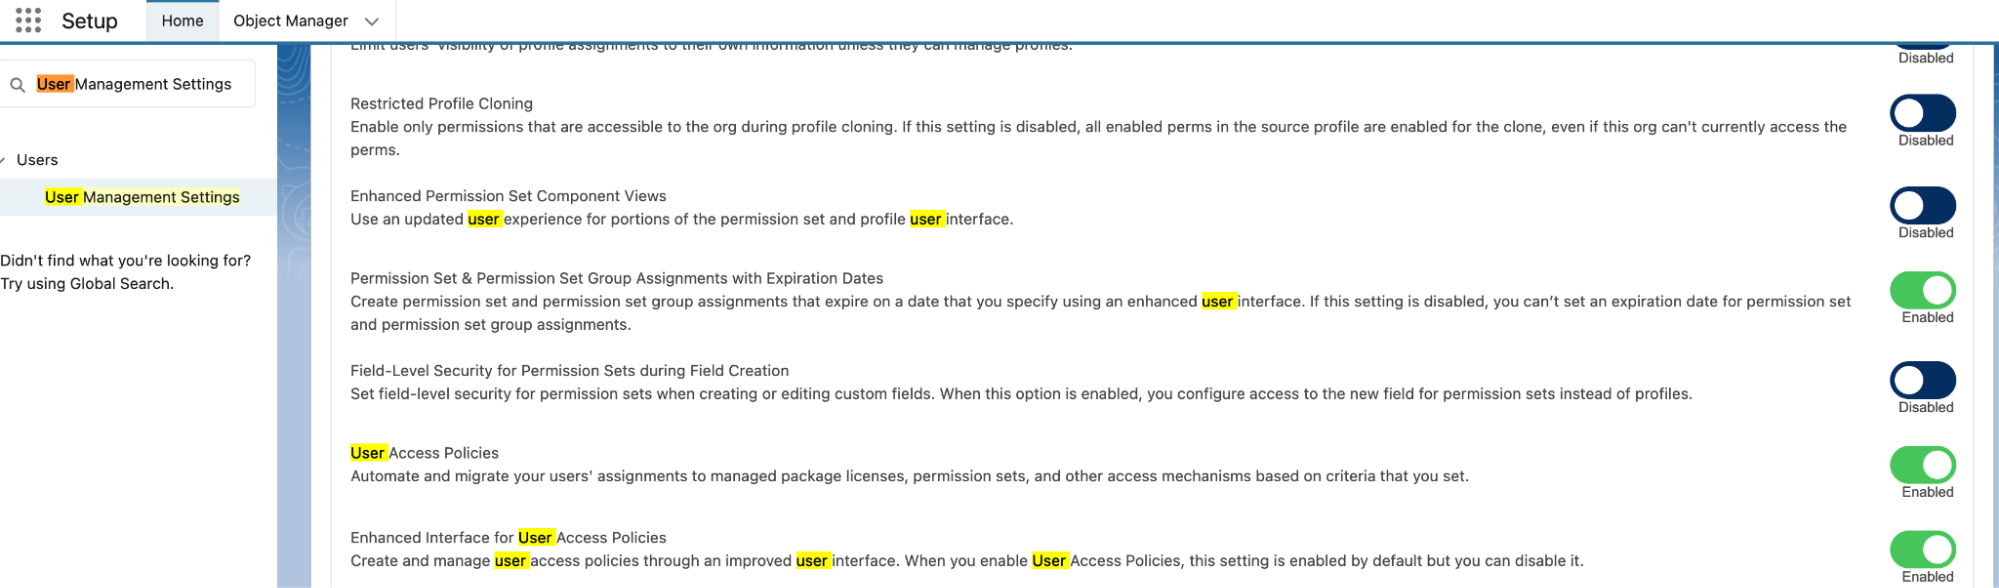
Enable User Access Policy
-
Navigate to Setup in Salesforce. In the Quick Find box, search for User management settings.
-
Scroll down to locate the User Access Policy option. Ensure the policy is set to enabled.
-
Click Save if you made any changes.
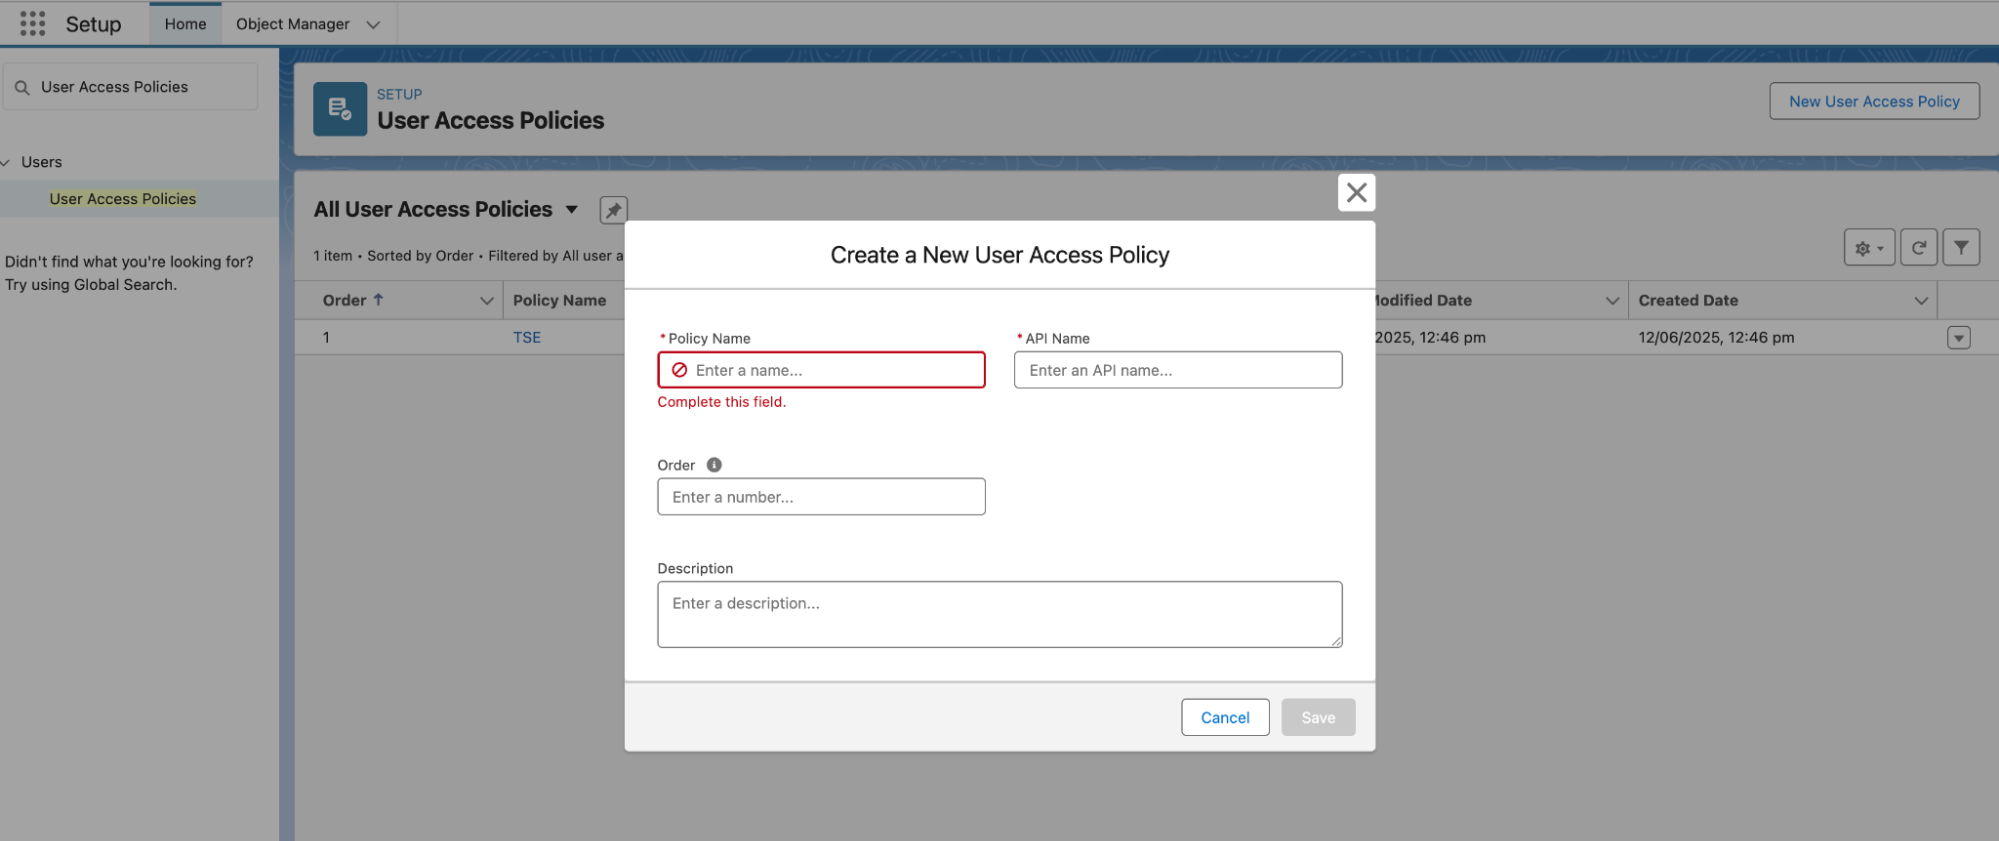
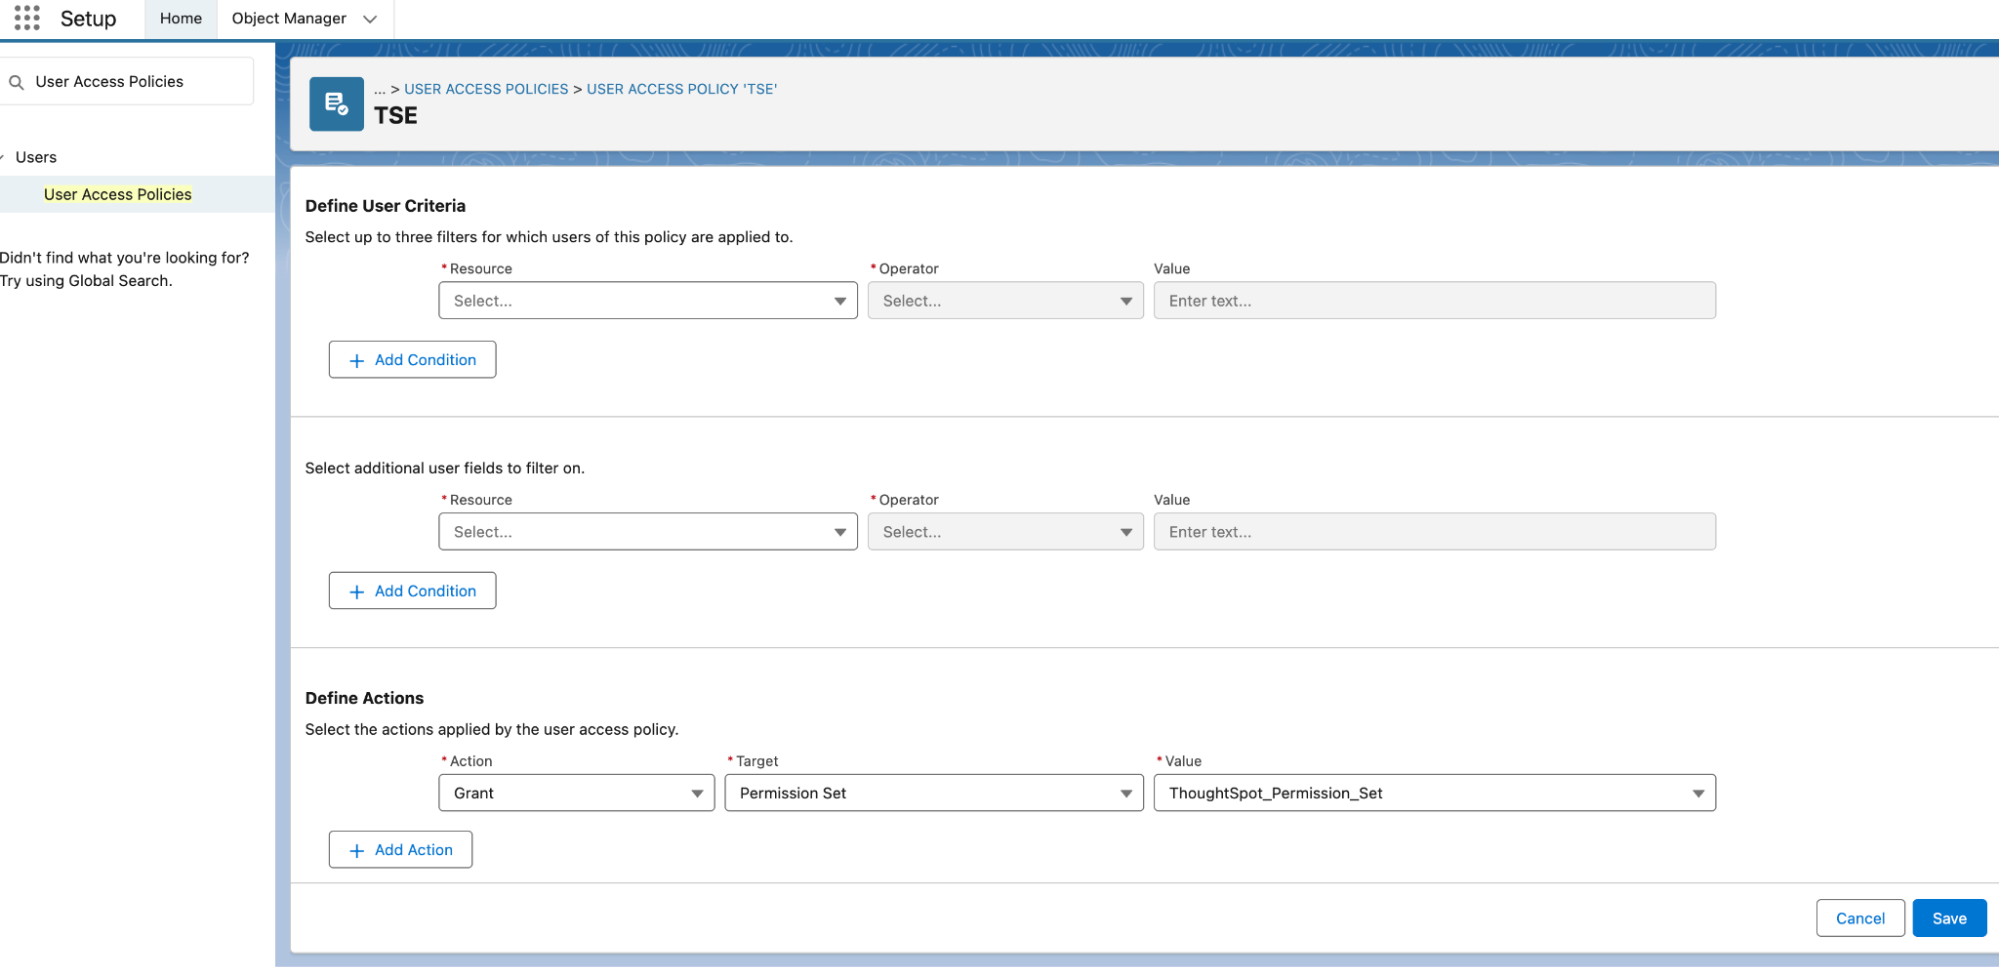
Create a new User Access Policy
-
From Setup, go to the Quick Find box. Search for User Access Policies.
-
Click New User Access Policy.
-
Provide a policy name (for example, ‘ThoughtSpot Access Policy’) and description (optional but recommended).
-
Click Save.
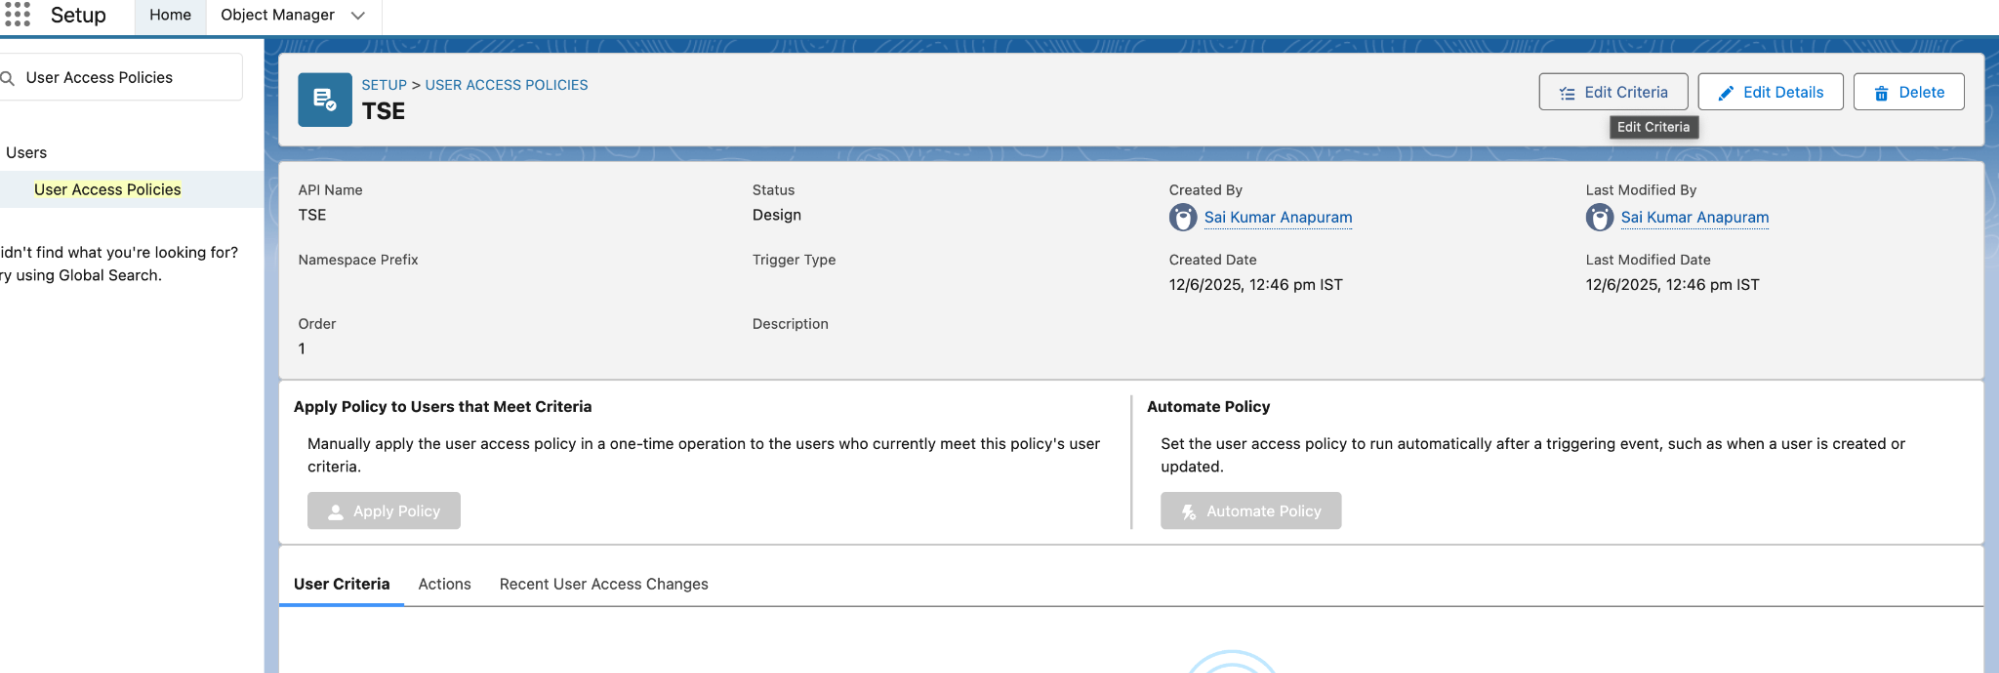
Define criteria for the policy
-
On the newly created policy page, click Edit Criteria in the top right corner.
-
Under User criteria, define filters such as:
-
Profile (your desired profile)
-
Role (your desired role)
-
(Optional) Set Active to true to include only active users
-
| These filters ensure only relevant users are automatically granted the appropriate permission set. |
Configure basic authentication
To configure basic authentication, you don’t need any additional setup or configuration.
Configure trusted authentication
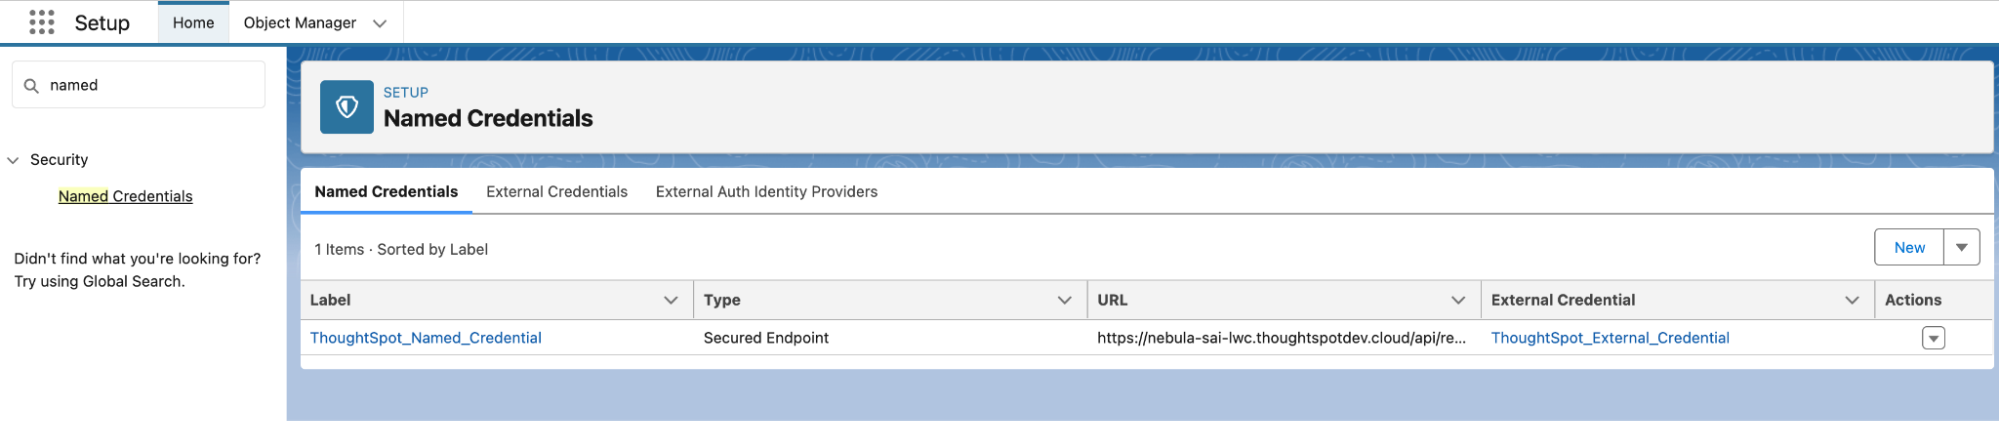
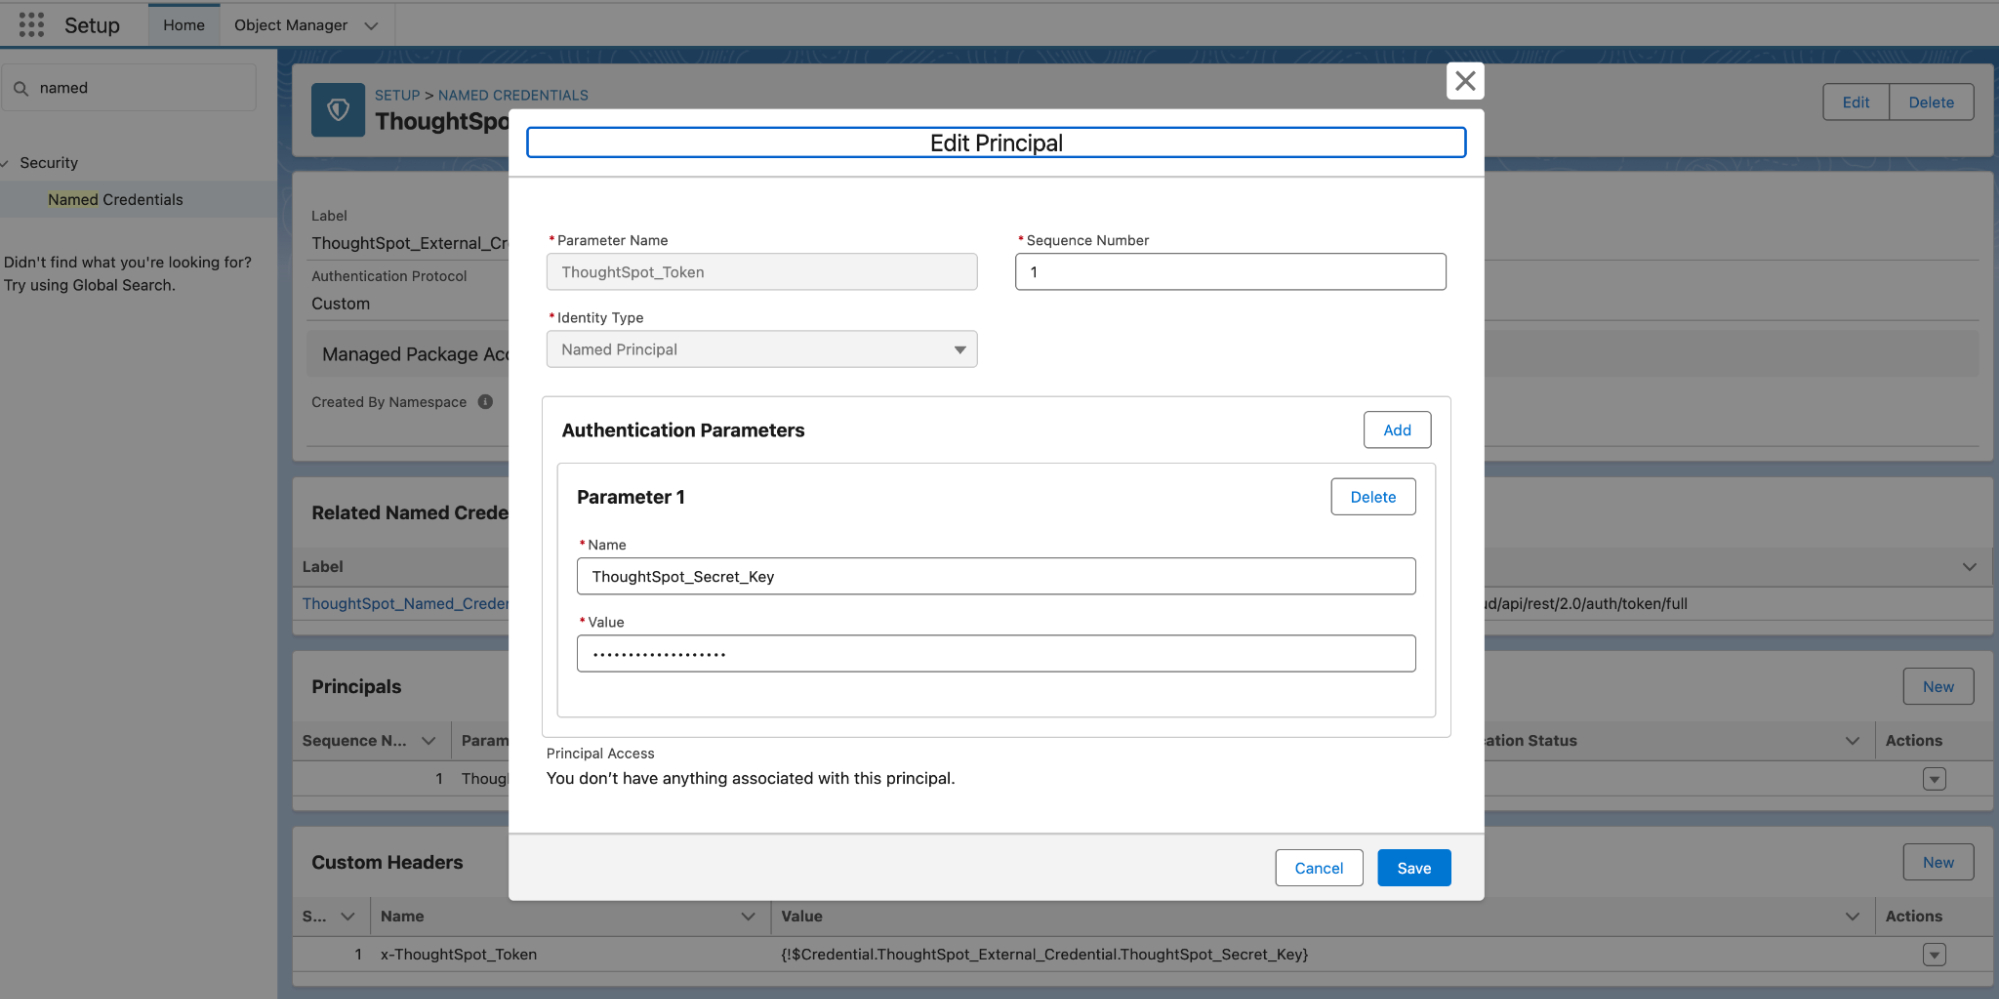
Named credentials
-
In Setup, go to the Quick Find box, and search for and select Named Credentials.
-
Click on Edit under the Actions menu for ThoughtSpot_Named_Credential and replace
yourTSurlin the URL with the actual ThoughtSpot instance URL and save.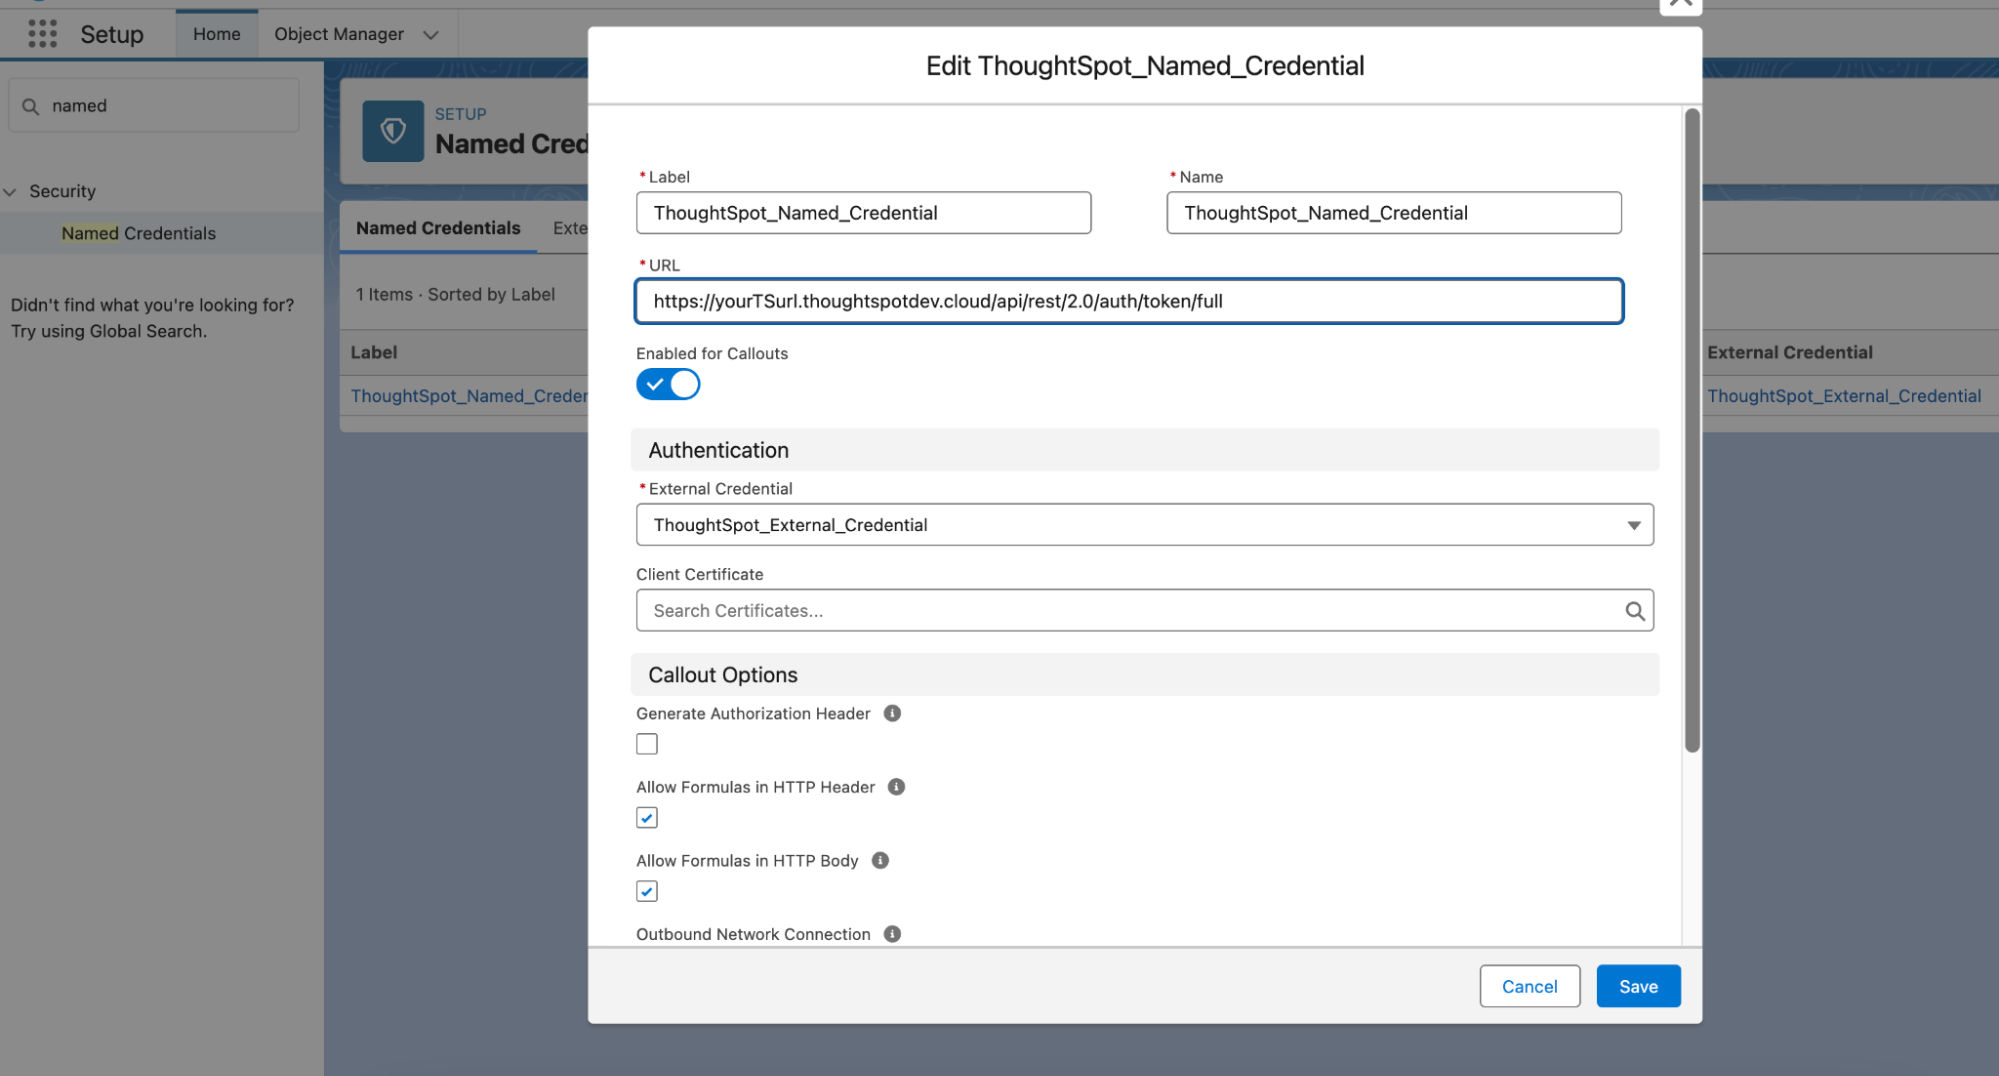
-
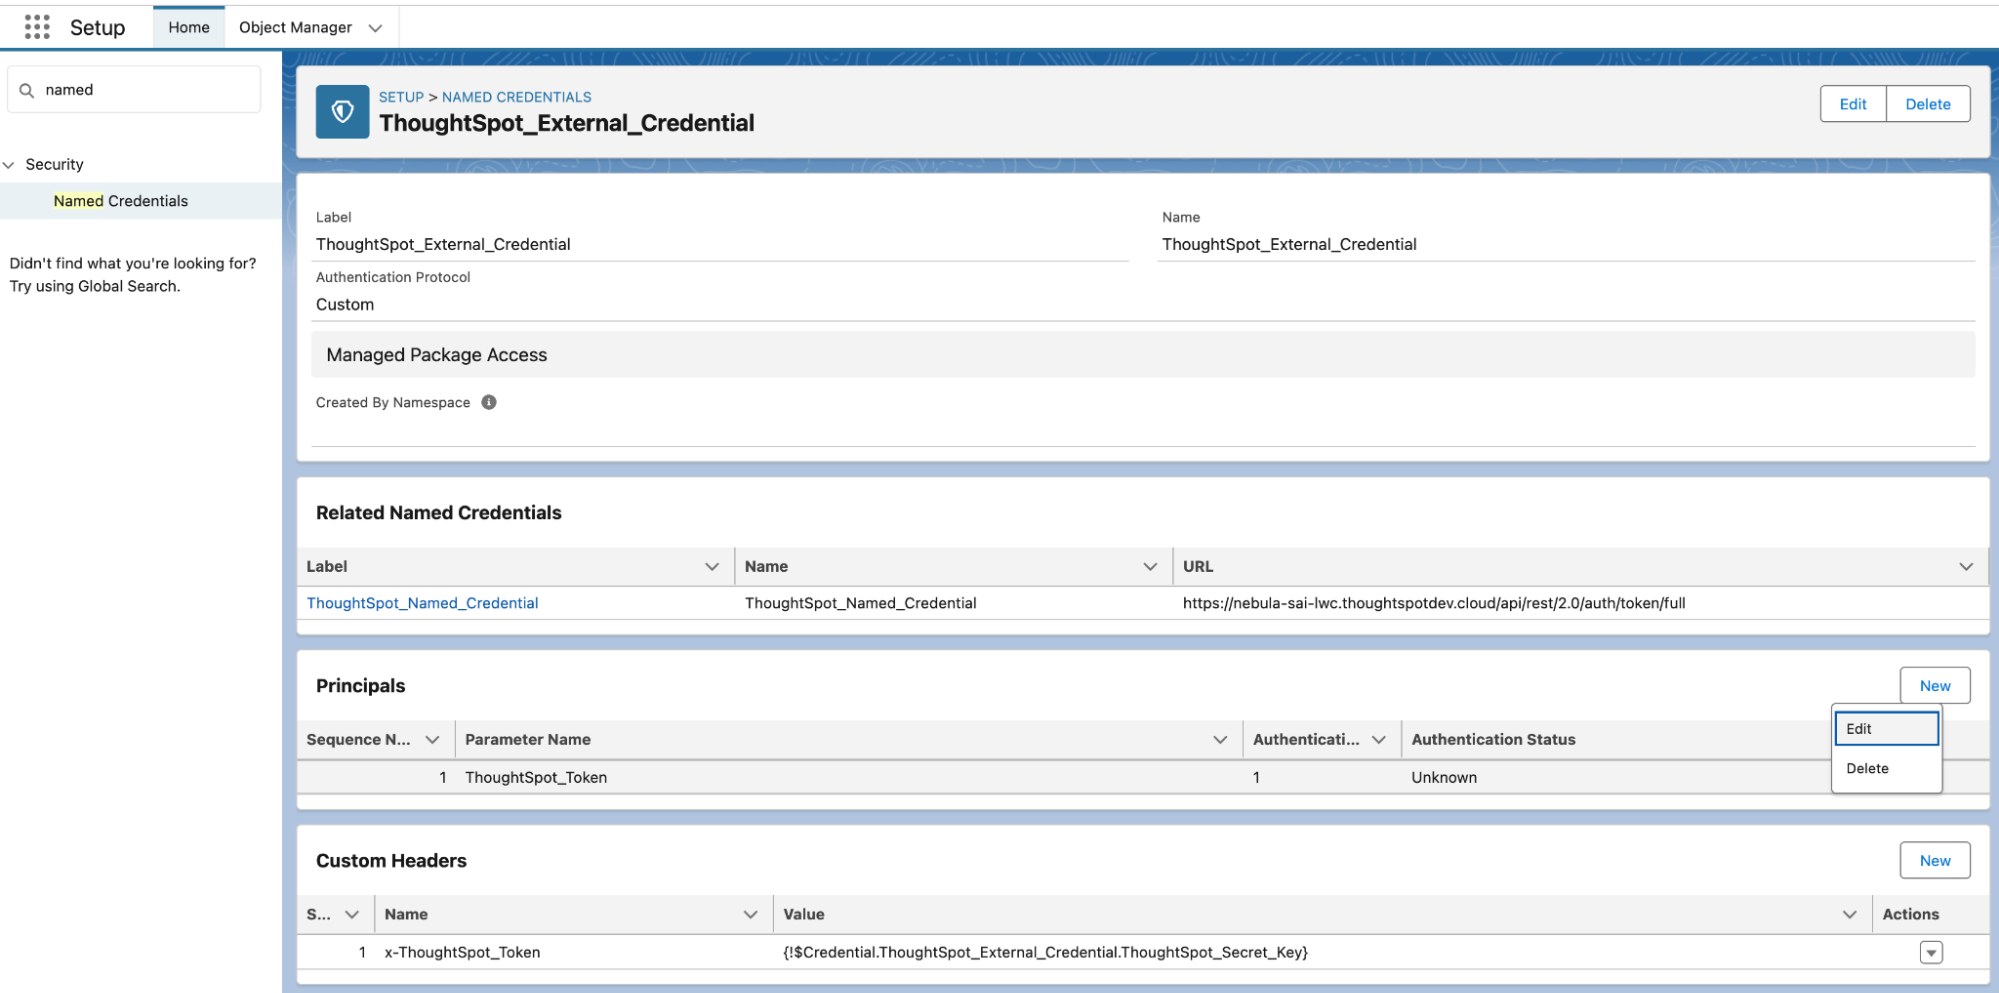
Click on the external credential tab and click on ThoughtSpot_External_Credential, navigate to the ‘Principals’ section, then click Edit under the Actions menu.

-
In ThoughtSpot, navigate to Develop > Customizations > Security settings to get the trusted authentication token.
-
In Salesforce, add an authentication parameter with the name ThoughtSpot_Secret_Key and set its value to the token you got from the above step.
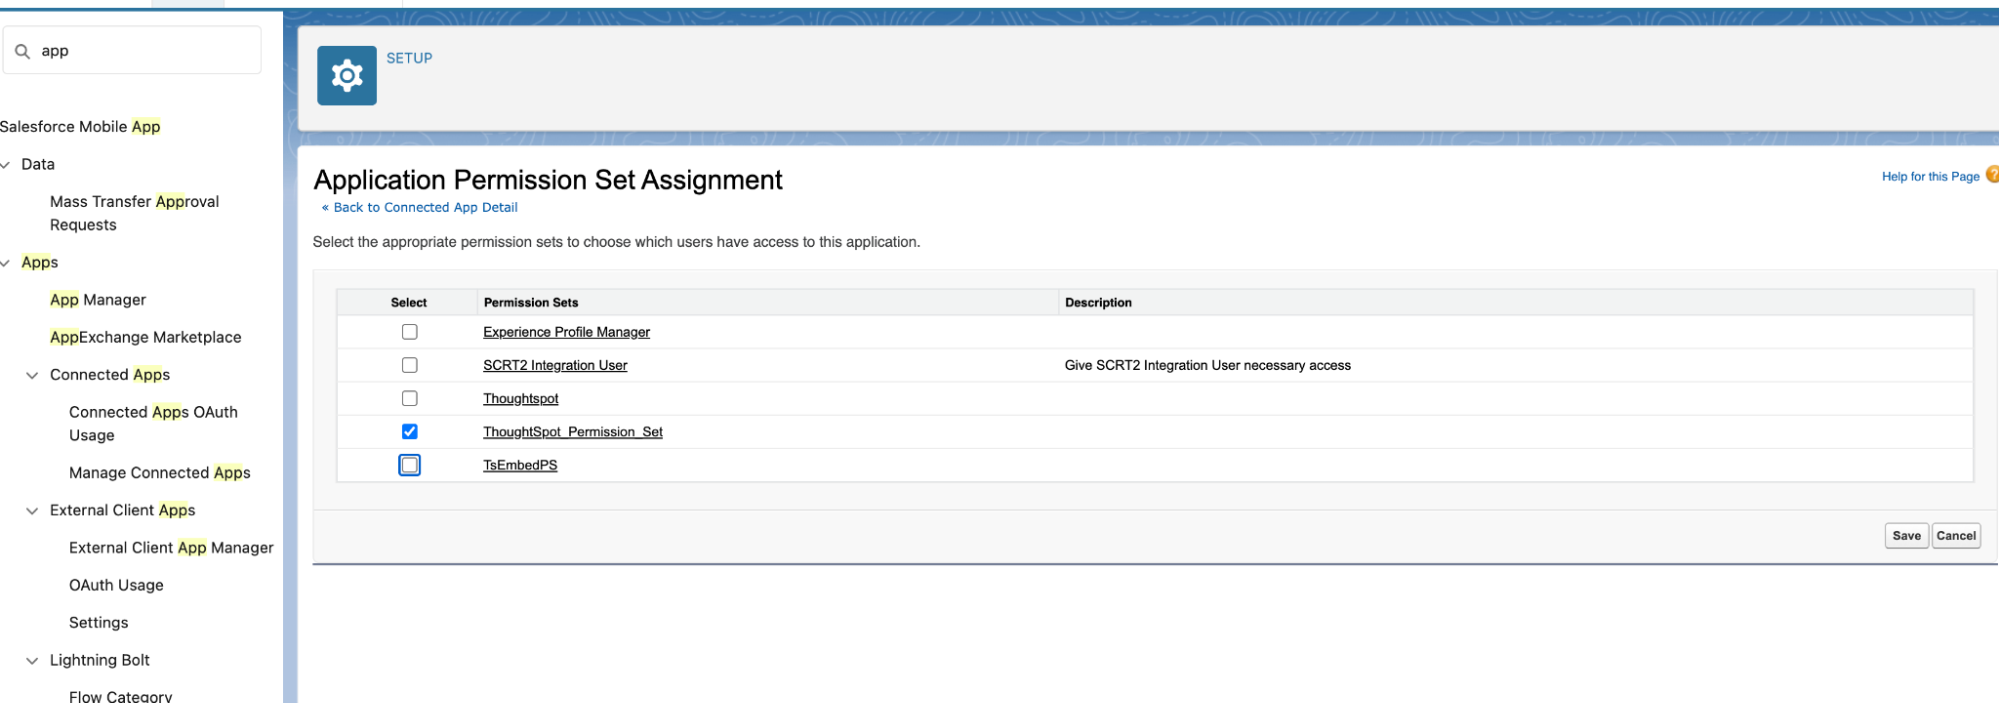
External credential principal mappings
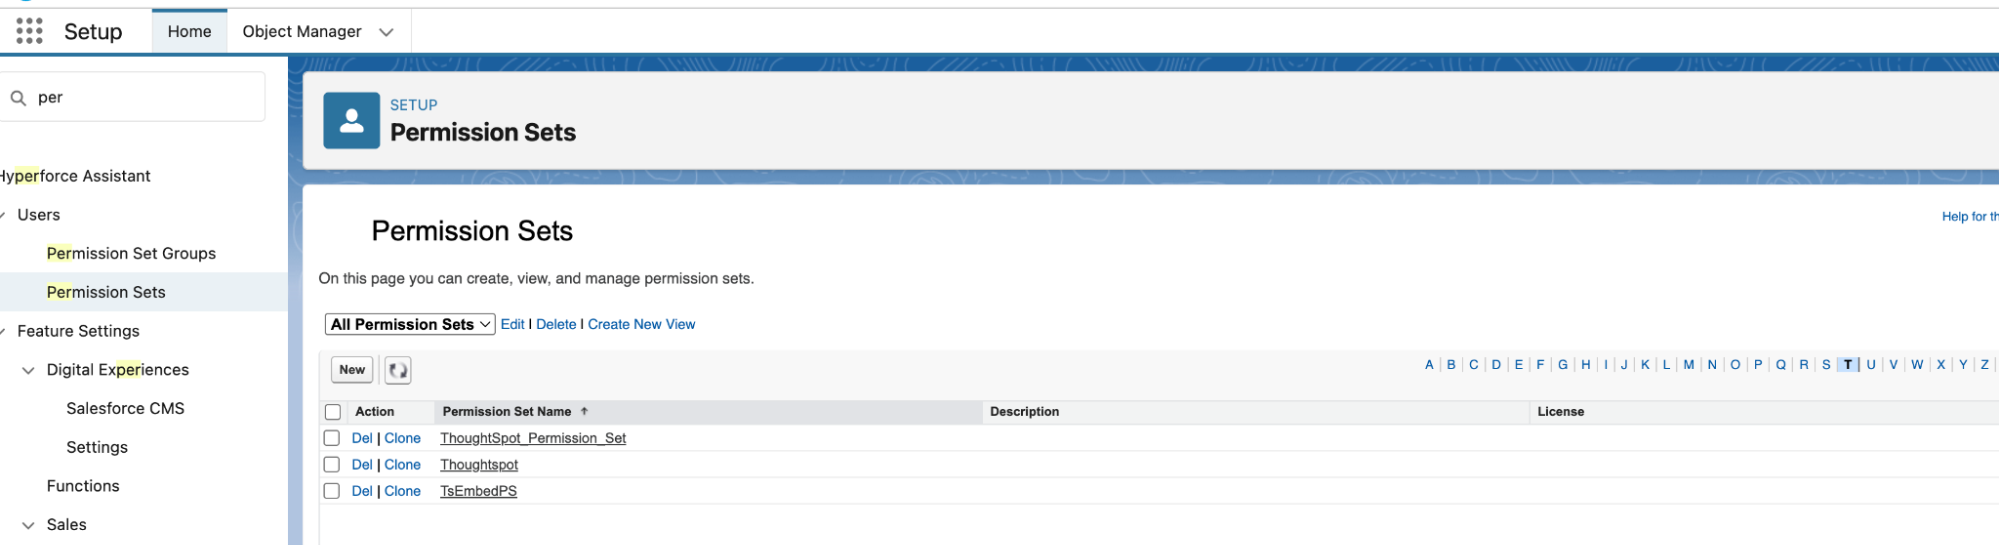
-
In Setup, go to the Quick Find box and search for Permission Sets.
-
Select the permission set used for integration, for example, ThoughtSpot_Permission_Set.
-
Within the selected permission set, scroll down to the External Credential Principal Access section.
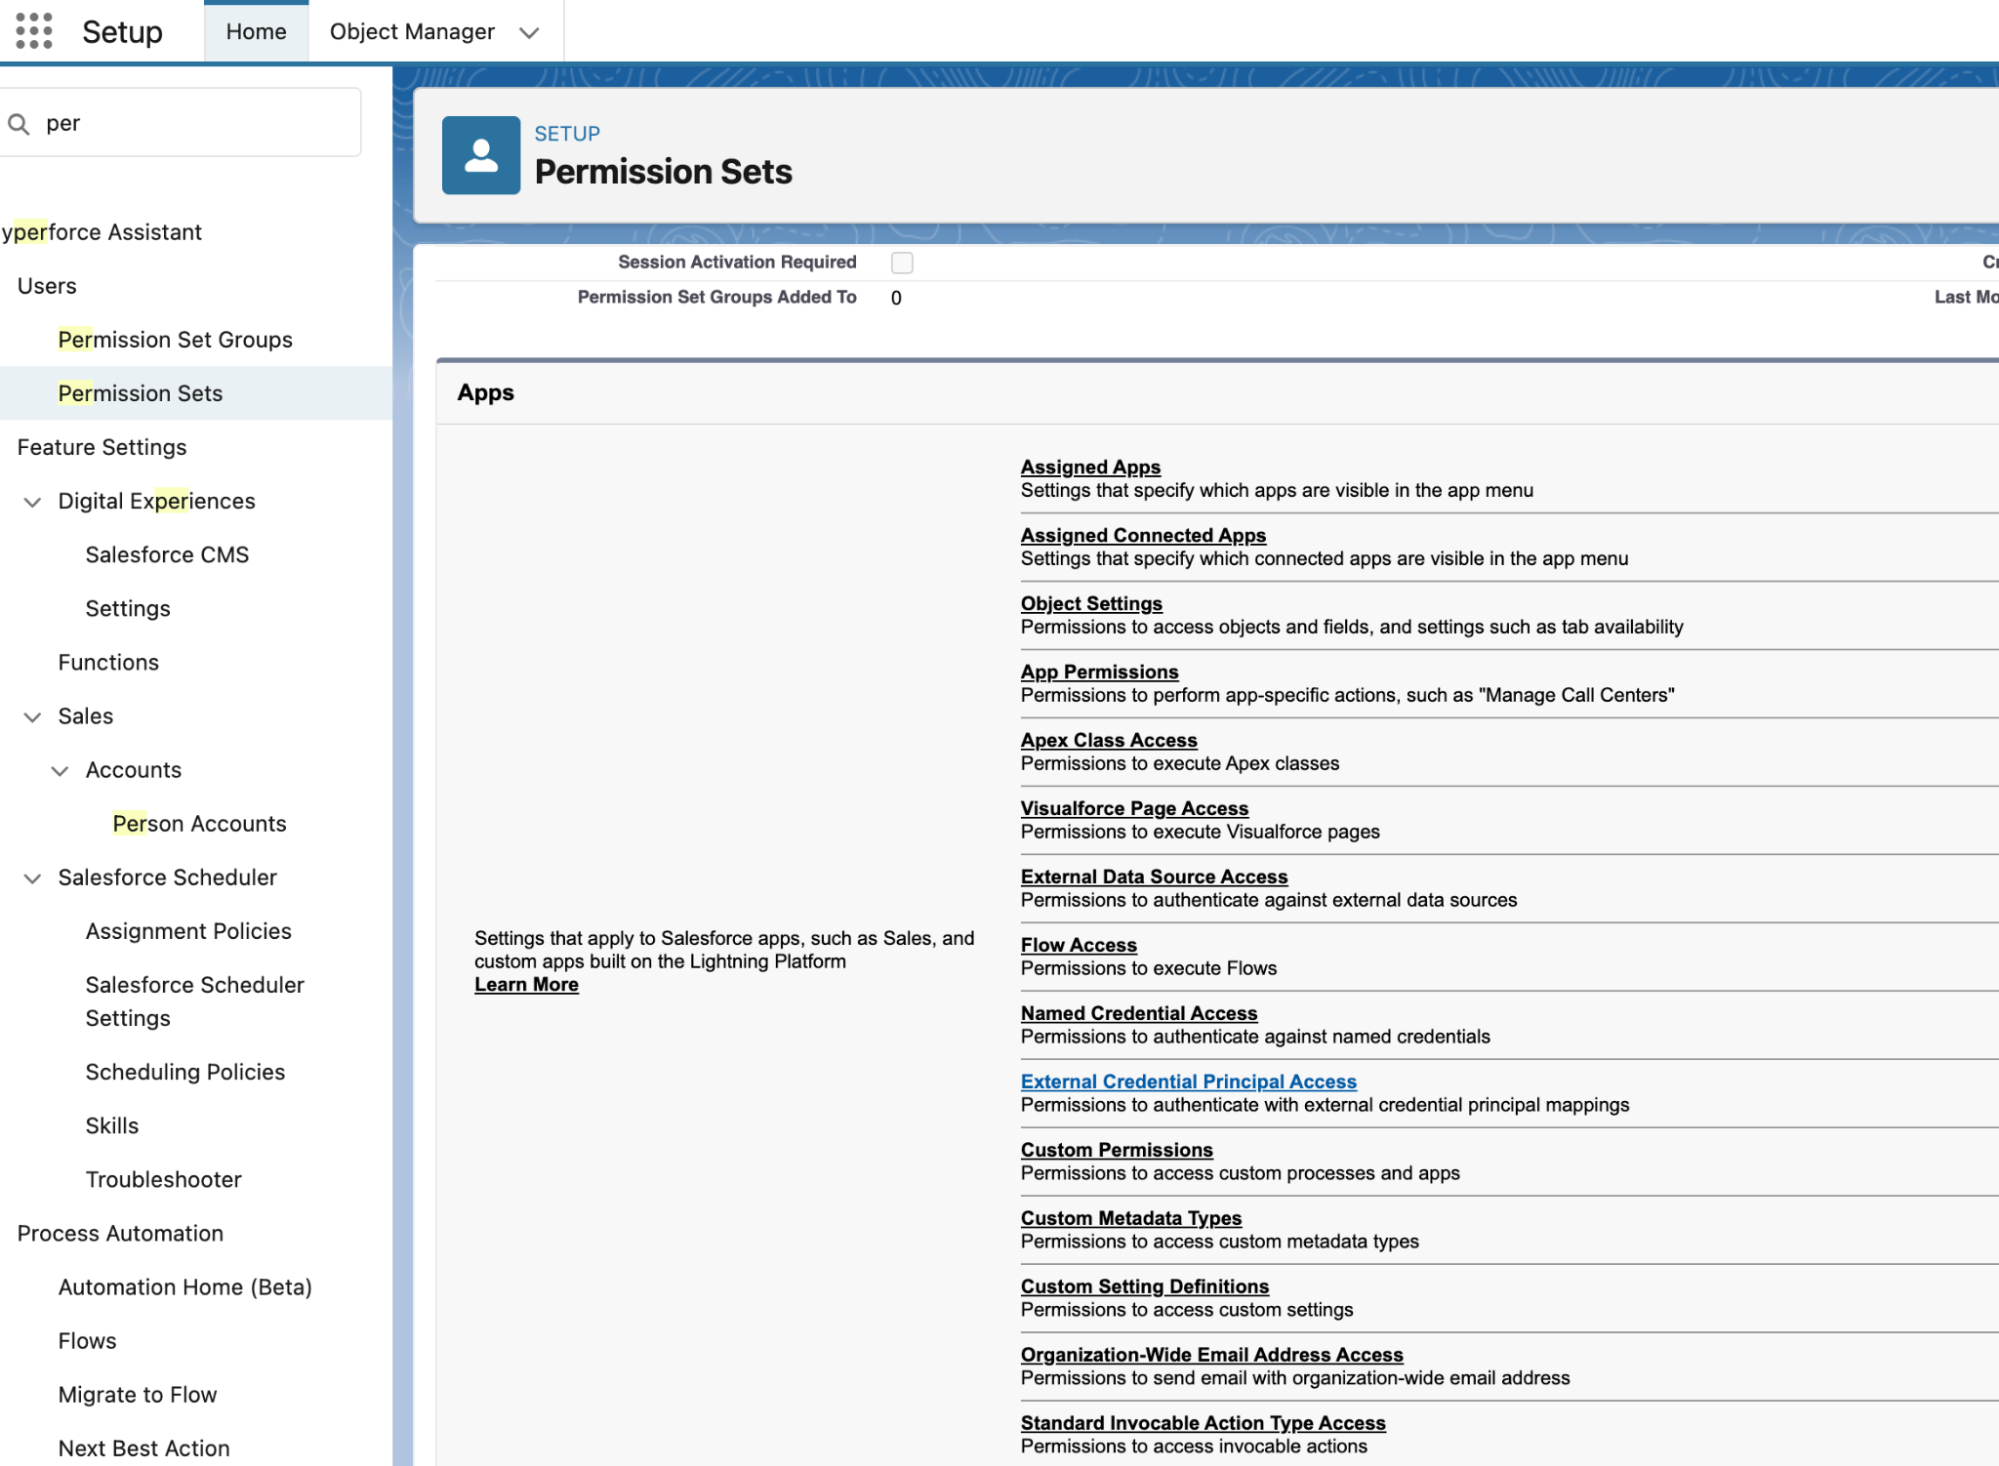
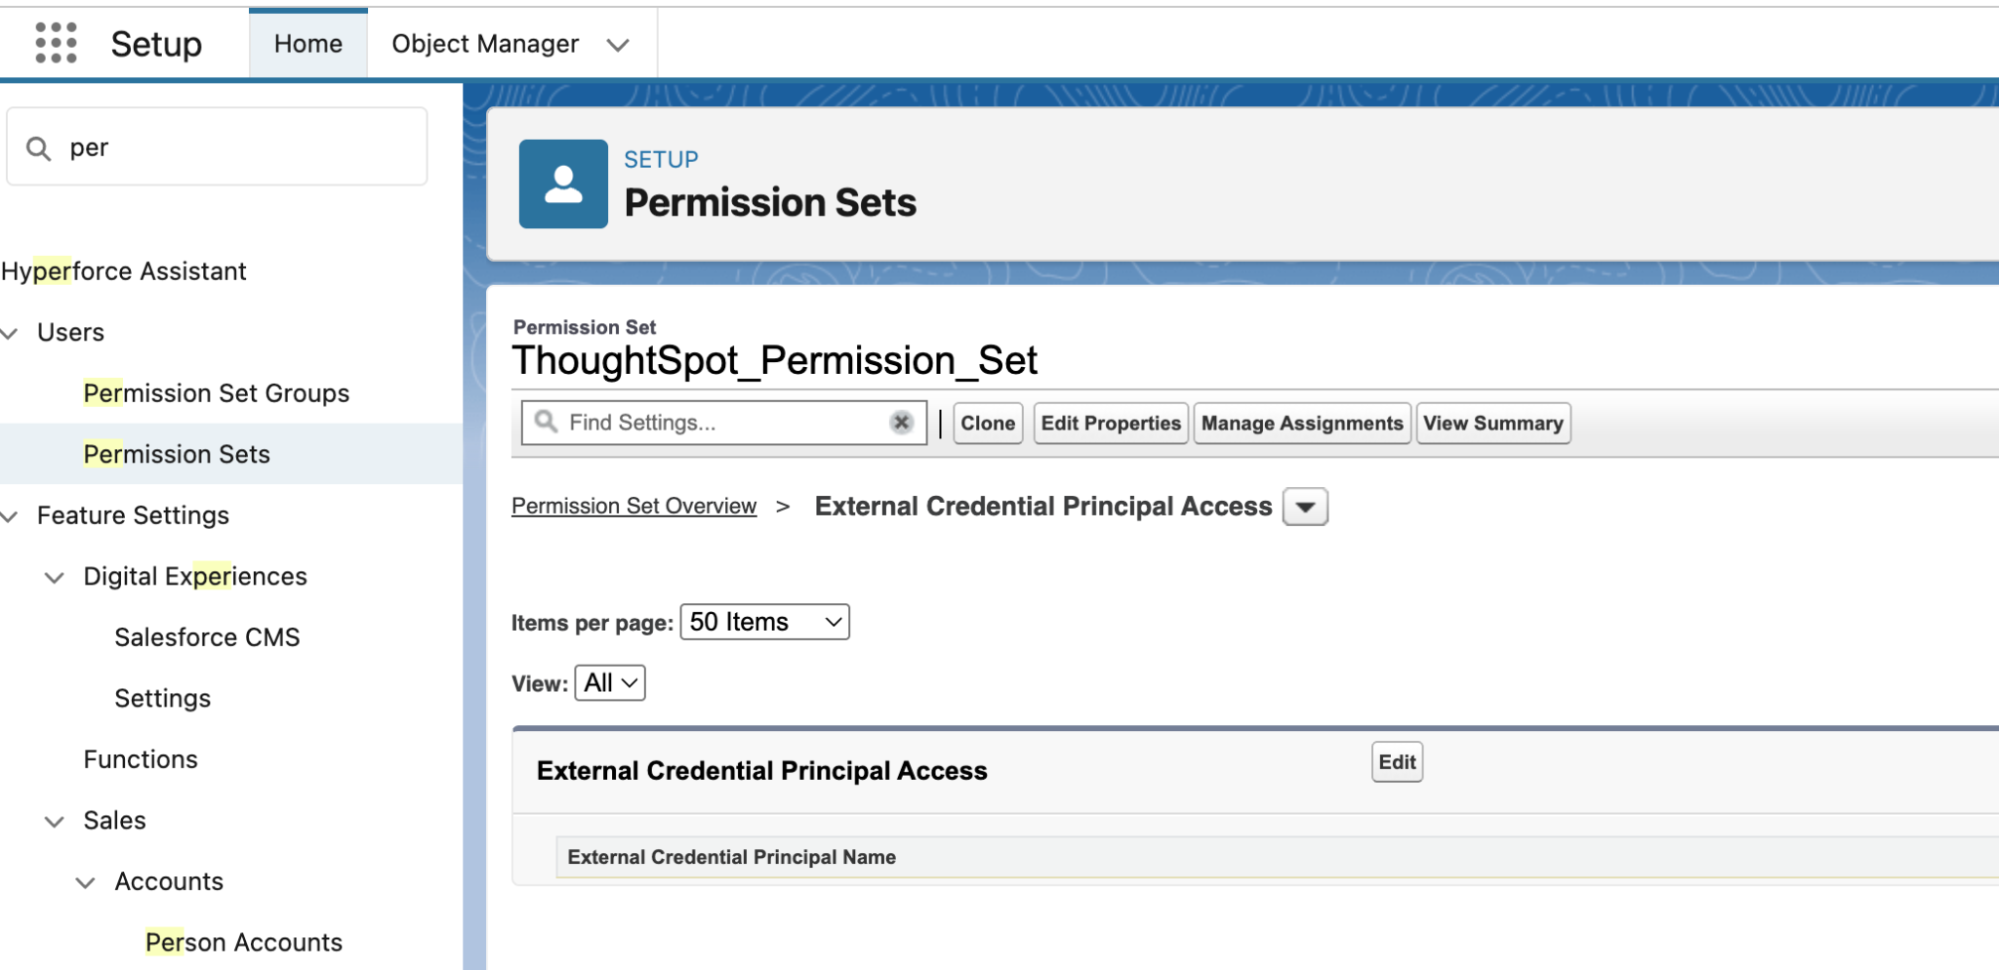
-
Click Edit.
-
From the list, select the ThoughtSpot_External_Credential under Available External Credential Principals.
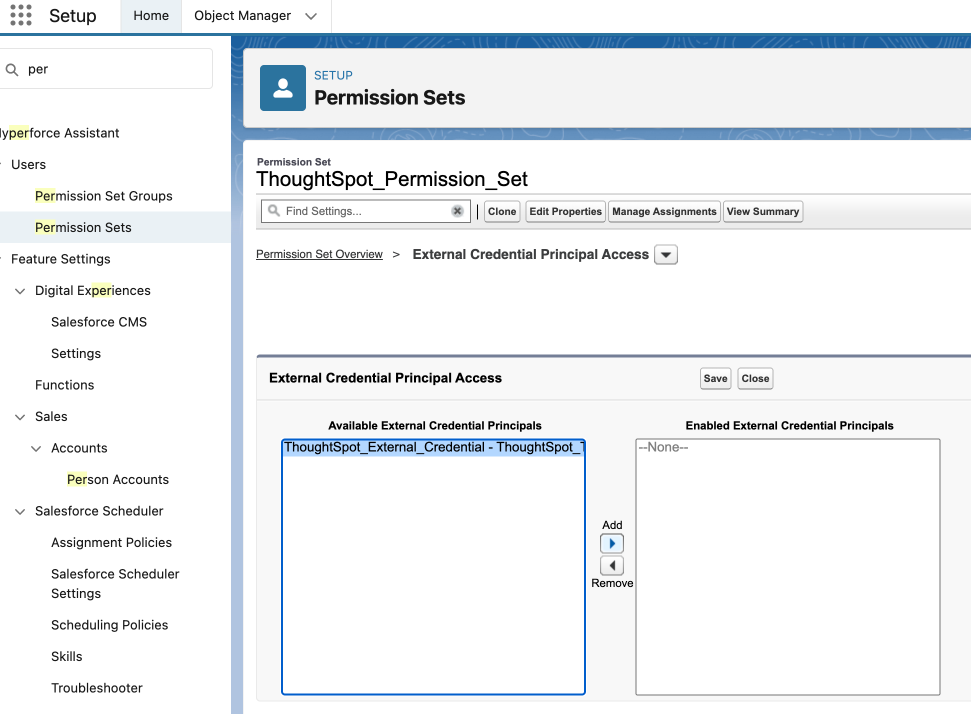
-
Click Add, then Save.
| This allows users assigned this permission set to use the specified External Credentials when making authenticated calls to external services like ThoughtSpot. |
Configure your SSO
Configure Salesforce (identity provider)
-
Sign in to your Salesforce org using admin credentials.
-
Click on the gear icon ⚙️ in the top right corner. Select Setup from the dropdown.
-
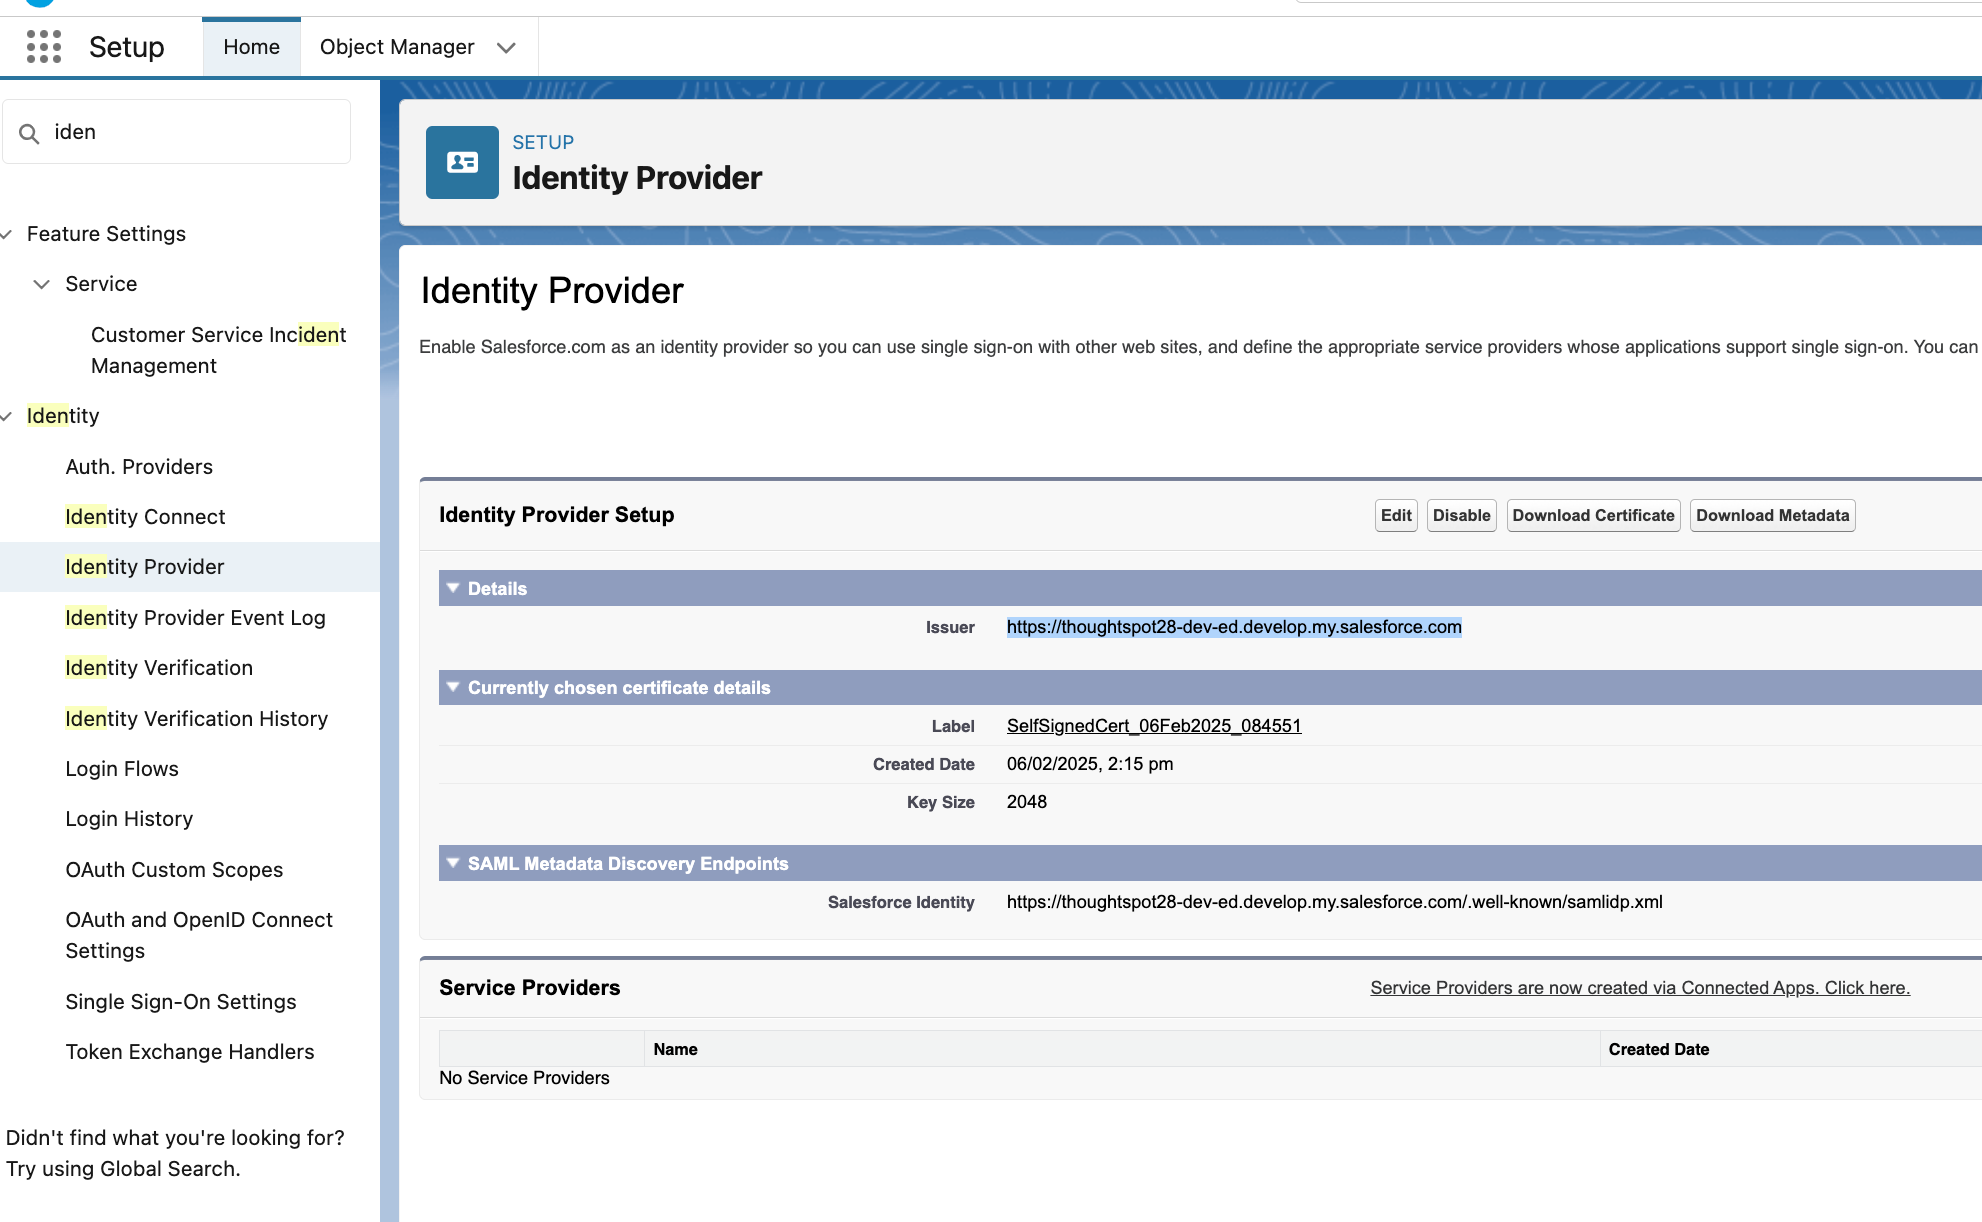
In the Quick Find box, type and select Identity > Identity Provider.
-
Click Enable Identity Provider if it is not enabled.
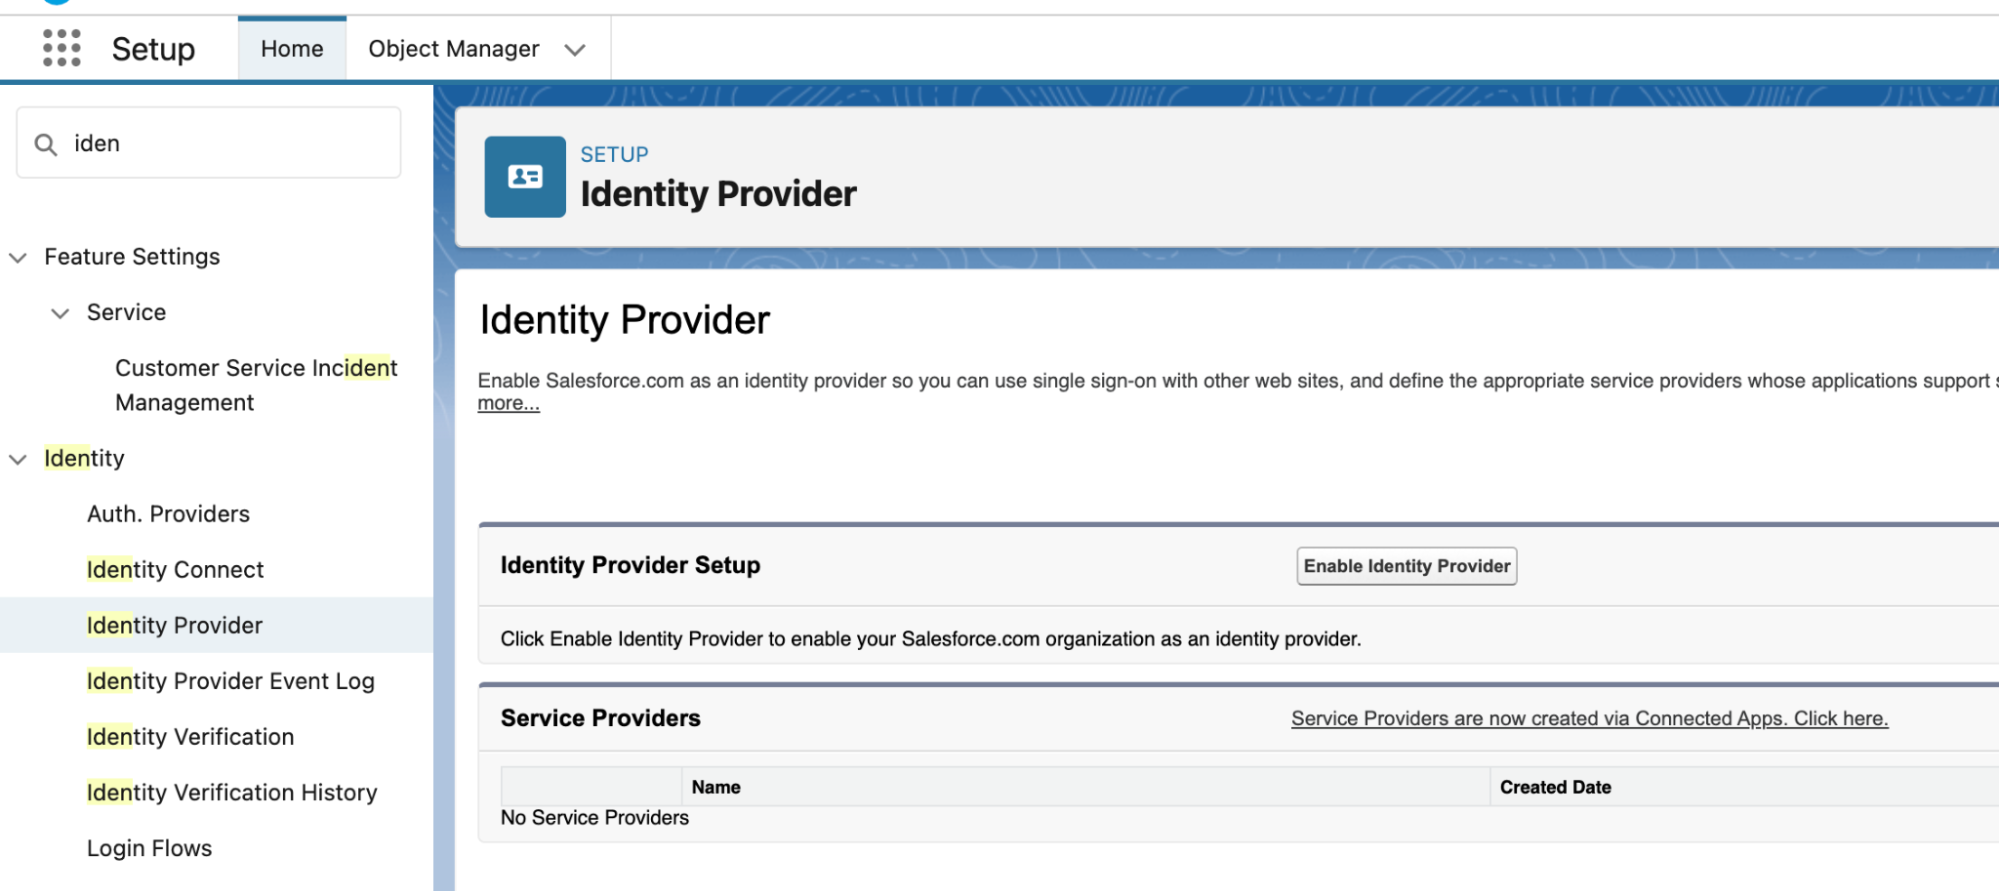
-
Create a certificate or choose an existing certificate and save.
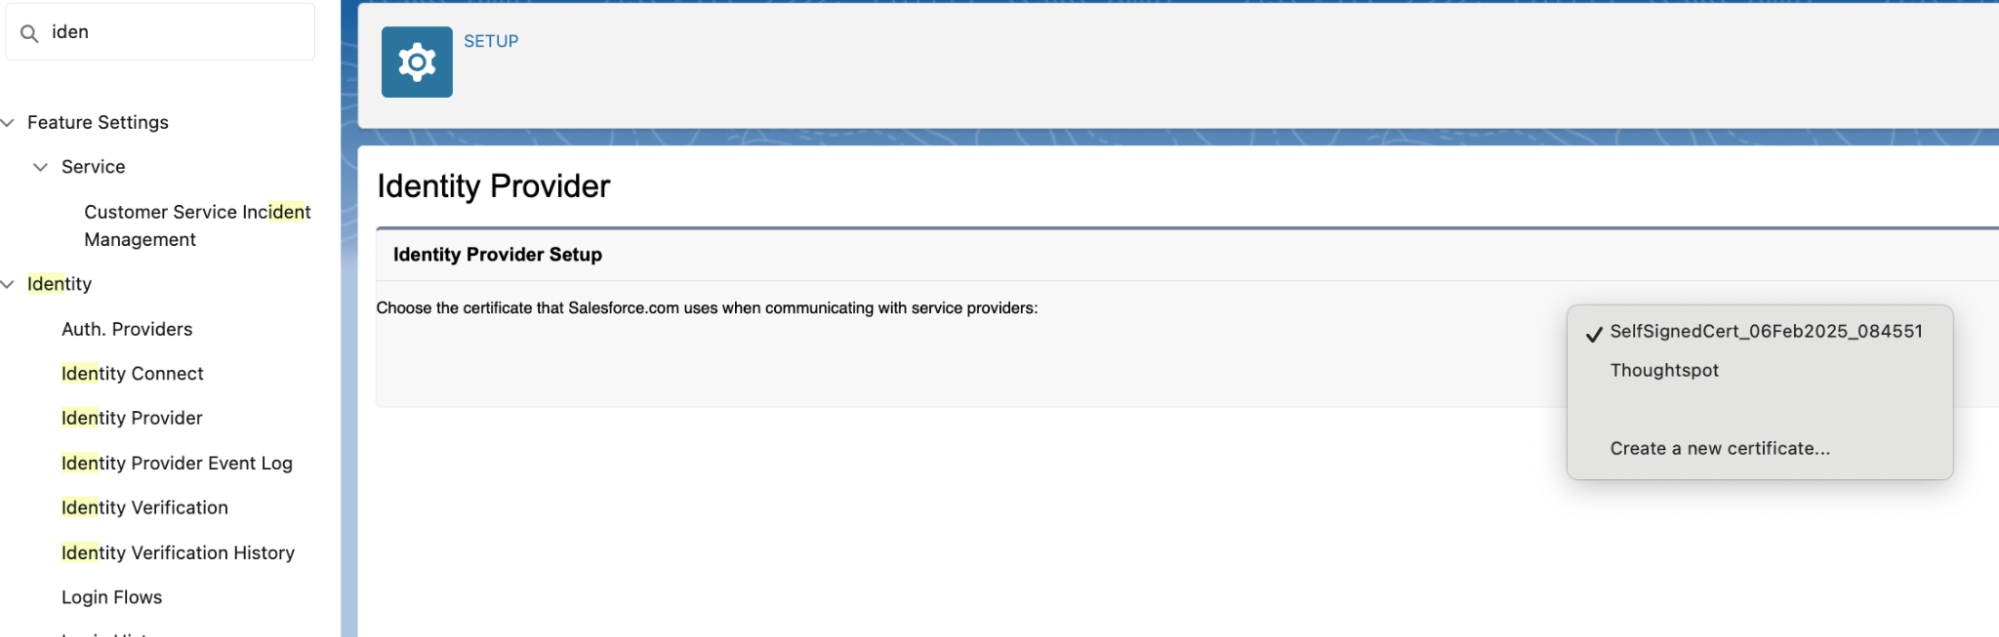
-
After saving, click Download Certificate to save the .crt file locally.
-
Copy the Issuer value shown on the Identity Provider page. You’ll need this for SSO configuration.
Configure ThoughtSpot (service provider)
-
Access your ThoughtSpot instance using your admin credentials.
-
Navigate to Admin > All Orgs > Authentication > Single Sign On.
-
Click on + Add Identity Provider.
-
Choose SAML 2.0 IDP from the options.
-
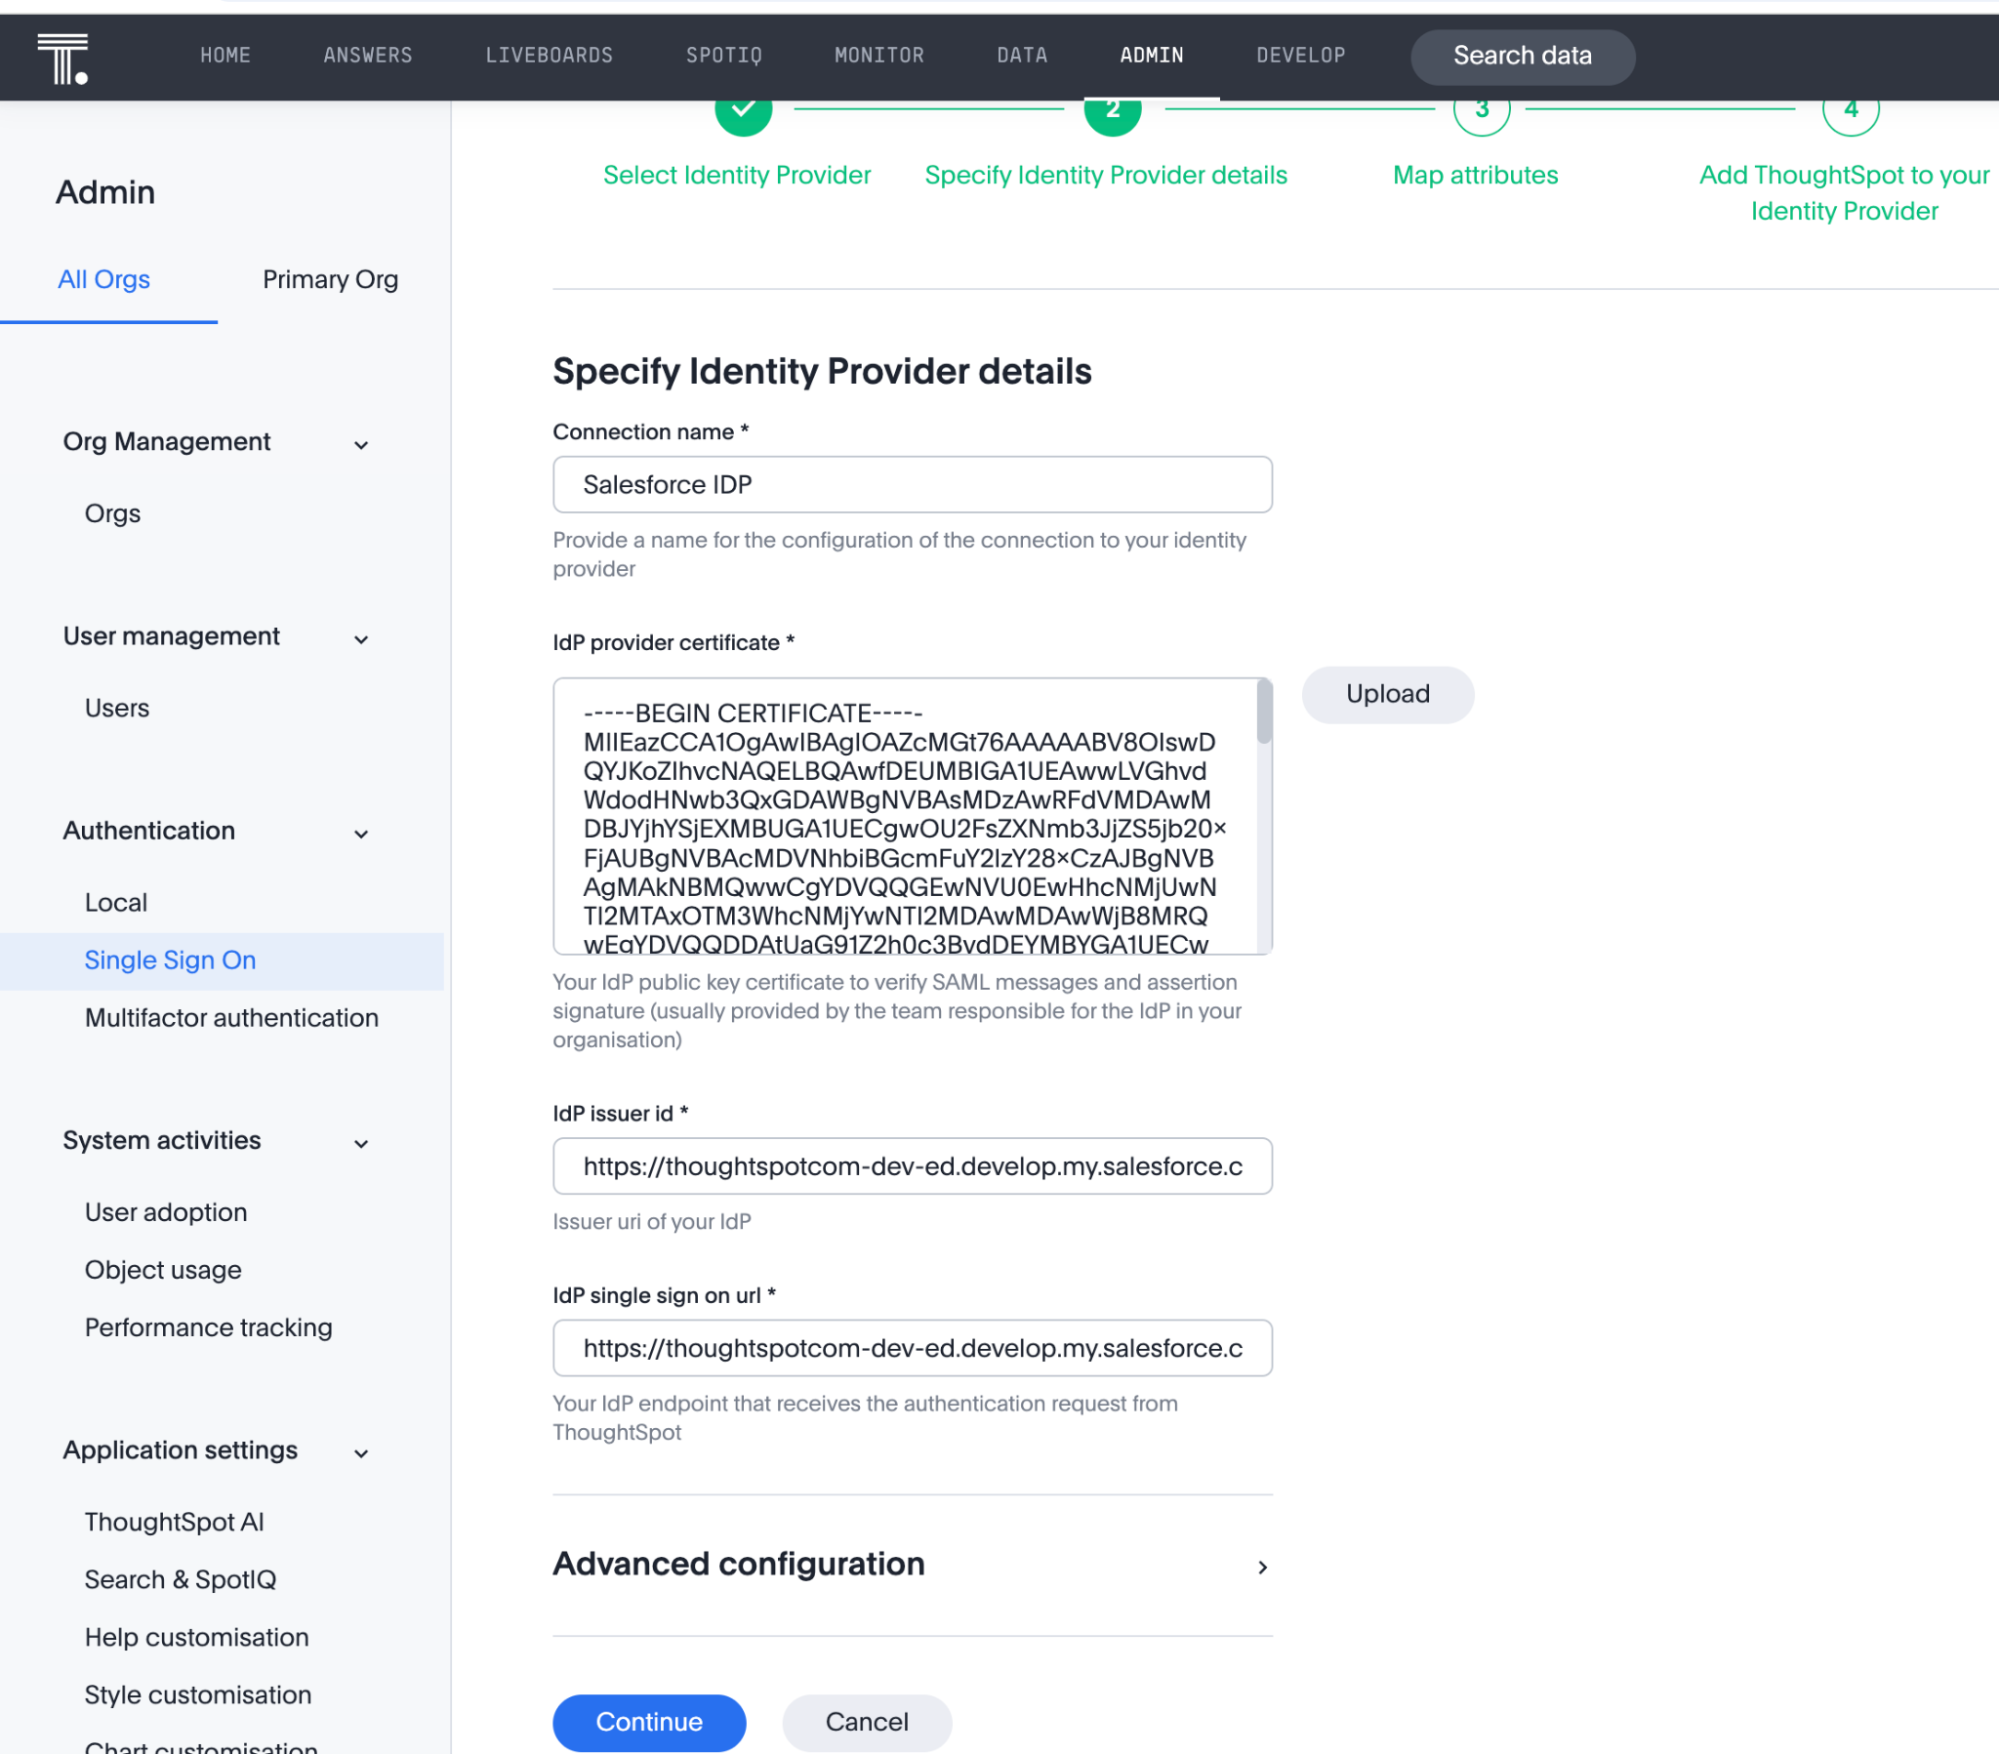
Under Connection name, provide a meaningful name for the connection.
-
Click Upload next to IdP provider certificate and select the .crt file you downloaded from Salesforce.
-
Under IdP issuer id, paste the Issuer ID you copied from Salesforce.
-
Under IdP single sign on url use the following format:
<IdP Issuer ID>/idp/endpoint/HttpPost. Replace <IdP Issuer ID> with the actual issuer URL. -
Keep the Advanced Configuration section as default and click Continue.
-
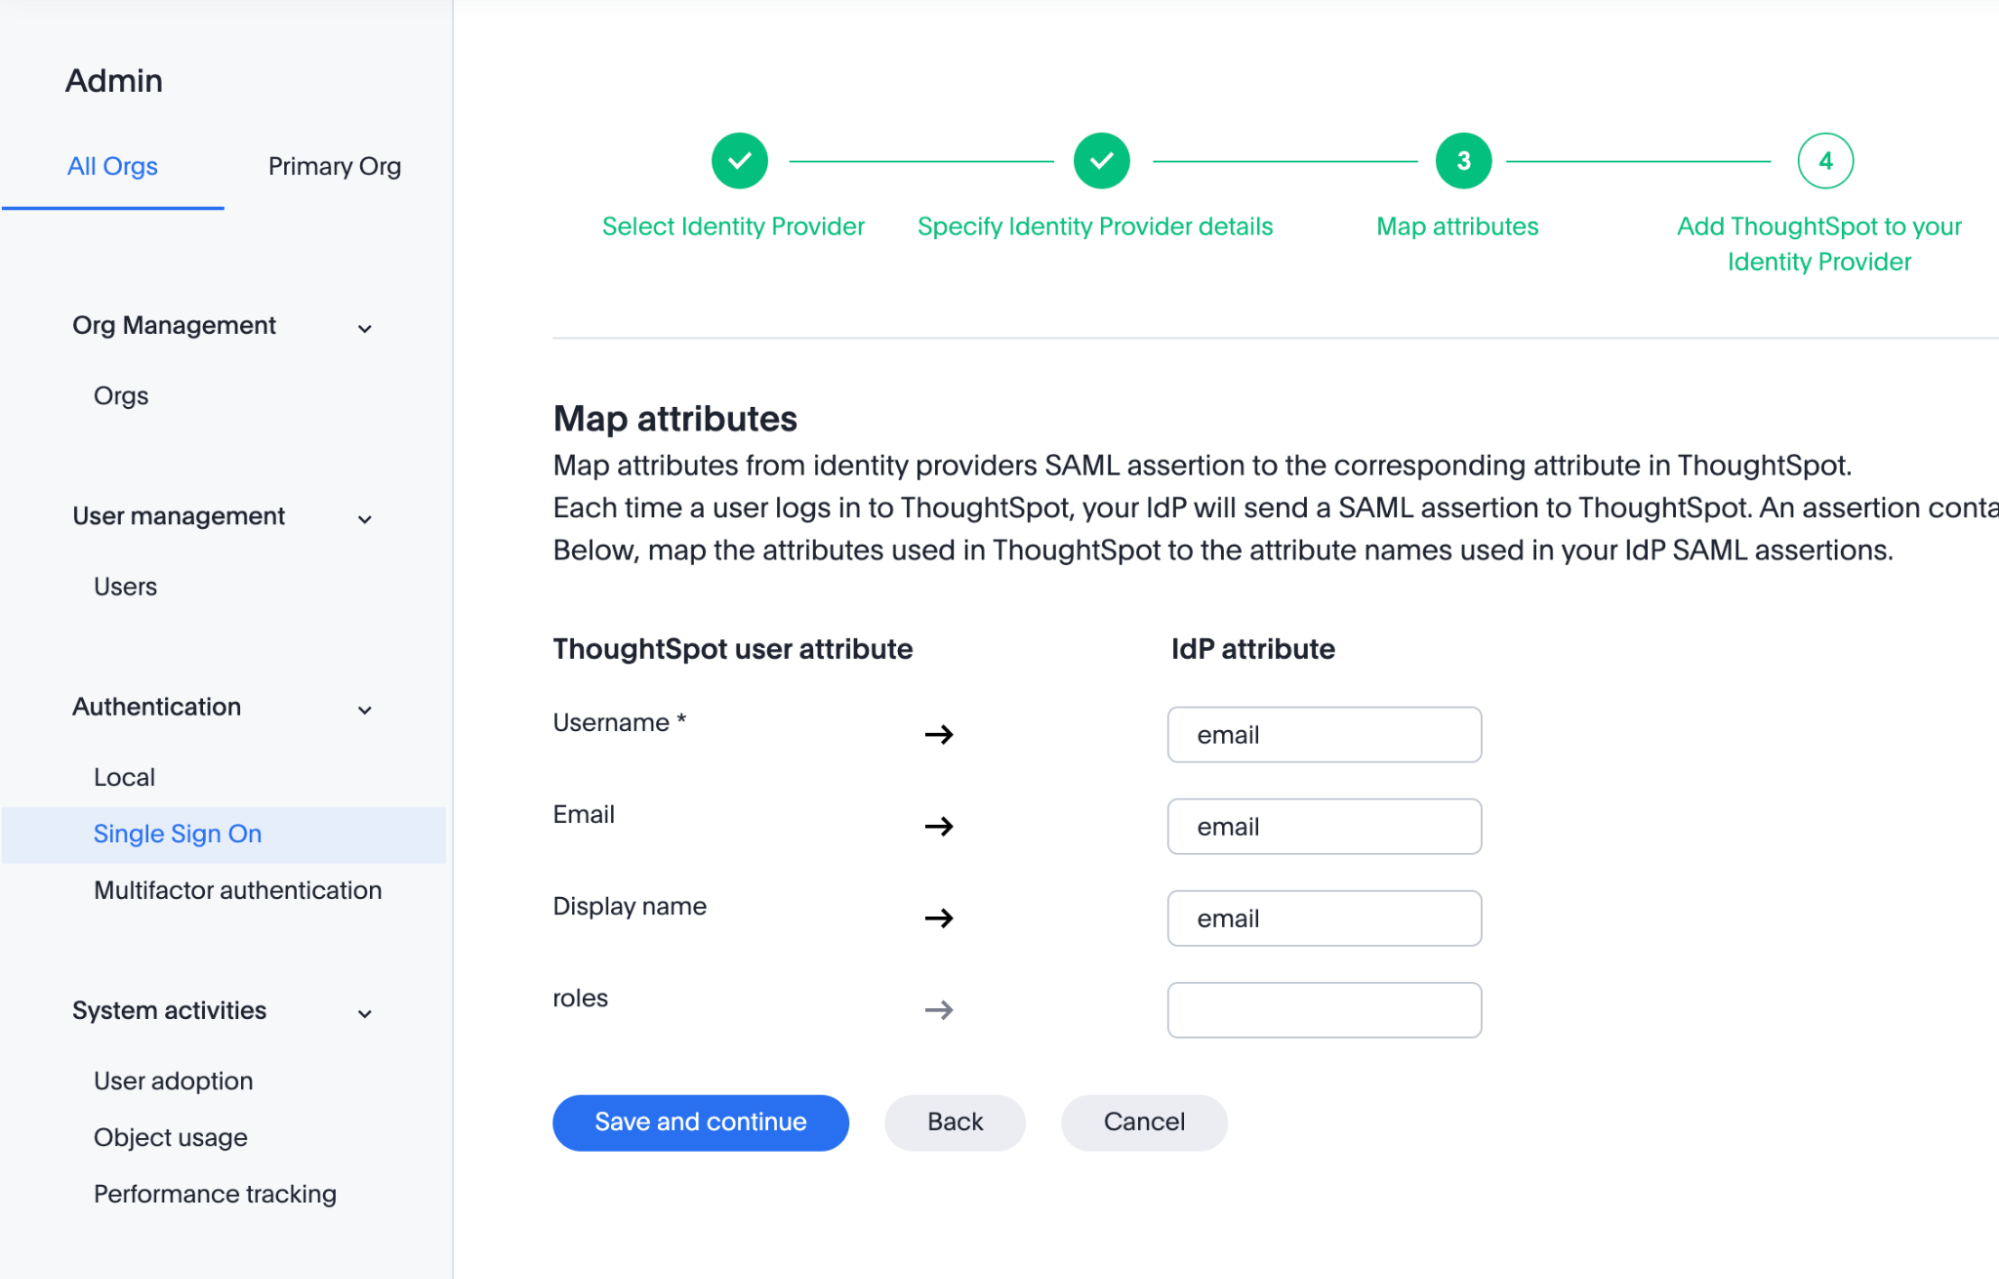
Under Map attributes, configure Username, Email, and Display name as “email”. Click Save and continue.
-
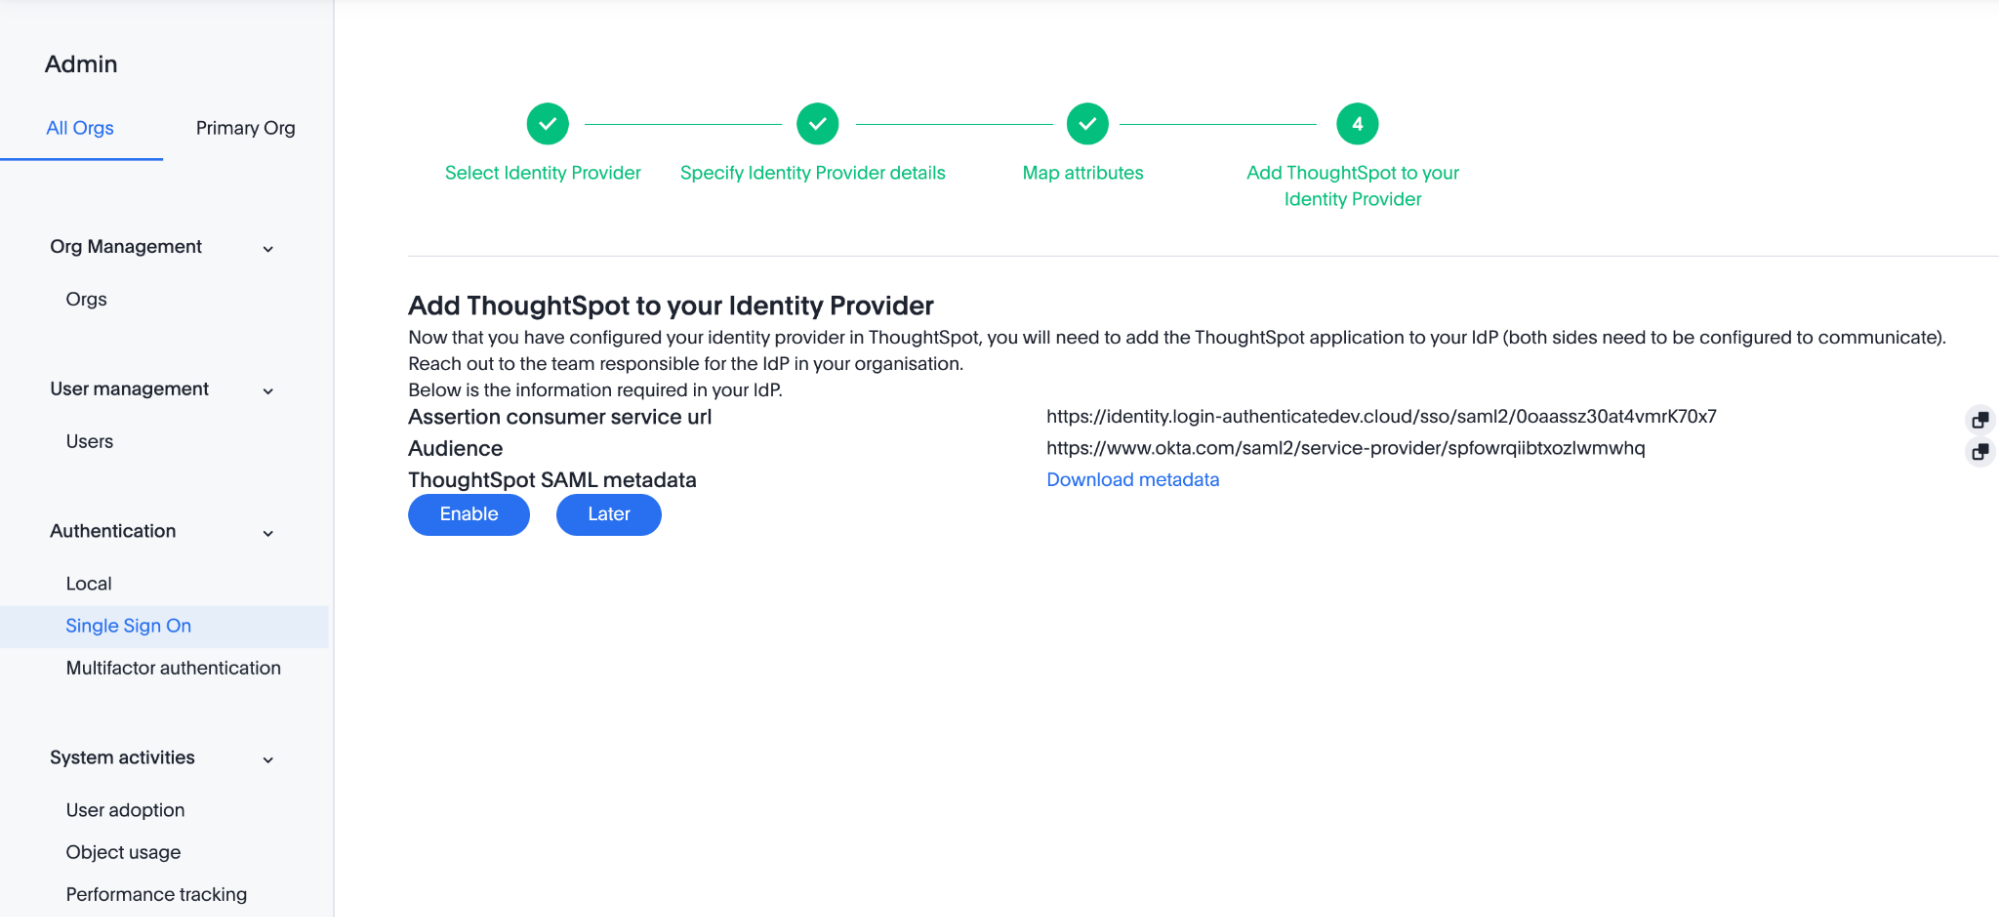
Save Assertion consumer service url and Audience and click Enable.
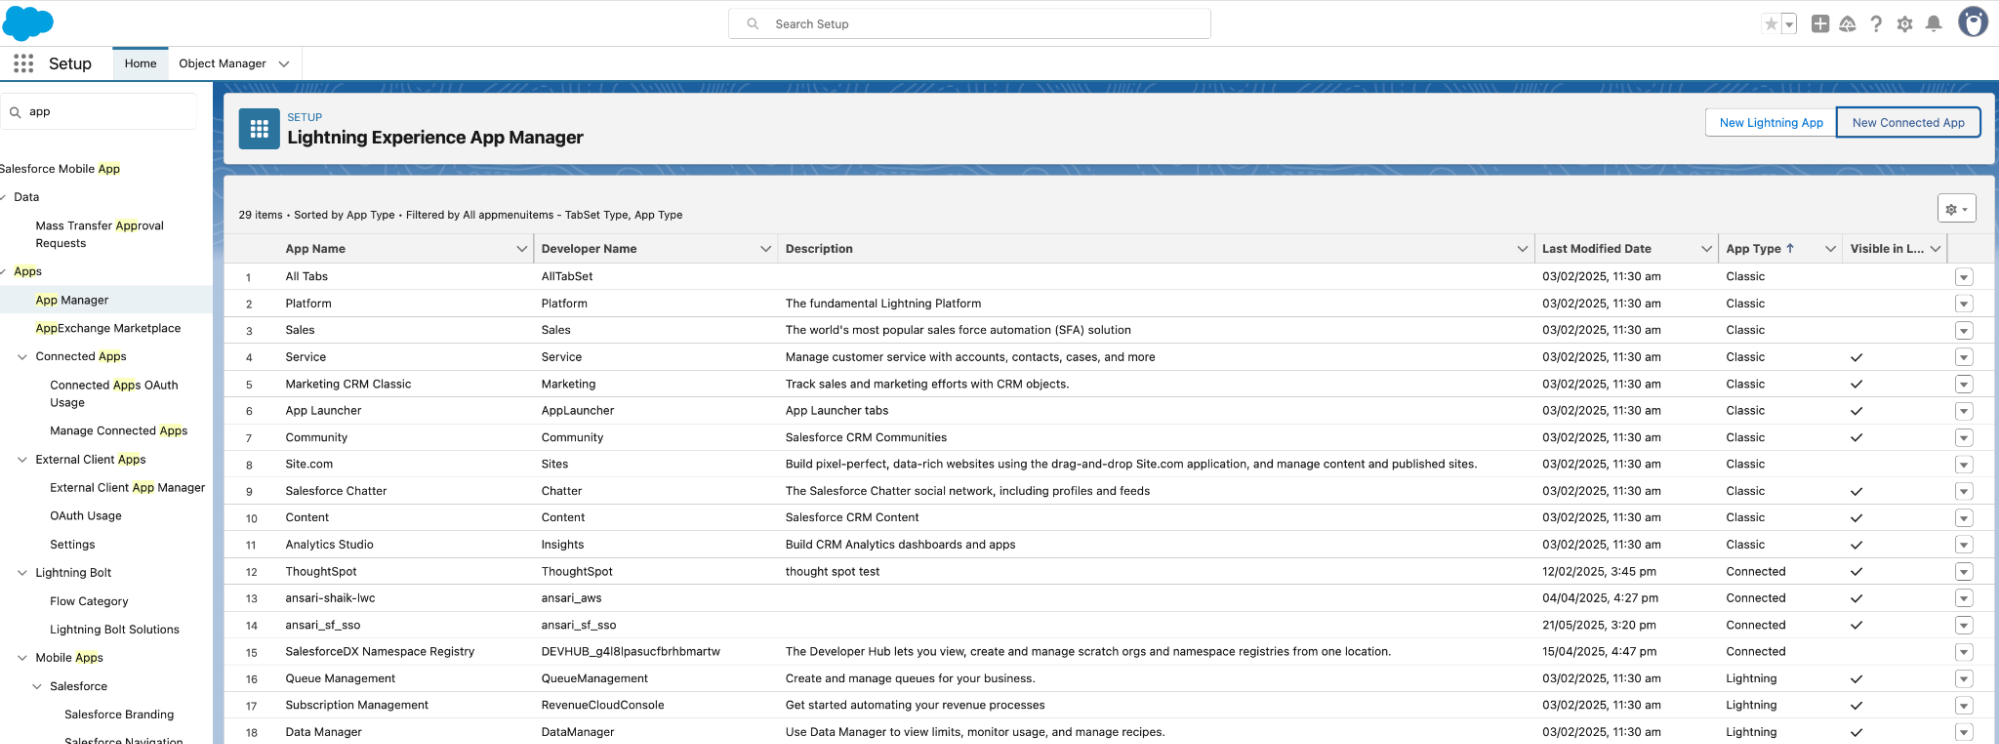
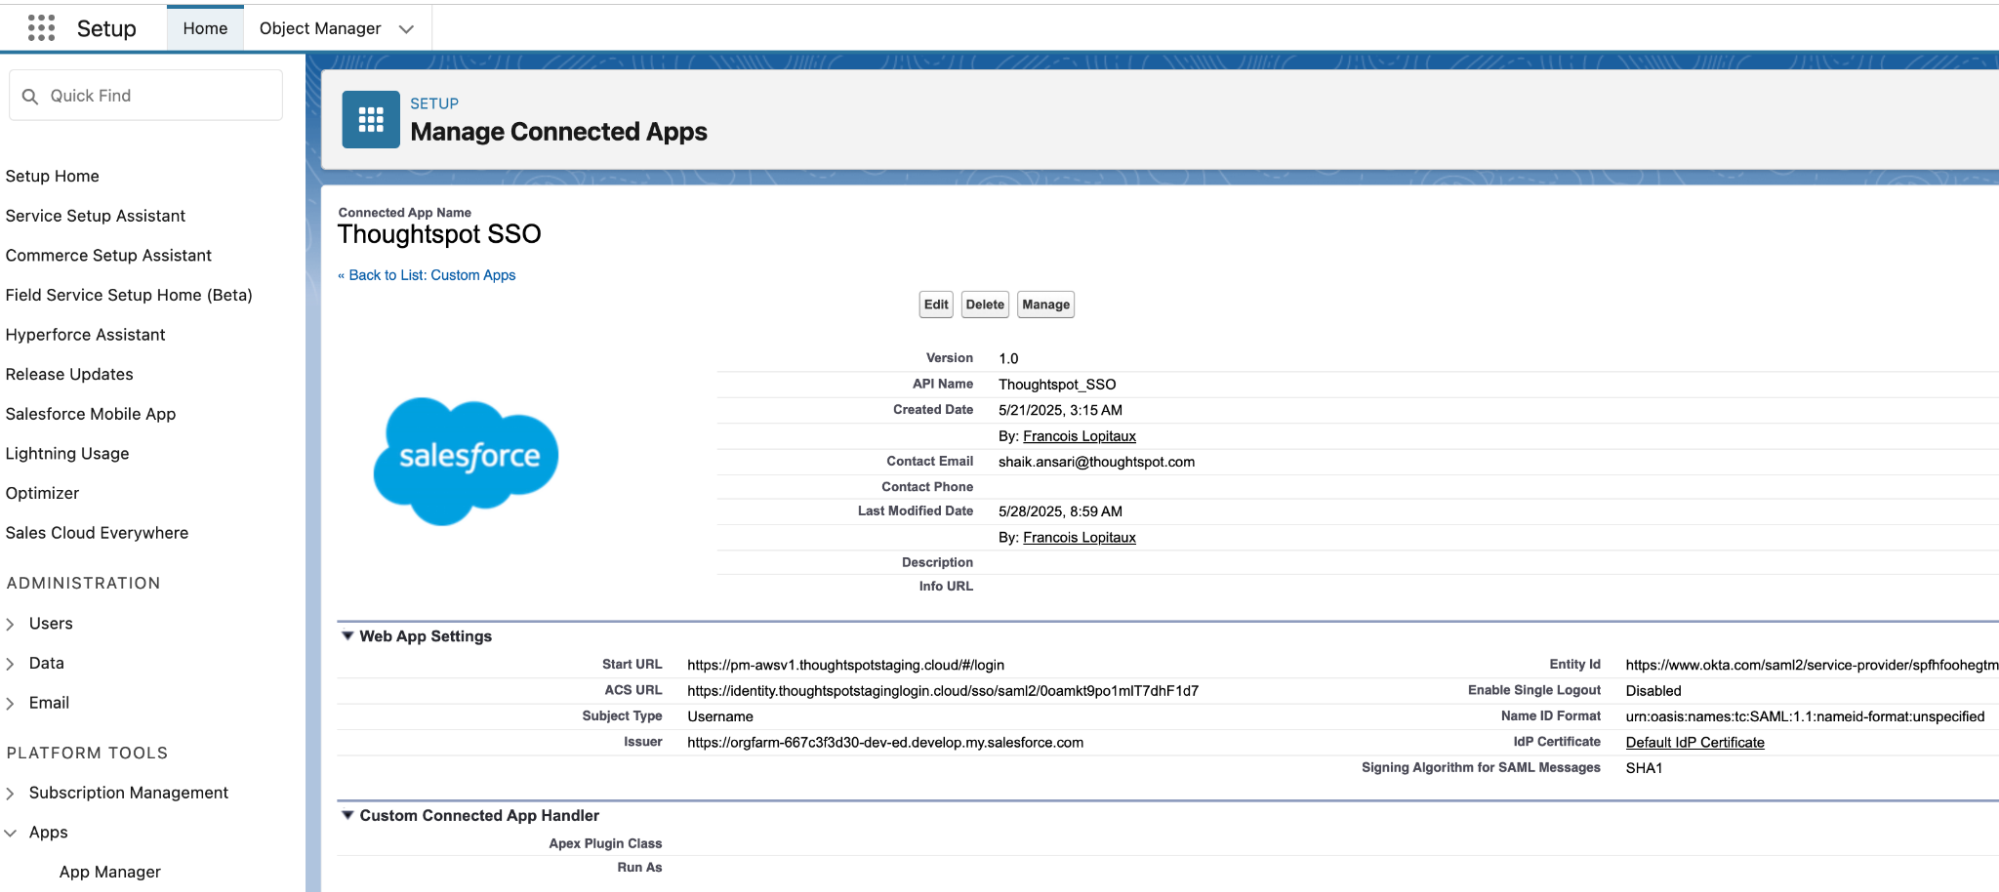
Create a connected app in Salesforce
-
Open Salesforce and navigate to Setup. Go to the Quick Find box and search for and select App Manager.
-
Click New Connected App.
-
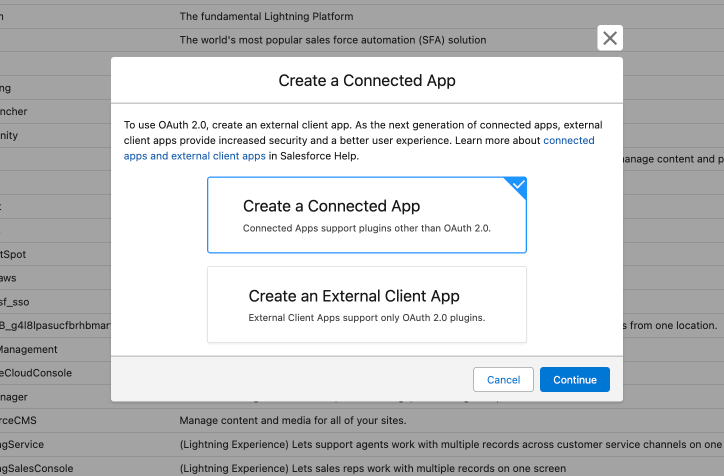
Select Create a Connected App, then click Continue.
-
Fill in the following fields:
Connected App Name (for example, ThoughtSpot SSO) Contact Email (your admin/support email) Logo/Image URLs (optional, for branding)
-
Scroll down and check Enable SAML.
-
Fill in the following fields:
-
Entity ID: Use the Audience value from ThoughtSpot.
-
ACS URL: Use the assertion customer service url from ThoughtSpot.
-
Start URL: Enter the ThoughtSpot login URL (for example, https://<your-thoughtspot-domain>.cloud/#/login or the login URL you plan to use)
-
IdP Certificate: Select the certificate created or chosen earlier in the Identity Provider setup.
-
Signing Algorithm for SAML Messages: Select the algorithm that matches what is configured under Advanced SAML Configuration in ThoughtSpot (For example, SHA-256).
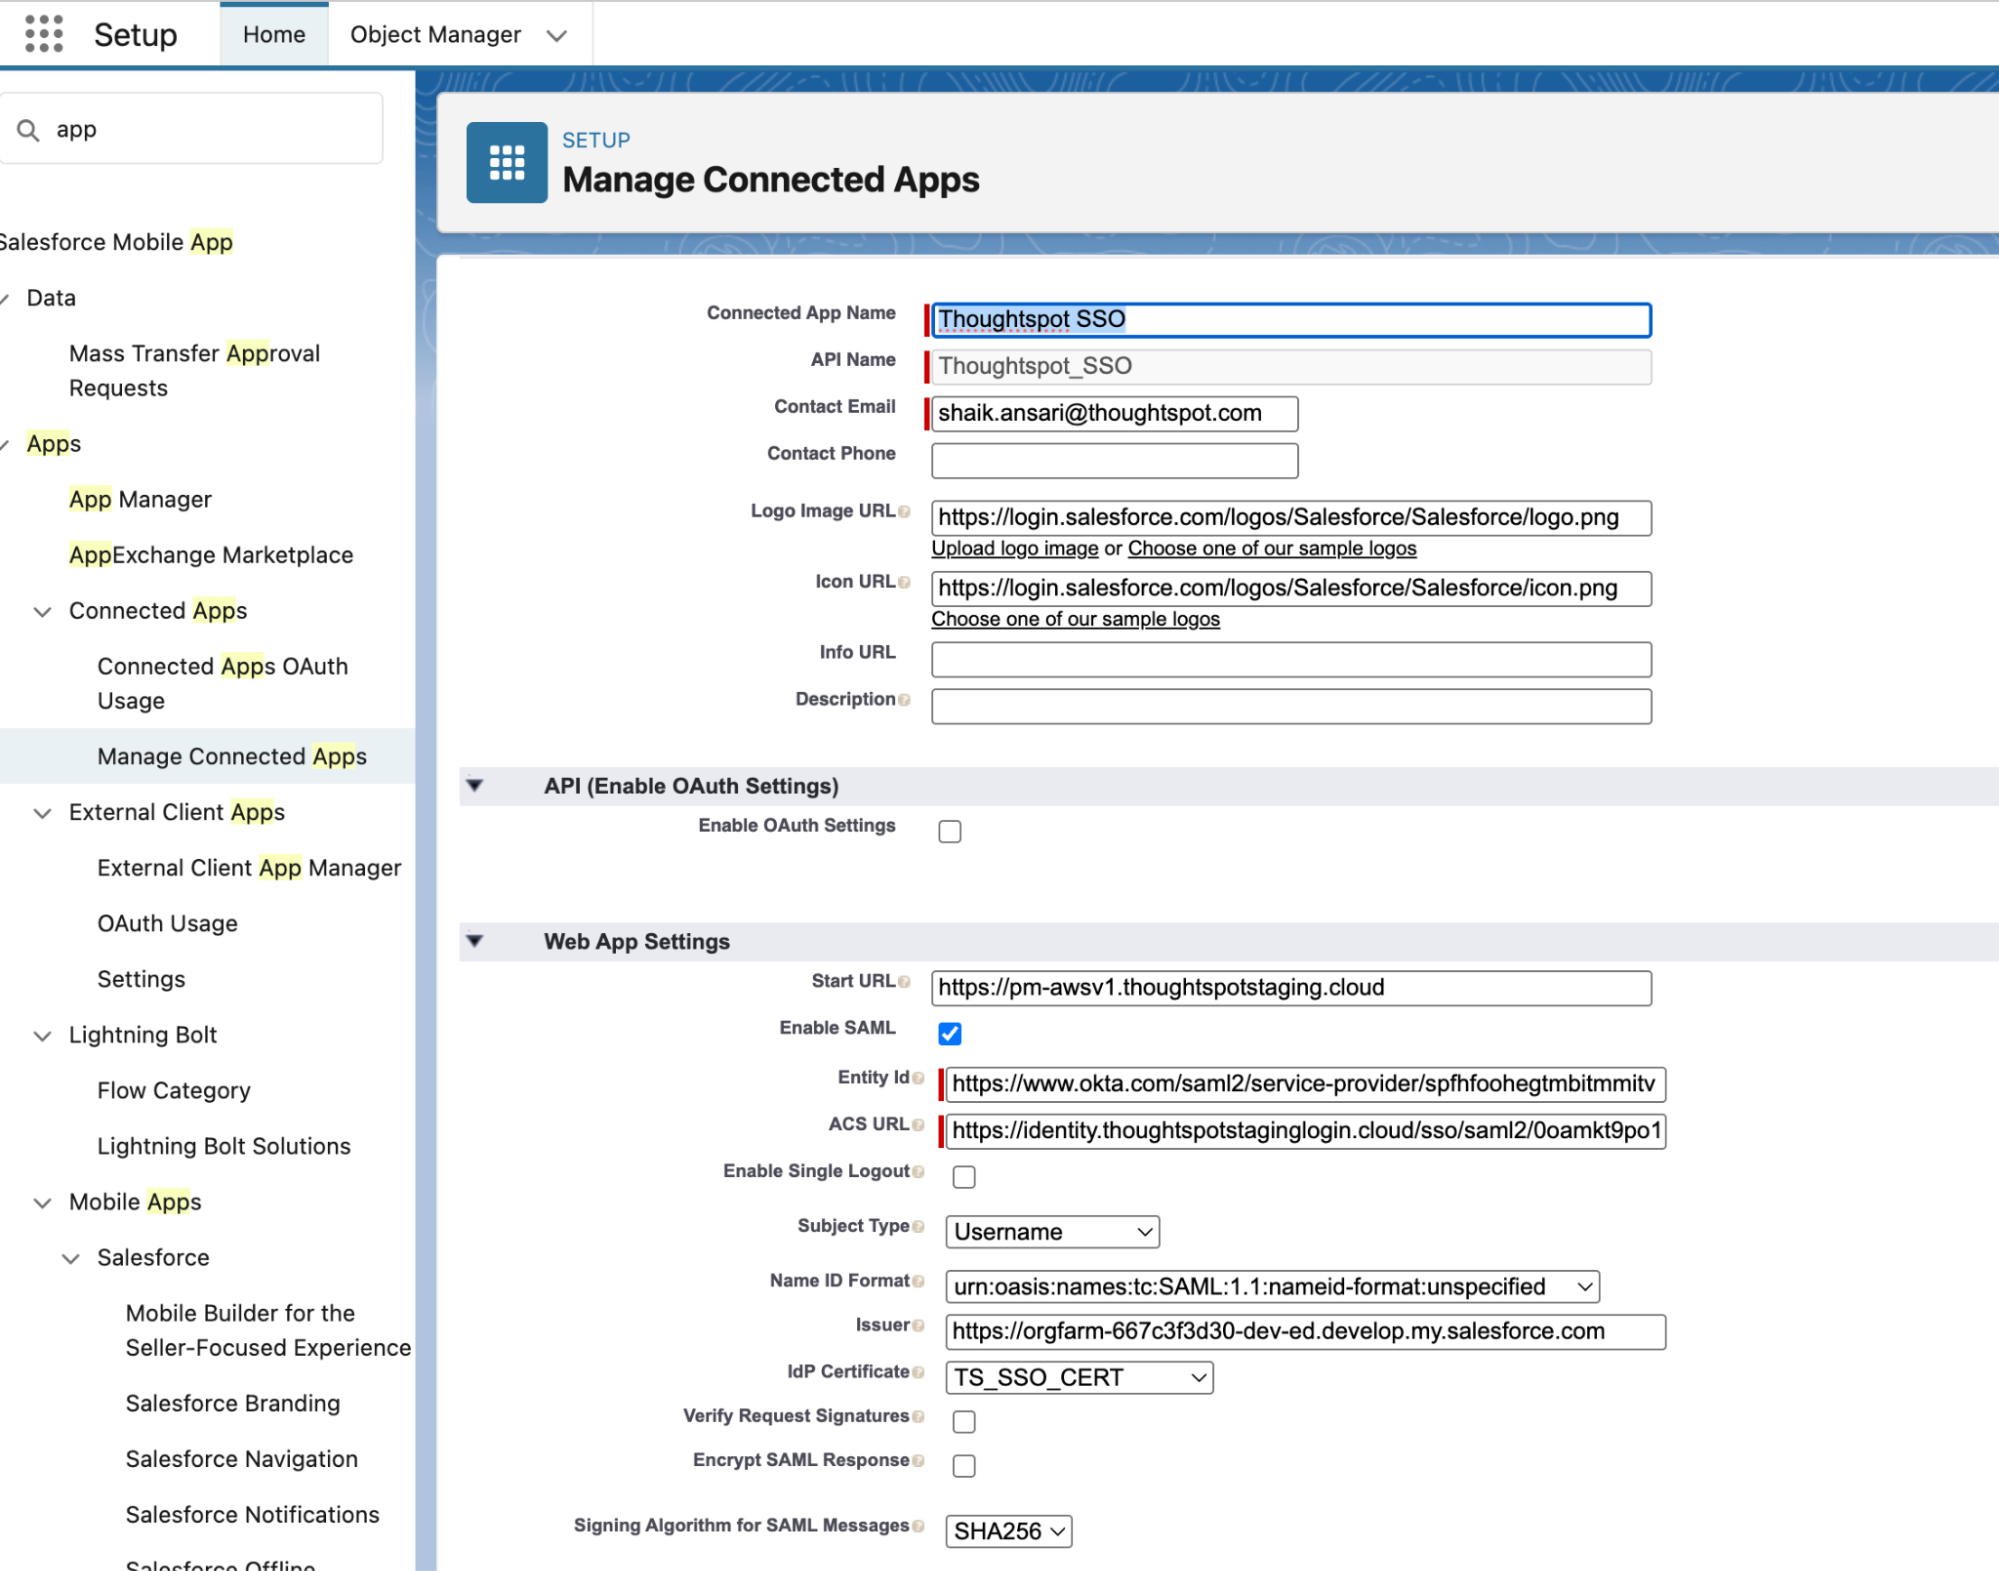
-
-
Click Save to complete the configuration.
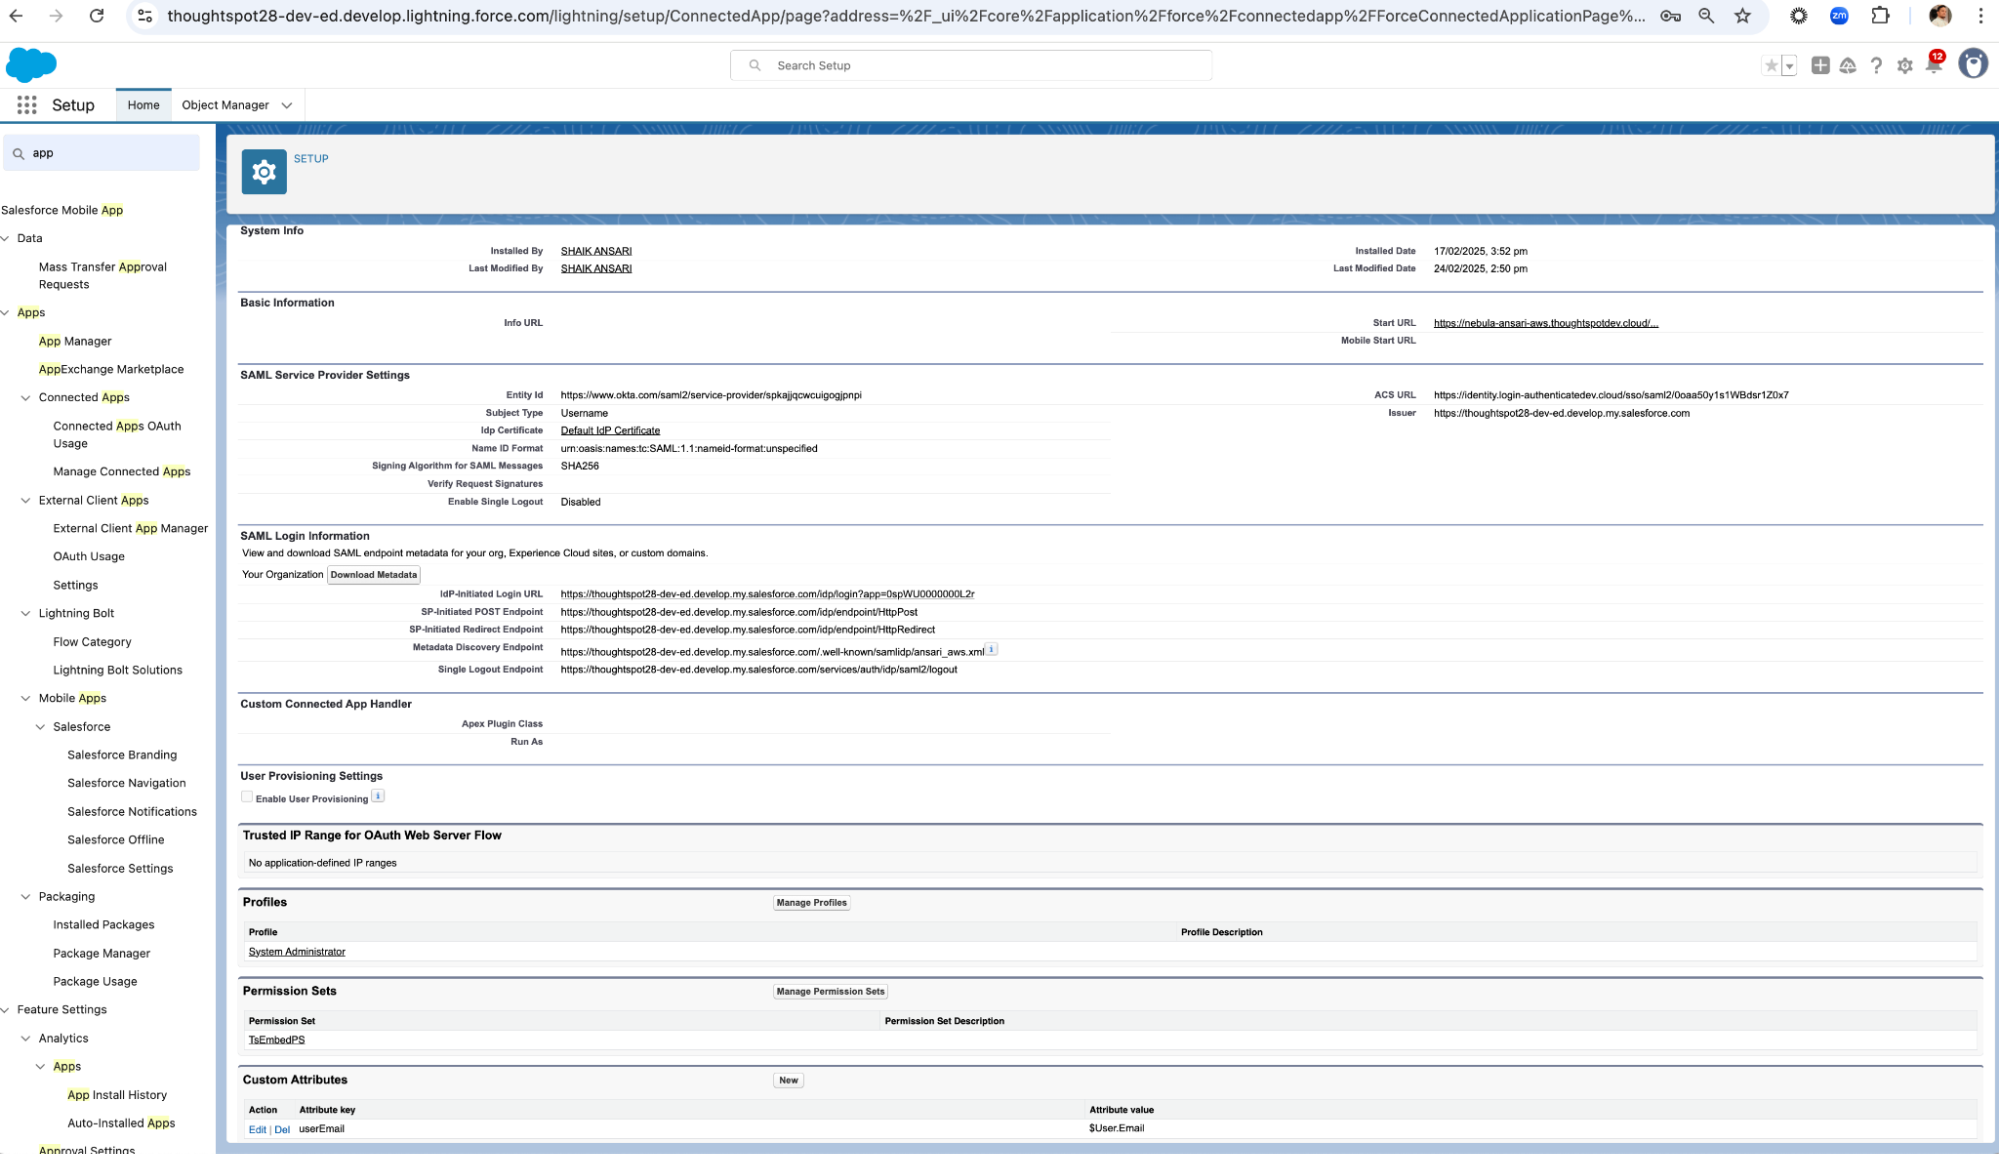
-
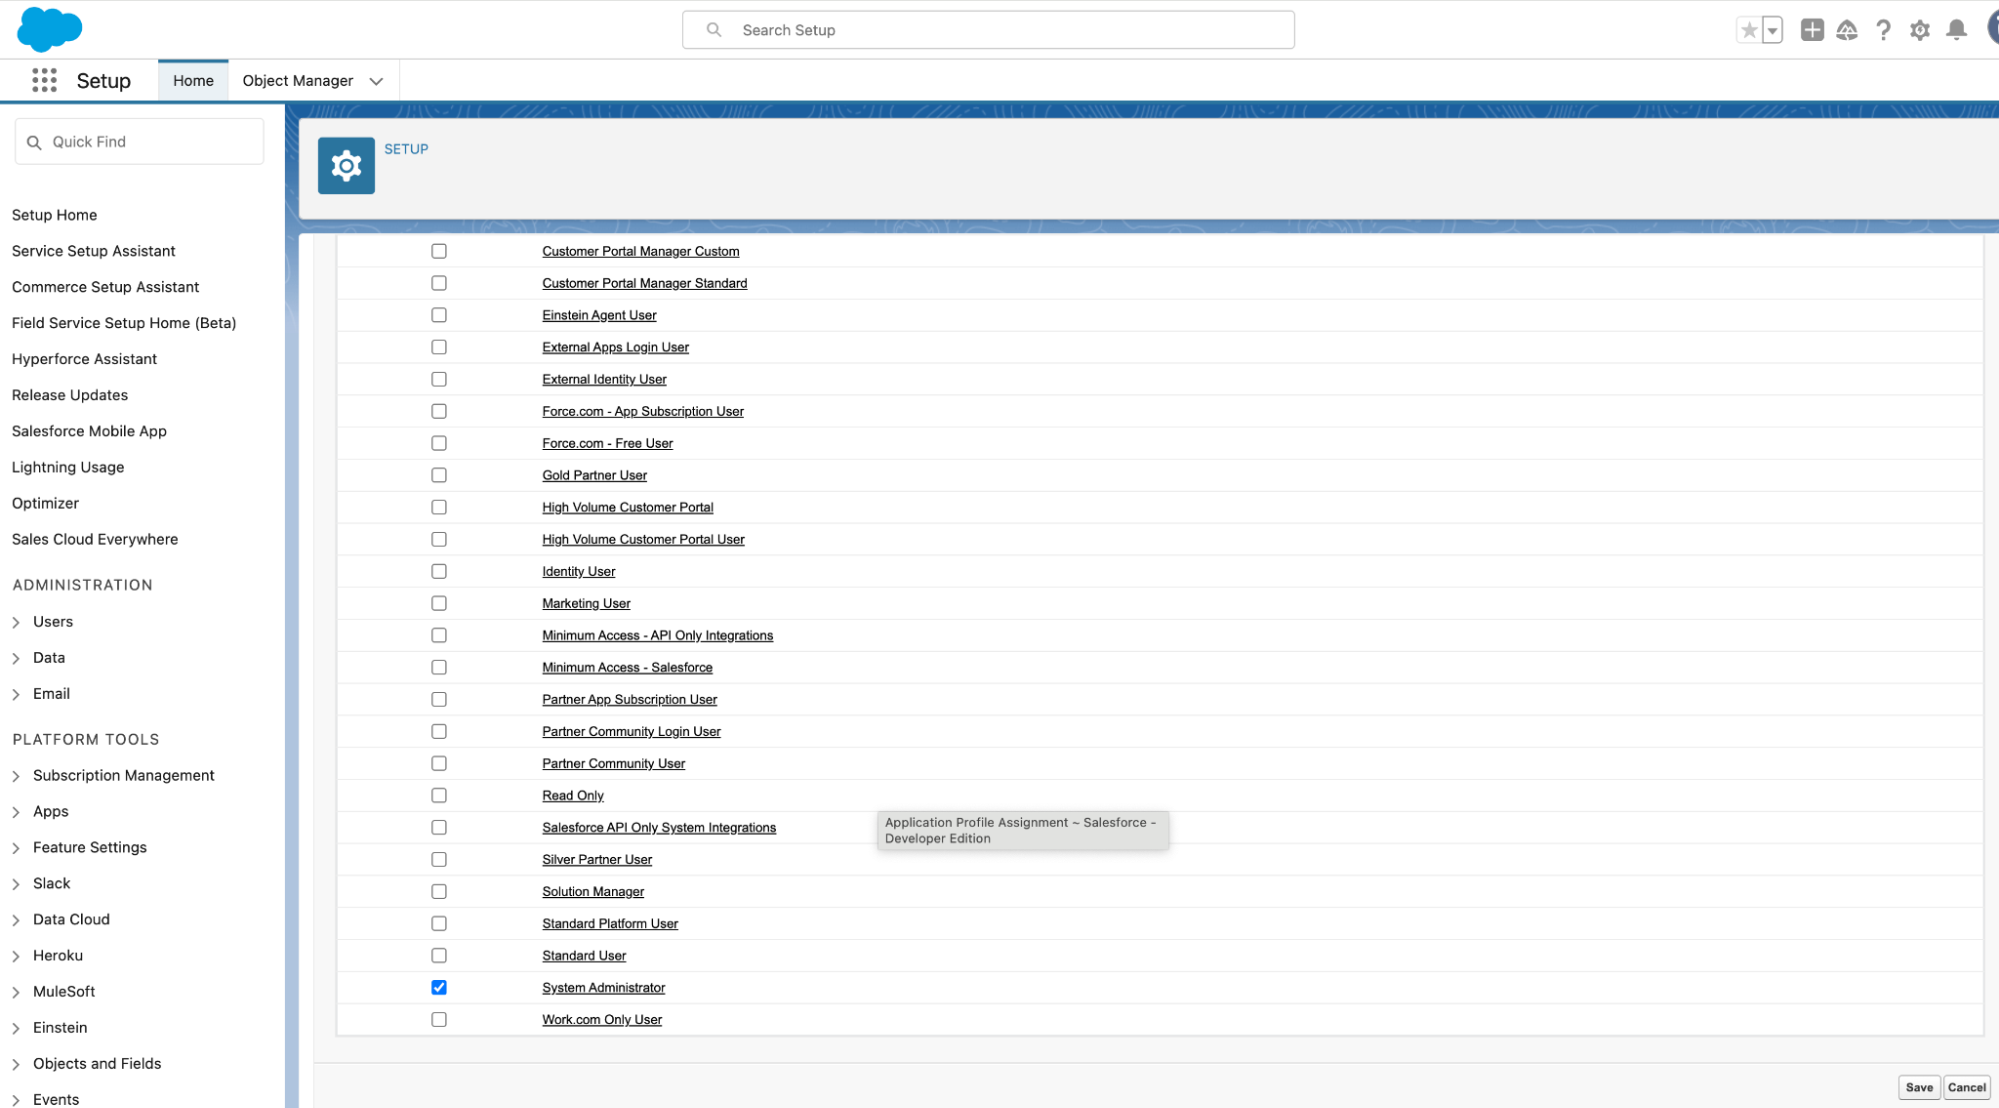
Click Manage.
-
Scroll to Profiles, then click Manage Profile.
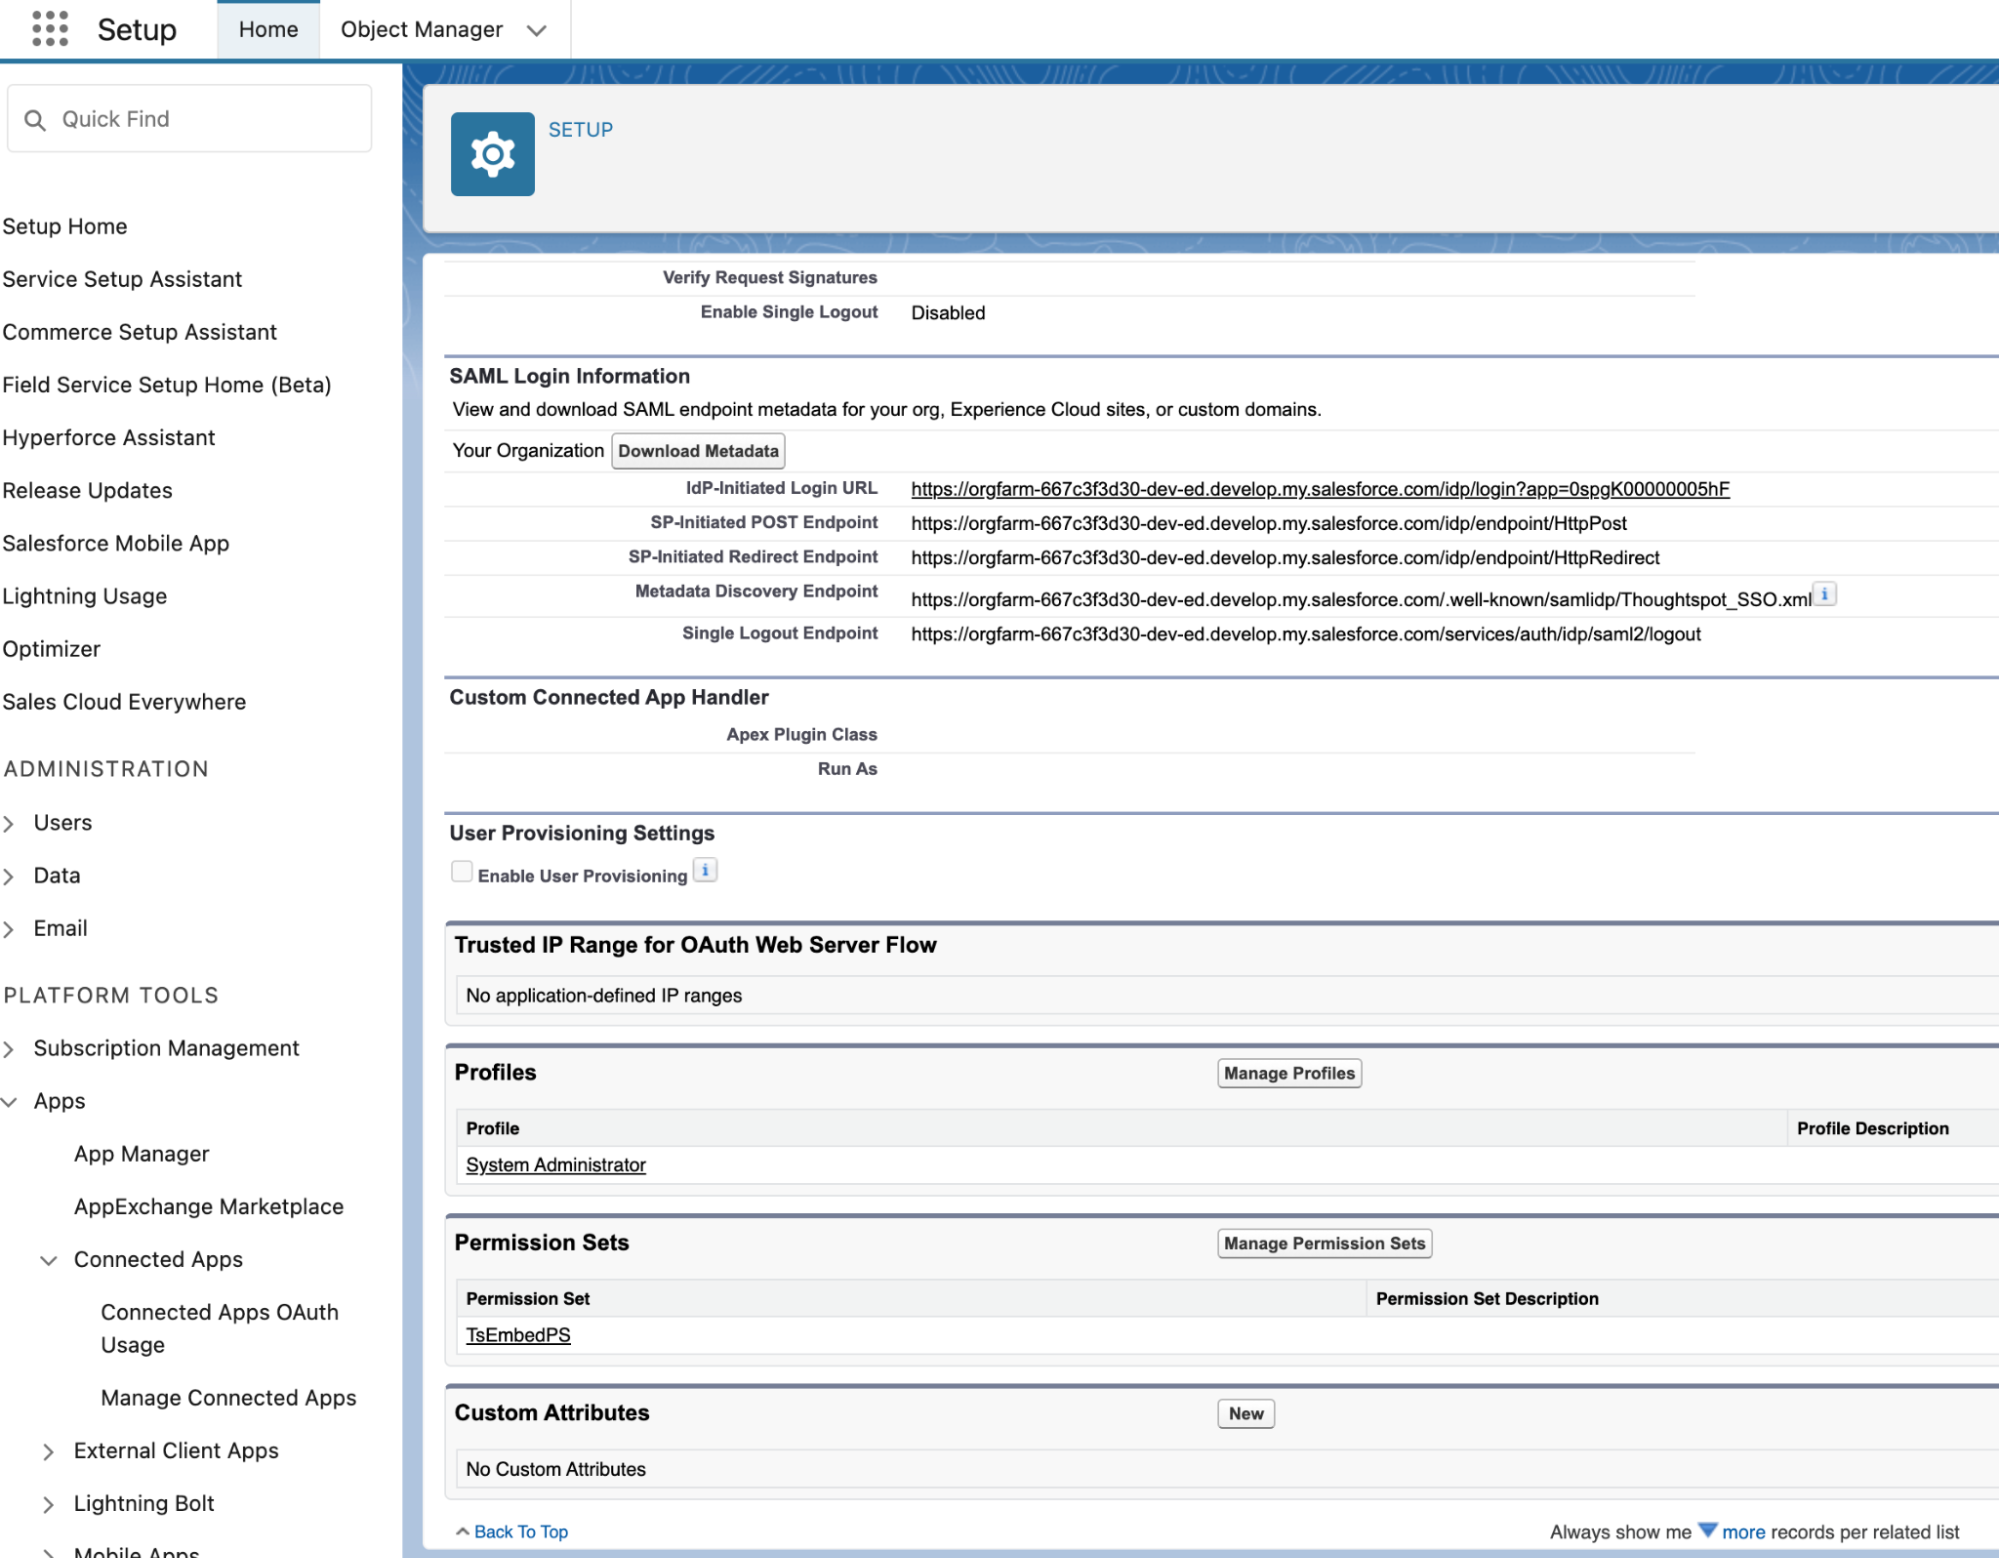
-
Scroll down and choose System Administrator or any suitable role and save.
-
Scroll down to Permission set and click on Manage permission set.
-
Choose ThoughtSpot_Permission_Set and save.