Integrate your tools into Spotter with Connectors
Spotter supports connecting to a large ecosystem of third-party tools and services—over 100 pre-configured connector templates, plus custom connectors—so you can integrate data sources, automation, and context directly into your analytics workflow.
Whether you want to search Confluence, Snowflake, or Glean for unstructured data, create tasks in Asana, message in Slack, or pull live data from the web, Spotter connectors make it possible to go from insight to action without switching tabs.
Browse the complete catalog in the Connector Marketplace.
Some popular connectors available as templates include:
-
Slack: Message, share analyses, and gather conversation context
-
Confluence/Jira: Search documentation, query backlogs, publish analysis
-
Asana: Create/assign tasks, monitor project health
-
Web search: Augment analytics with live external context—such as disruption news or exchange rates
-
Microsoft Teams, Salesforce, Glean, Snowflake, and many other enterprise apps
See the Connector Marketplace for the full list.
- Example use case
-
Search for real-time disruption news — such as port delays or weather events — to inform inventory and logistics analysis.
- Example use case
-
Pull live exchange rates or macro news to inform financial data analysis.
Connector templates and marketplace
Spotter’s connector catalog includes hundreds of pre-configured templates for popular apps and platforms. Templates simplify setup, provide integration docs, and allow one-click or guided configuration.
To browse the full catalog and add connectors, visit the Connector Marketplace.
Understanding the MCP architecture
ThoughtSpot’s integration works as a two-way street. Understanding these roles is crucial for proper configuration.
-
Spotter as an MCP Host (Inbound):
-
ThoughtSpot acts as the primary interface. It hosts external tools. When you ask a question about a Slack thread or a Jira ticket, Spotter reaches out to those services to pull data in or push actions out.
-
-
ThoughtSpot as an MCP Server (Outbound):
-
ThoughtSpot acts as a data provider for other AI agents (like Claude or custom internal bots). These agents can “call” ThoughtSpot analytics to answer questions elsewhere in your organization. For more information, see MCP server integration.
-
Configuration guide
Administrators must whitelist and configure connectors before they are available to end-users.
| Spotter as an MCP host is only available with Spotter 3 and must be enabled separately. Once enabled, any MCP tools enabled by the admin will be available to all users of Spotter. Each user must enable the tools for themselves from the Spotter prompt bar and authenticate. |
Enable Spotter 3.0 capabilities
-
Navigate to Admin settings > ThoughtSpot AI.
-
In the Spotter 3 capabilities section, click Edit.
-
Ensure Enable Connectors/MCP is set to Enabled.
-
Click Save. Note that this may cause a brief service interruption.
Register a new connector
-
Open Spotter and click the gear icon
 in the lower left corner. Select Connectors.
 -
In the Connector Marketplace, you can enable a connector from the catalog of templates or add a custom connector.
-
To add from a template, simply click Add in the marketplace.
-
To add a custom connector (not listed in the catalog), provide the required details:
-
Connector Display Name
-
MCP URL
-
Authentication (None, OAuth, Bearer)
-
-
Follow the prompts for credentials and authentication.
For details on connector types and setup steps, see Spotter Connector Marketplace.
| When adding a custom connector and using the OAuth authentication method, you must whitelist ThoughtSpot’s callback URL: https://oauth.thoughtspot.app/callback. |
Test your connection
You can now validate that your MCP connectors are connecting and functioning, from the Spotter AI settings panel. If the connection fails, you see a detailed error showing what needs to be done to fix the connection.
To test a connection, follow these steps:
-
Open Spotter and click the gear icon in the lower left corner. Select Connectors.
-
Create a new connector, or select the More icon
 next to an existing connector and click Edit.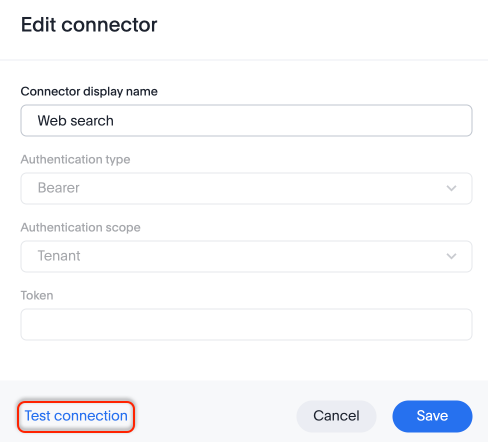
-
Click Test connection.
-
Depending on the authentication type, Spotter asks for validating information. If the authentication type is OAuth, a pop-up appears asking you to connect to the connector. If another authentication type is used, a prompt appears to enter validating information, like the token.
-
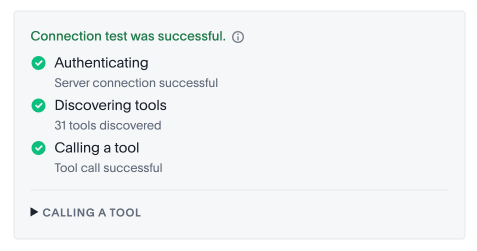
Spotter performs three checks:
-
Server connection: Verifies the MCP URL is correct. Checks that the server is running and accessible from your network.
-
Tool discovery: Fetches the tool listing from the MCP server. Confirms the server is responding and returning tools.
-
Tool call: Invokes a tool against the live MCP server and validates a successful response. This is the definitive check — passing Step 3 confirms that connectivity, authentication, and tool access are all working end to end.
-
-
Any error that appears in the process of testing a connection displays at which step the verification failed, and offers additional steps you can take to resolve the issue, like reaching out to the MCP server owner.
-
Once the connection is successful, click Save.
Authentication methods
When configuring a connector, you will need to specify an authentication method. The sections below cover the supported transport protocols, authentication methods, and known limitations.
Transport protocols
Spotter Connectors support two transport protocols for connecting the Spotter backend to MCP servers:
-
SSE (Server-Sent Events) — A unidirectional, HTTP-based protocol where the MCP server pushes events to the Spotter backend over a persistent connection.
-
Streamable HTTP — A bidirectional HTTP-based transport that supports streaming responses, providing a more flexible and modern alternative to SSE.
Authentication
Spotter Connectors support the following authentication methods when connecting to MCP servers:
-
None — No authentication. Suitable for MCP servers that are publicly accessible or secured at the network level.
-
OAuth 2.0 — Industry-standard authorization framework. Spotter handles the OAuth flow to obtain and refresh access tokens for secure, delegated access to MCP servers. The following client credential configurations are supported:
-
Dynamic — Client ID and secret are discovered automatically using Dynamic Client Registration. No credentials are required during connector configuration.
-
Public Client — A client ID is required, but the client secret can be omitted.
-
Static — Both client ID and secret are provided upfront at configuration time.
-
-
Bearer Token — A static or pre-issued token passed in the Authorization header of each request. These are tenant-scoped and not user-scoped, so all the users will be using the same token provided by the admin while creating the connector. Suitable for simpler integrations or development environments.
OAuth 2.0 limitations
-
Spotter does not support passing the OAuth client_id and client_secret in request headers.
-
Client credentials must be provided via the request body (i.e., as form-encoded parameters in the token request), which is the method recommended by the OAuth 2.0 specification (RFC 6749).
-
MCP servers that require header-based client authentication are not currently supported.
Security and privacy
-
Enterprise-Grade OAuth: Your third-party credentials are never stored by ThoughtSpot. We use secure tokens to communicate with your apps.
-
Role-Based Access: Spotter can only "see" what you have permission to see. If you don’t have access to a private Slack channel, Spotter cannot pull data from it for you.
-
Audit Logs: Admin settings allow for the monitoring of tool usage and connector health.