Creating an App in AgentSpot
Learn how to create an App. You describe what you need, the agent does the rest.
An App is a live, interactive data experience built on top of your organization’s trusted data in ThoughtSpot. While an Agent is the AI assistant you talk to, an App is the polished, shareable product it helps you create — designed for a specific audience, built around a specific story, and always connected to governed, accurate data.
Qualities of an App:
-
Multiple sources, blended: You can build apps from ThoughtSpot models, and all connectors (Salesforce, Jira, Drive, and many more) that AgentSpot supports.
-
Always live: App fetches fresh data from every connected source, on every load.
-
Governed data: Data is always scoped to the viewer’s permissions. Every viewer only sees the data they have access to.
-
Stunning design: The agent designs the layout, visuals, themes and builds an app based on your context without much effort from the user.
-
Free-form Apps: Apps are infinitely malleable and don’t have a rigid structure like traditional dashboards. It facilitates free-form expression. You can create newspaper-style briefs, card views, interactive boards, themed views, and more. If you imagine it, and prompt it, an App in AgentSpot can create it.
What you can build
An App can be anything from a personal home page to a board-grade artifact. Here are a few sample apps we’ve created to inspire you.
Best practices for prompting
Create high-quality apps by defining four core elements: intent, scope, sources, and style anchor.
Some prompting tips that help produce great results include:
-
Specify a visual style: Use references like "Spotify Wrapped," "NYT briefing," or "Airbnb page" to instantly lock the design layout.
-
Add context around data: As we’re still improving accuracy, add as much context around data as possible: Key metrics, how you define them, custom calendar rules, targets and so on.
-
Keep it focused: Structure your brief for 3–5 key sections to ensure a polished, readable output.
-
Define the audience and timeframe: State who the app is for and the time period (e.g., "For sales leadership, this quarter vs. last") to adjust tone and scope.
Sample prompts
-
Quarterly Recap: "Give me a regional performance report from our GTM RevOps model. Show ACV, deal count, and win rate broken down by region and segment for this quarter. Make it feel like an Economist data essay, restrained two-color charts."
-
Customer expansion recap: “Give me a recap of our top 20 accounts' growth this year, from our CS GTM model. Break it down by product line and segment. Make it feel like a New York Times briefing, editorial with a short lede up top”
Creating an App
Prerequisites
The following are required in order to create an App:
-
You have access to AgentSpot.
-
You have at least one data source available — a ThoughtSpot model, a Google Workspace connection, or another connector configured in AgentSpot.
-
Data sources are optional at the start. You can connect one from the menu or let AgentSpot infer the right source from your prompt.
Step 1: Open the App builder
-
In AgentSpot, go to My Apps (apps you have created).
-
Click Create new app.
The App Builder opens. A set of starter prompts is displayed for inspiration — you can use one as a starting point or write your own prompt from scratch.
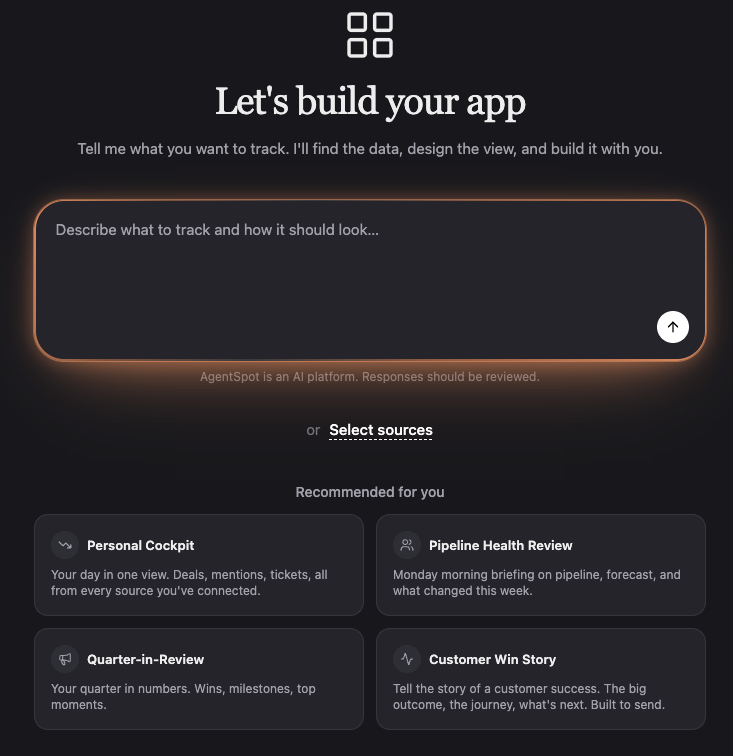
Step 2: Connect a data source (optional)
You can connect a data source before writing your prompt, or skip this step entirely and let AgentSpot resolve the right source from context.
To connect a source manually:
-
In the App builder, click Select sources to open the slide-out panel on the right.
Available source types include:
-
Data sources — Models or Worksheets available on your ThoughtSpot instance
-
Click Connect ThoughtSpot models.
-
Click to select a specific Model(s) or Worksheet(s).
-
Click Save.
-
-
Connectors — such as Google Workspace (Google Sheets, Docs, Drive) and other connected services available in AgentSpot
-
Click Connect apps & sources.
-
Click to select a specific app.
-
Click Save.
-
-
|
If you skip this step, AgentSpot will analyze your prompt and select the most appropriate data source automatically. |
Step 3: Describe the App you want to build
In the prompt field, describe what you want the App to show and how you want it to look. Be as specific or as general as you like — AgentSpot will fill in the gaps.
Example prompt
Build an executive dashboard for my top 20 accounts this quarter. Show revenue, growth rate, and health score from our Salesforce data. Style it like a Spotify Wrapped — bold colors, hero numbers, and clear section headers.
When your prompt is intentionally brief or open-ended, AgentSpot performs a deeper analysis of the connected data source to determine the most relevant metrics and the best structure before generating the App.
| You can collapse the agent chat panel on the left side of the App builder to create more room while you review the App, then expand it again to keep refining by conversation. |
| Generation may take a few minutes for complex prompts or large datasets. A visible work timeline shows you what AgentSpot is doing as it builds the App. You do not need to wait on a static loading screen. |
Choosing a design style
Before it builds, AgentSpot proposes a set of distinct design styles for your App and asks you to pick one. If you have design preferences saved in memory, AgentSpot offers them as ready-made options:
-
Option 1 — Your personal memory style (if you have saved design preferences in personal memory)
-
Option 2 — Your organization’s memory style (if org memory contains design preferences)
-
Option 3 — Agent-generated style based on your prompt
If no design preferences are saved in memory, all three options are generated by the Agent based on your prompt.
Only saved preferences that describe an actual look (typeface, color, background, design system) are offered. Notes about writing style or tone are not treated as design instructions. If you skip the picker, AgentSpot applies the top option.
Step 4: Review the preview
When generation is complete, AgentSpot automatically displays a preview of the App.
Review the layout, metrics, and design. The preview reflects AgentSpot’s interpretation of your prompt and data. For example, a prompt asking for four metrics may result in four KPI cards plus supporting detail visualizations drawn from the underlying dataset.
If you are satisfied with the App, proceed to publish it. If you want changes, see Editing a published App.
Step 5: Publish the App
-
In the preview, click Publish.
Publishing makes the App live for you only. It is not yet visible to other users in your organization.
Step 6: Share the App
To make the App available to other users:
-
Open the App.
-
In the upper-right part of the window, click Share.
-
Do either of the following:
-
To make the App available to all AgentSpot users, click Share with all.
-
To share with specific individuals or groups, click Add a user, and select the user(s).
-
-
Click Save shares.
The App is now accessible to the users you have shared it with.
Editing a published App
You can edit an App at any time after publishing — the full conversation context is preserved, so the Agent understands what was built and why.
-
In My Apps, open the App you want to update.
-
In the upper-right part of the window, click Edit.
You return to the same conversation in the App builder. The Agent has full context of the original build.
-
Describe the changes you want to make in the prompt field.
Example:
Change the theme to dark mode.
AgentSpot updates the App based on your request. For significant changes — such as a full theme change — it may regenerate the entire App.
-
When the update is complete, the preview refreshes automatically.
-
If you are happy with the result, click Publish to make the updated version live.
If you close without publishing, the App reverts to the previously published version. Your unpublished changes are discarded.
Duplicating an existing App
You can duplicate an existing App in order to use it as a starting point for your own App.
To duplicate an App, do the following:
-
Go to the AgentSpot home page.
-
In My Apps, click Browse existing apps to see apps created by others in your organization.
-
Open the App you want to duplicate.
-
Click the 3-dot menu (…) in the upper-right portion of the page and click Duplicate.
-
In the Duplicate confirmation message, click Duplicate App.
AgentSpot creates a full copy of the App as a new draft, with the same layout and connected data. You can rename and edit it however you want. The copy of the App remains unsaved until you publish it. If you want to save it and work on it later, you must publish it. When you publish it, it is visible by default only to you.
Because the copy is an unsaved draft, AgentSpot warns you before you navigate away and lose it. -
To save your duplicate App, click the Publish button.
Summary
| Step | What happens |
|---|---|
Create |
Open My Apps → Create new app → App builder launches |
Connect data (optional) |
Select a ThoughtSpot model, Google Workspace file, or other connector — or skip and let AgentSpot resolve the source from your prompt |
Describe |
Write a prompt describing the App’s content and style |
Generate |
AgentSpot analyzes the data and builds the App; a work timeline shows progress |
Preview |
App is displayed automatically when generation completes |
Publish |
Makes the App live for you |
Share |
Makes the App visible to all users or selected users |
Edit |
Re-enter the original conversation, make changes, and republish |
Adding actions to an App
Beyond reading and displaying data, an App can now include actions — viewer-triggered write-backs to a connected source, such as moving a Jira issue or posting an update to Slack. To add one, describe it in your prompt (for example, "add a button that marks this issue done in Jira").
Actions behave differently from the rest of an App:
-
Nothing runs on load — an action stays dormant when the App opens. It runs only when a viewer triggers it from a control in the App, never automatically.
-
The viewer confirms first — each action is confirm-gated. The viewer is asked to confirm in a dialog before the write is sent.
-
Affected tiles refresh — after an action completes, the tiles whose data it changed reload automatically so the App reflects the new state.
-
Reads stay read-only — the queries that populate an App never write, send, or post; write-backs happen only through an action a viewer explicitly triggers.
| The exact button label, placement, and confirmation wording are chosen when the App is built and vary by App. Confirm the action’s target source and permissions before sharing the App widely. |
Known limitations
-
Planning with Spotter: The App builder now uses Spotter to do model-scoping during planning, so it plans queries against your ThoughtSpot Models based on the context you provide. Extra context in the prompt still helps accuracy for ThoughtSpot model data: fiscal year rules (e.g., "our year runs August to July"), measure grain, entity aliases and so on.
-
Data accuracy is a work in progress: The agent occasionally builds against the wrong data shape, or ThoughtSpot returns 0s where you expect numbers. If you see it, tell the agent inline: "why is X blank? diagnose and fix it." It recovers within minutes. Please report cases so we can review and improve.
-
Interactivity favors the browser, with reactive re-fetch when needed: Sorting, tabs, drill-downs, and local filters work at the browser level on already-fetched data. Controls that re-scope the server query — a filter on a large table, a period picker — are now supported as reactive re-fetches for a tile’s filters, sort, and parameters. The agent prefers client-side interactivity and only re-queries the backend when a control genuinely needs fresh rows.
-
Write-backs only through confirmed actions: An App performs side effects only through a viewer-triggered, confirm-gated action (see Adding actions to an App). There are no automatic or load-time writes, and the queries that display data stay read-only.
-
Workflow outputs are not convertible to Apps: Output from AgentSpot Workflows cannot currently be converted into a published App.